Gassed

There is a long list of considerations when turning an ordinary vintage pickup into a custom classic truck. Some are cosmetic, others are for performance, and there are often safety issues as well. In the case of our 35 Dodge pickup, all three are factors.

If we had chosen to keep things 100% original, a true restoration, we wouldn’t think about installing a custom fuel tank. But once you start modifying things, as we have in this build, then a custom fuel tank starts moving up on your list of priorities.

A typical fuel tank on a classic truck is just a large, unchambered reservoir and the harder you drive the car the more the fuel moves inside the tank. Make a hard right turn, and inertia causes the fuel to move left. Accelerate hard, and as the car lunges forward inertia causes the fuel to move backwards.

Most vintage vehicles couldn’t accelerate hard and were incapable of taking turns at high speeds without rolling over. Their brakes were inadequate for high gravitational force stops. You get the point; the fuel tanks could be simple without consequences. Model A Fords had gravity fed fuel tanks eliminating the need for a fuel pump.

Controlling fuel slosh inside the tank isn’t overly critical with a carburetor like we have on the Hemi engine because some fuel is stored in the carburetor’s fuel bowl. The bowl typically stores enough fuel that inertia inside the tank doesn’t become much of a problem for regular driving.

baffles inside gas tank.jpg

Still the best idea for our carbureted hemi engine is to control the slosh through baffles built inside the tank. The old Dodge will be quite a thirsty ride with that engine and will need a constant fuel supply at a precise pressure. Even though driven by an old codger and in gentlemanly fashion, it will still generate movement in every direction not anticipated by the original tank design and location.

Baffles inside the fuel tank help keep the pickup point for the fuel pump submerged in fuel so that the fuel pump is constantly pumping fuel to the engine. If the fuel is pulled away from the pickup during acceleration or hard cornering, the pump begins to pull in air. Our main goal was to keep as much fuel as possible in the part of the tank where the fuel pump is located.

Where to locate the new tank is still another important question. No question that it had to relocated from its original position inside the cab, under the seat. But where? In the end there were only two choices. First was ahead of the rear end and the second choice was just behind it

images.jpg


As you can imagine, fuel tanks come in thousands of different shapes and sizes, but Ralph had one on hand that was leftover from a different project. It is a custom made aluminum tank with internal baffles to keep the fuel where it needs to be. On close inspection we saw that the space just ahead of the rear axle would be needed for mufflers and the drive shaft.


Fuel tank.JPG


The decision was made to locate the new gas tank behind the rear end at the extreme rearward portion of the vehicle. We will protect it with a stout bumper and the bed will be sitting on top of it for protection from above. A lot of plumbing and a strong fuel pump will be required to move the gas forward up to the engine compartment.


We’re gassed.


Dashing

I have often thought that from the point of view of the driver, the dashboard may be the one part of the street rod that is most viewed. You watch the graceful rising arc of the tachometer as your foot sinks deeper into the throttle and you are appreciative of that tachometer—valuable information may keep an expensive engine in one piece. The back of your head is someone else’s problem. It’s not like you have to stare at it for hours on end or use it for critical gear changes. So you can leave its destiny up to the femme with the buzzin’ clippers and call it good. Not so with the dashboard of the street rod. You will stare that thing down on long road trips and need to consult it during gear changes and illicit top-speed testing. It had better be right. It had also be pretty.

Back to my 35 Dodge pickup. It came with a dashboard just like all cars and trucks. The word “dashboard” was originally used to describe the wooden or leather “board” carriage makers attached to the front of carriages to prevent mud and rocks from being splashed (or “dashed”) onto drivers and their passengers by the horses that pulled them about. In essence, dashboards served as mud flaps for horses’ hooves. Absent the horses, builders of horseless carriages found that board to be a convenient location for gauges that displayed various bits of useful information like how fast am I traveling. By 1935 the dashboard was highly evolved. Better a dashboard than a mud flap in your modern car. Won’t you agree?

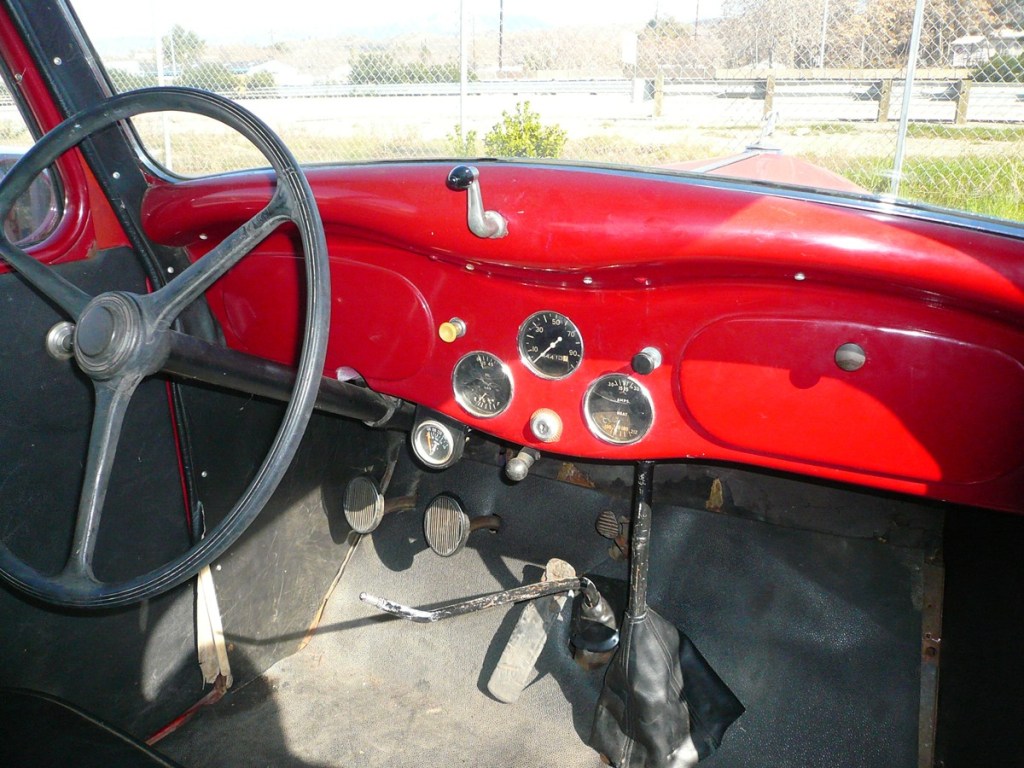
But that old mud flap wasn’t always the epitome of style. The red dashboard featured above is from a1935-Chrysler-dash.jpg 35 Dodge pickup—not mine but a good one. It shows some factory design effort to please the eye but is frankly quite utilitarian. And that’s generally okay with pickup owners. However, that very same year Dodge had a more visually pleasing dash for buyers of its upscale sedan models. I found one.

new old 35 sedan dash.jpgThis was more like it and I decided to jettison the original dashboard in favor of something with more “dash” and “flare”. I had scoured the country for a Dodge sedan dashboard. This is quite easily done online. I found a parts yard (we used to call them “junk” yards) that had acres of mostly Dodge, DeSoto, Chrysler and Plymouth cars. A sedan dashboard in good shape was on offer. There was no glove box door but I reasoned I could find one elsewhere. And eventually I did, albeit with some difficulty and for a princely sum.

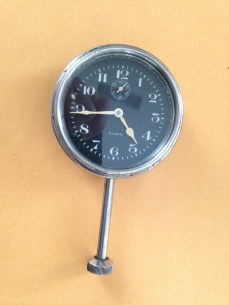
I saw great potential in the new dashboard. It had a huge central hole for the very cool looking speedometer and a couple of holes where planned air conditioning vents could find a home, and other smaller ones where light and wiper switches could be fitted. The glove box door would be the ideal location for the original Elgin clock to be placed. A machinist cut the exact sized hole. By original I mean it isn’t a fake Elgin, not that it was ever found in a 35 Dodge pickup.

Elgin clock for dash.jpg

The glove box itself, the box part not the door, will be custom made from aluminum rather than cardboard because it will house a battery cutoff switch. That switch can shut off all power from the battery. An ignition key won’t be used and it will take three steps to actually start the vehicle (battery on, ignition on, press starter button). I guess that’s reasonably secure on the strength of the assumption that most thieves can’t follow more than two consecutive steps or won’t think to look in the glove box for the battery cutoff switch.

The more I thought about the new dashboard, the more complicated it became.

1935 Dodge sedan dash design 1 copy 2 2.jpgEnlarging the new dashboard.JPG

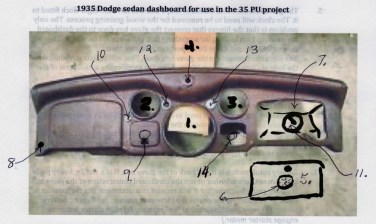
Finally I promised Ralph that before I left to come to Geneva I would lay out the whole dashboard design in a separate document. You see the schematic here.

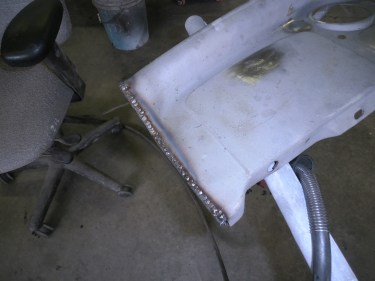
When it came time to fit the new dashboard in its proper front and center location we discovered that it wasn’t the same length as the original. I would have thought the pickup would be narrower but not so. Ralph welded a half inch of new metal on each end of the dash to make it fit just so.

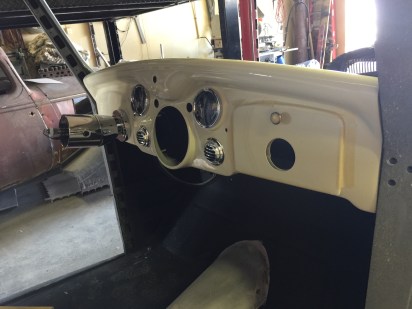
An old flywheel was used to take the place of a steering wheel when Ralph fit the new, but still rough, dashboard in place inside the bare cab. The trial fit looks good. The plan is to paint the dashboard in pepper white–the secondary color for the truck. The firewall is the same color and the contrast appears to be pleasing. We’ll hear what the critics say later.trial fit of dash.JPG

Not sure where he found that old seat but Ralph wanted to be sure about how things were lining up inside. I’ll have more to say about the steering column later. It goes straight through, not beneath, the left-hand side of the dash.


P4300080.JPG


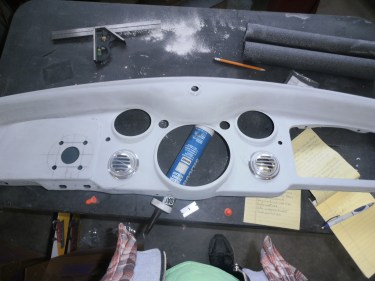
As work on the “new” dashboard proceeds, you will notice a couple of things. One, the dash is sanded and primered and sanded again–many times. Two, air conditioning vents have been added in round holes where square holes (see above) were found originally. Three, the hole for the dash mounted steering column has been cut in precisely the right place. From there the steering column enters the steering drop mechanism. I’ll save a complete explanation of that piece of engineering marvel for a later post.

P5190084.jpgA few months after the above photo with the new dashboard tacked in place, we turned attention briefly to whether the dashboard should receive a wood grain treatment or be painted. I once had a chrome dashboard in a ’32 Ford–bad idea.  The glare from the sun nearly blinded me on several occasions. So chrome was out but what about a modern wood grain application? As the wood grain application is basically a decal we gave that a trial run. I liked the off white color much better.

dashboard painted.jpg


Painted here in the contrast color, Pepper White, the dash really comes alive. I can’t wait to see it after the gorgeous speedometer fills the big center hole and the matching clock takes its position on the glove box door.PB280124.JPG

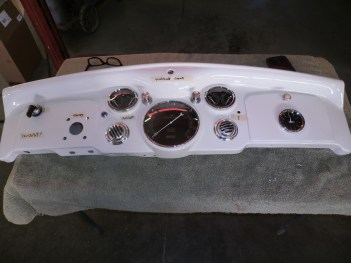
And here it is! Now with a few more gauges and big speedometer and clock installed. The project will take a leap forward when the dash is installed in the cab enabling the complex wiring to begin.

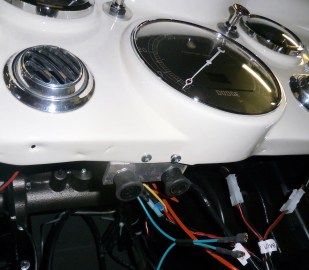
The dashboard has continued to be both an inspiration and a frustration. It is truly a gorgeous design, in my opinion, and well worth the extraordinary effort that we’ve put into it. But, at the same time, I would be less than candid to not admit that it has also been complex and costly. And well over a year after the 1935 sedan dash was located, purchased and shipped off to Ralph, it is still not quite complete. In the photo below (January 2018) the dash is in the vehicle with wiring to gauges more or less

Dash with speedometer and clock.jpgcomplete. Notice that the steering column runs through the dash, not below it. We are using a “Steer Clear” chain device that allows a more horizontal path for the steering column. The windshield crank is also now visible as is the ignition switch to the far left. The two AC vents are functional and both heat and cool air will enter the cab through the dash. The glovebox is not functional although it was originally. We had to seal it as there is no room behind it for a box of any useful depth.

P1290137 copy.jpg


Finally, the steering wheel is added. This particular wheel is still somewhat uncommon in hot rod use and that suits me fine. It is from Johnson’s Hot Rod Shop and follows a design that was found in the early 20’s. The modern 16″  incarnation is constructed to be adaptable to an Ididit Steering Column. The rim is black and compliments the black and white interior color theme. Being flat offers no protection for the driver in an accident but contributes to a bit more interior room.

Then, almost as an afterthought, we were reminded that the Air Conditioner control knobs had to be mounted somewhere. And out of sight, I instructed, because AC wasn’t available in cars in 1935 and also because these rubber knobs just don’t work with the type of theme we have going. Okay, so I can’t name exactly what theme I think this is but it wouldn’t accommodate two rubber AC knobs. They had to be accessible but out of site.

P2090141 (1).jpg


I gave Ralph a bunch of ideas but they were all either too complicated or wouldn’t fit the available space. In the end, he made a little bracket underneath the dash just to the left of the speedometer. Yes, they will be a little hard to see down there and that is mostly good. I will just have to learn the right positions.


unnamed.jpg

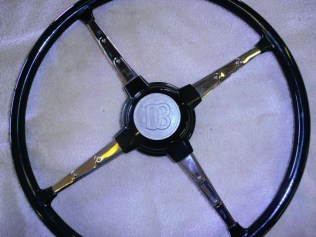
The handmade 16″ steering wheel came with an uninspiring horn button. I found an old Dodge Brothers hubcap (hubs were small in the 20’s) and had Ralph trim it to fit the opening in the wheel for the horn button. We will paint it before long but I am liking this small detail.


The dash is now almost complete. There is a ton of wiring that goes behind it. As soon as that is all in place, Ralph will try to fire up the old baby hemi for the first time.

Whoa!

Brakes are the most important part of a hotrod. Not sure who said that but it may well be true. Other contenders would be tires and engine. But we already know this old Dodge has tires, albeit skinny ones, and a hemi V8 engine. But does it have brakes?

If you can’t stop well, you’re going to rear-end someone with your fancy new street rod. It’s not If, it’s When. We’ve all had a scary moment when a car in front of us slams on it’s brakes and we’ve had to slide to a stop. If you can’t stop well, you’ll hit them, injure yourself and them, and destroy your beautiful creation.

That would be a cheery way to learn about new brakes for old rods, huh?

Older drum brakes like those this pickup was born with, when rebuilt, can stop well. But not nearly as well as newer disc brakes. Which is what the car in front of you has. See where I’m going with this?

So, we need hotrod brakes on our hotrod!

Switching to disc brakes on the front should be the minimum you do.

imgres.jpg

Many guys don’t want to run disc brakes because of their looks. If you are going for a stealth or sleeper look, and don’t want to give away that your 1935 Dodge is really a modern vehicle posing as an old timer, disc brakes won’t help you maintain cover. But even if the old Dodge brakes could be rebuilt to perform better, they wouldn’t really combine well with the modern suspension components already in place. No, not much chance that this Dodge will be mistaken for a strict restoration strutting along on its way to the concours d’elegance down on the beach with the wine and cheese crowd.

So, what are good guidelines? Without beating around the bush, buy Wilwood brakes. I am not going to do a commercial here. Just saying that Jay Leno uses Wilwood disc brakes on everything in his shop, and he could buy the Wilwood company. Jay and most every other high end hot rod shop uses Wilwood brakes and so did we. And not just the front but in the back as well.

F134031280.jpg

If you think that driving around in a 1935 vintage vehicle is scary, particularly when boasting a high power engine under the hood with triple the original power, then what about rolling around with drum brakes and old, skinny tires that can increase 60-0 stopping distances to over 200 feet. That means every time you cruise in your drum brake–equipped street rod, it’s probably the worst-stopping car on the road. Even if you have the reflexes of a 13-year-old iPhone game geek, stock drum brakes can’t do much to save your fenders in a panic situation. Given these cold, hard facts, aftermarket disc brakes are one of the best upgrades you can make to keep your prized hot rod wrinkle-free and make it much more enjoyable to drive.

But the story can’t end here because modern power boosted disc brakes require a healthy master cylinder to push the hydraulic brake fluid through many feet of brake lines. How do you get from the brake pedal, with your heavy boot on it, to the calipers forcing them to squeeze the dickens out of the the rotor and bringing you and your machine to a fast, straight, controllable stop?

We decided to keep the big master brake cylinder off the firewall where it would be an unsightly lump competing for attention with the lovely engine. This clever piece of engineering enables the entire master cylinder to be turned at a 90 degree angle to the brake pedal instead of the usual 180 degrees thus causing the master cylinder to protrude directly into the under hood area and thus remains entirely hidden out of view under the dashboard.

Fitting the underdash master cylinder.JPG

You see the master cylinder completely hidden beneath the dashboard as expertly installed by Ralph. This was a trial fit before the cab had even been sand blasted. It fits perfectly but does occupy a lot of horizontal real estate also needed for wires, dashboard gauges, AC and heater controls, windshield defroster tubes, glove box, etc. It won’t all fit–or will it? Stay tuned.

Rust and Patch Panels

Just like death and taxes are the only two sure things in life, rust and hidden damage are the only two sure things in vintage project cars. No one wants to admit it, and it’s a bummer, but we all have to address them at some point in the build. We’re at that point now with the 1935 Dodge pickup project in Ephraim, Utah under the expert hands of my friend and master hot rod builder, Ralph.

Luckily the Dodge was originally a Colorado truck, a dry part of the country. Not as good as a southern California provenance (car speak for the car’s history) but in Colorado, Utah, Nevada and Utah, cars that sit out in the open air are comparatively free of consuming rust. Covered by surface rust, yes, but only the metal bits that are next to constant dampness suffer cancer destroying rust. That’s how the theory goes, anyway.

cut-out-rust-completely.jpg

Fortunately, throughout our build progress so far, we uncovered patches of rust in just a few of the usual places for pickups, the lower part of the cab where water from the bed would have leaded and the bed itself and the cab corners. I’ll have more to say about the bed later but basically it was useless. The working end of the little Dodge had given its last full measure of effort—and we discarded it. However, to its credit, we had a new bed made at a shop near St. George, Utah in brand new, high quality steel.

Pickup beds are formed mostly by flat panels and are therefore easily and inexpensively reproduced. By contrast the rear fenders of the pickup, which we also discarded and new, were procured in beautifully sculpted steel. Fenders of vintage street rods have many curves and are difficult to reproduce and comparatively expensive. Like the fenders the curved sheetmetal was originally formed at the factory by massive presses that stamped the steel in the form designed. A few cabs are reproduced these days but not for the Dodge.

Sandblasted cab.JPG

To expose all of damage to the cab from rust and crashes, Ralph turned his sand blaster on the cab, inside, outside, bottom and every which way. The best thing about sand (or media) blasting is that it uncovers the true condition of sheetmetal. That’s also the worst thing about media blasting.

Photos here show the cab after Ralph’s thorough sandblasting session. All sorts of things are revealed. It’s now clean, bare, old metal and will rust again quickly if not treated with rust inhibitors. While still a very solid body, Ralph did uncover several spots of rust that needed a true bodyman’s touch.

P2160039.JPG

This is where patch panels or rust repair panels come in. The ones we needed were available on eBay Motors. I purchased them believing the seller that they were indeed for a 1935 Dodge pickup cab.

P2160041.JPG

Ralph had the repair panels at his shop for a long time before he actually needed them. But it was only when he dug them out for panel repair that he discovered that they weren’t quite true to the intended application and required a good deal of metal working artistry before he could weld them in place.. So while the grafting in of pre-made patches makes this job a bit easier, it still takes experience, proper equipment, and honestly a bit of artistry to create truly excellent custom body patch panels. Thankfully I have long since found exactly the right guy to help make the old Dodge look like it had never known rust.

P3300057.jpg
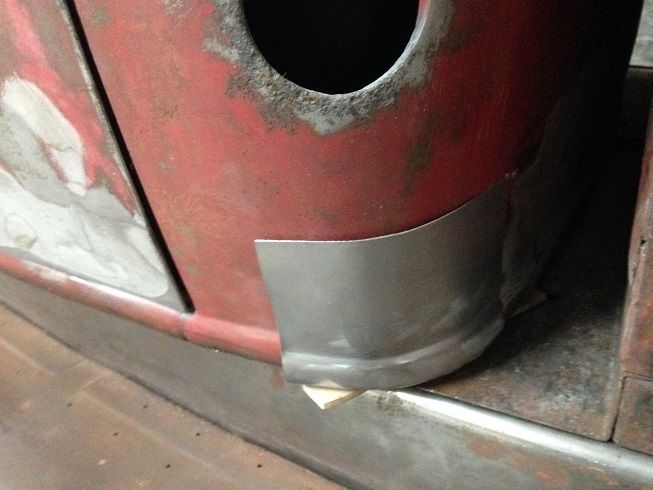
Some holes are filled in, usually because of metal rot, but sometimes because a change will be made and to make everything fit just rust, some basic changes in the body or sheet metal have to be made.

Here is an example of a new hole or a reshaped hole. The truck’s battery goes under the driver’s seat. Pretty darn hard to get to it but for number of reasons we decided keep modern 12V Optima batter in approximately the same position.

P3300055 (1).jpg


However, we it came to the old air vent, a different decision was made. I think these old mechanically opened and shut vent doors were ingenious. I like the look of them and I enjoy the fantastic volume of air that flows through them on a hot day. But our issue is different.  Since this old truck will be sporting a modern air conditioning and heating system, there wouldn’t be much point to opening that vent. But the biggest problem with the air vent was in what lay below the surface–the mechanical bits cleverly engineered to open shut the vent from inside. That piece of real estate located directly behind the dash is heavily disputed. It will be a miracle if we can find a place for everything.


Properly Positioned

Proper assembly of the ’35 Dodge pickup begins before everything is even fully cleaned and repaired. This is a key point that everyone either learns or already knows instinctively:

  1. Make sure that the rear wheel wells are aligned with the rear axle.
  2. Make sure that the front wheels wells are aligned with the front axle.

Wheel too far forward an inch.JPG

Read this as having the rear wheels and tires mounted to the axle, the fenders are mounted in their factory determined position, and then stand back to make sure that it looks right. In this first photo to the left, the front wheels/tires don’t look right. Off by a less than an inch (too far forward), this problem has to be addressed at this stage or it never will be. For a build like this you can’t risk that crippling error. Perfect alignment in the rear.JPG

Positioning can be done simply by “eye balling” or it can involves multiple trips walking around the vehicle, raising and lowering it on the lift to view it from a variety of angles, and measuring the distance from the outer edge of the tire to the curvature of the fender to determine if all points are equal-distant. The rear tire/wheel was perfect once Ralph got the smaller 16″ wheels with larger tires mounted on the rear axle.

Look at the example of this near completed hot rod. The rear tire is not centered against the fender relief in the body. At this stage there is little the owner or builder can do with going back many costly steps. It is critical to get this right early in the build process.

20131118_193617.jpg

I have seen, heard and even commented on wheels and tires not being center in the wheel well. This is one of those things where visual impression is even more important than the measurements—it has to look correct although seeing and measuring usually, but not always, confirm one position or placement as the best.

Our biggest misstep and a semi-expensive one was in misjudging the overall diameter of the 18″ wheels and tall tires in relation to the rear fenders. Okay, they are super cool and the idea was good but the execution was impossible.

Huge difference between 18

Others, with a different vision for what they were building might have cut the rear fenders in an effort to make the fenders blend with the size and shape of the tire/wheel combination. But that wasn’t our style and would not have been in keeping with a resto-rod theme.

So what do you do with custom made parts that you have removed from original packing and actually “used” in the sense of mounting the tires to the wheels? They can’t be used on this project. I wish I could say with a straight fact that we had never experienced this but that wouldn’t be true. I am usually responsible because typically I am located physically at some distance and can’t do the careful measurement to double sure of everything before purchase. In this case I miscalculated, originally believing that the tall tire/wheel combo would fit under the rear fenders. They clearly will not. Decision, sell them on eBay. This high, modern look stuff and we reasoned that other might want it too. And because they are getting it from me I have to eat about have the cost. Certainly better than nothing at all. Everything sold a couple of weeks after posting the ad on eBay.

Finding Space

It won’t all fit. That was the diagnosis when Ralph sent me a long email with lots of photos. Although we didn’t have the new radiator and its attached electric fan and shroud, we knew that there was only so much room. The radiator goes inside the grille shell. In front of it is the AC condenser which is about an inch thick. Condensers look very much like radiators, just a little thinner, and since they also depend on air flowing through them, are usually located in front of the radiator. Behind the radiator is the fan and covering the fan is the shroud. All in all we guessed about 5 inches. Ralph was worried it wouldn’t fit.

Engine to firewall clearance.JPG

Decision time had come. Fundamentally the only way to get more space is to cut into the firewall. Firewall–that’s the name, now appropriated by the electronics industry, but originally the domain of every automobile with a gasoline burning engine under the hood. The combustion of a volatile air/fuel mixture is supposed to take place inside the engine. That’s why we call them internal combustion engines.

Sometimes, not often, but experienced by most every hot rodder, is external combustion and that isn’t good. Hence the need for a firewall between you and that hot lump of iron in front of you. By recessing the firewall deeper into the interior of the car or, in this case the pickup’s small cab, we bring all that heat and noise just a little closer to our legs.

But in reality the whole firewall isn’t moved rearward from its original factory provided position. That’s possible but not necessary and really not desirable. Just a portion needs to be cut out.

Pickups were working trucks. Utilitarian devices not the 3-ton luxury behemoths you see today posing as work vehicles. Okay some of them are. But in the “old days” the only reason you bought a pickup was because you needed it for your job. Pickups were worked hard and used up. As for creature comforts, there just weren’t many. The cabs were tiny in order to give more real estate to the working portion of the little truck, its bed. It needed to be big to carry big loads. Pay loads or payloads. Good reason that “pay” is in payload—that is what truck owners wanted—a vehicle that could help them get better pay. Look how long the bed is on the truck as compared to the cab. Our government is said to have three equal branches. This pickup cab isn’t quite a third and may even be shorter than the hood area.


Original bed on pickup.jpg

When you cut into the firewall to make more space for the engine, you take away the same space from the interior of the already small cab. But I wanted the hemi engine. And even though it is a baby hemi, it demanded more space. We relented. The firewall had to be cut in such a way as to gain about 2.5 inches of space under hood.

The first cut used the factory embossed structural reinforcement lines to guide the cut. The angular result allows some rearward movement but looks sharp, unappealing and hard to access.

A recessed firewall.JPGRalph tried to do it artistically, this time gave the recess a simpler, smoother look. This preserves excessive intrusion into the cab’s interior while allowing us to cram that engine into its new home under the hood of an old Dodge truck.

Cutting the firewall.JPG


What is cut on the outside must be repaired from the inside. In other words we can just leave an open hole there or the idea of “firewall” would be compromised. Ralph welds in place a homemade steel cover shaped simply to fill in the portion removed. When this is ground smooth, cleaned and painted, the recessed part of the firewall shouldn’t be noticeable from the inside. A

Rebuilding the firewall for more room.JPG


It may look rough and dirty now but stay tuned. Making it all pretty is coming. This area may eventually be covered in fine German square weave carpet.

Shoehorn

While installing an engine and transmission into an old Dodge pickup where it didn’t originally belong isn’t rocket science by any means, it is done with great care and respect for certain laws of physics and the known technology of hot rodding.  We want the engine to look good, mounted securely, align with critical body parts, high enough to keep the oil pan from hitting the pavement, low enough to fit under the hood, back enough to allow for a radiator fan, forward enough to clear the firewall. In short, this is a long, painstaking job.

Trial fit of engine.JPG

Any carbureted engine like my little hemi should be mounted with the carburetor base level. But level with what? Level with the ground at ride height, which means Ralph had to set the vehicle up at its intended ride height with the final wheels and tires (more about that later) and level it side to side before even starting to mount the engine. The front-to-rear rake must be taken this into account when preparing the frame. I wanted the traditional “street rod” stance, higher in the rear and lower in the front. When the wheels and tires arrived we were eager to get them mounted on the new suspension. That would show us how the pickup will stand.

Initially, we planned for 18” wheels in the rear and 16” on the front axle. But with the really tall tires on those big 18” wheels, we discovered that this combination would not fit under the rear fender. This is rather hard to know beforehand. But we quickly moved to ordering 16” wheels all around and running taller tires in the back to achieve the same effect.

the 18" wheels won't fit.JPG

Once all this preparatory work was done, Ralph was finally ready to drop the engine in place and start working out where the mounts must be welded in place. The baby Hemi 270 engine going in the ’35 pickup fortuitously had a flat-bottomed oil pan and was narrower across the valve covers than I thought. Ralph bolted the transmission to the block and lowered the whole thing down on the frame and under the firewall. With the correct motor and transmission mounts in place, Ralph got the carb base level in both directions.

20170727_152339_001 (1).jpg

Other factors came into play at this point, such as making sure there was ample room to fit a fan between the engine and radiator. We didn’t have the custom-made aluminum radiator, fan, and shroud from the manufacturer at that point so some estimates were necessary.


We noticed that there was tight clearance between the rear of the driver-side cylinder head and the firewall–

Going to need a recess.JPG


–and insufficient clearance between the left front fender and the right side engine valve cover.

Fender interference with valve cover.JPG

As I stated at the beginning of this posting, such an installation isn’t the most complicated fabrication job in the world, but it’s easy to get the measurements, angles, and geometry wrong and many backyard street rods do prove that they are super fun even if they don’t handle well and are inherently dangerous. I think we’re good with this one and it should ride and handle like a modern car.  And this chiefly due to Ralph’s many years of professional experience. Now the fun part comes when trying to route the exhaust headers and steering through the same space. But we have a plan for that.


Frame and Suspension

One thing depends on another. Although isn’t a set sequence to rebuilding a car some jobs clearly must precede or follow others. For example, the engine placement is critical but it must be set onto the frame such that the carburetor is level with the ground. But how would you know what is level with the ground if the frame isn’t straight with, the suspension bits in place? Street rods of all sorts typically have “bigs” and “littles”.  The tall tires and wheels are in the rear and the shorter ones up front. Don’t ask me why they just do. Almost always. If those tires aren’t on the vehicle how could you determine level? And there are many other examples.

The frame was sandblasted. Then it was checked every which way to be true and straight. All welds were examined. New welding of questionable joints. Then the frame was boxed. Originally almost all frames for vehicles were “C” channels—actually more like this “[“. By boxing is meant the addition of steel on the open side forming a closed rectangular shape. Heavier but much stronger and given the age of the old frame and the new duties to be asked of it, better to have the stronger, more rigid frame. After all the preparation work the frame is carefully painted with a rust inhibiting paint.

Cleaned, painted frame.JPGNow we ready for the suspension.

Think of suspenders. What do they do? As a dedicated suspender wearer, I understand that the critical function is to keep my pants up. Suspensions systems do that and a little more. The suspension makes for a pleasant, smooth ride. Keeps the car pointed in the right direction and keeps the whole frame and body and everything inside from dragging on the pavement.

The original suspension just wouldn’t work here. It was a straight steel beam in the front. This is the way it had been done almost from the beginning of automotive history. A straight iron axle with wheels on each end and a pair of leaf springs bolted to the axle in the center and to the frame at each. Well who wants to know this anyway? Let’s be brief.

s-l1600.jpg

The image to the right is what you get from Kugel out of the box. Not that brakes and coil over shock absorbers are included as is the steering arm. We will have electric power steering in the old Dodge.

In the rear, it was much the same although more fabrication is required. The rear axle has several additional functions and one less–it doesn’t steer the vehicle. But it is the part of the suspension system responsible for sending power from the engine to turn the rear wheels. Like the front, the rear axle originally had another pair of leaf springs holding up the frame.

Rear suspension.JPGNone of the suspension works well for a vehicle with triple the horsepower of the original and with speeds that are at least double those of 1935.


New rear axle.JPG
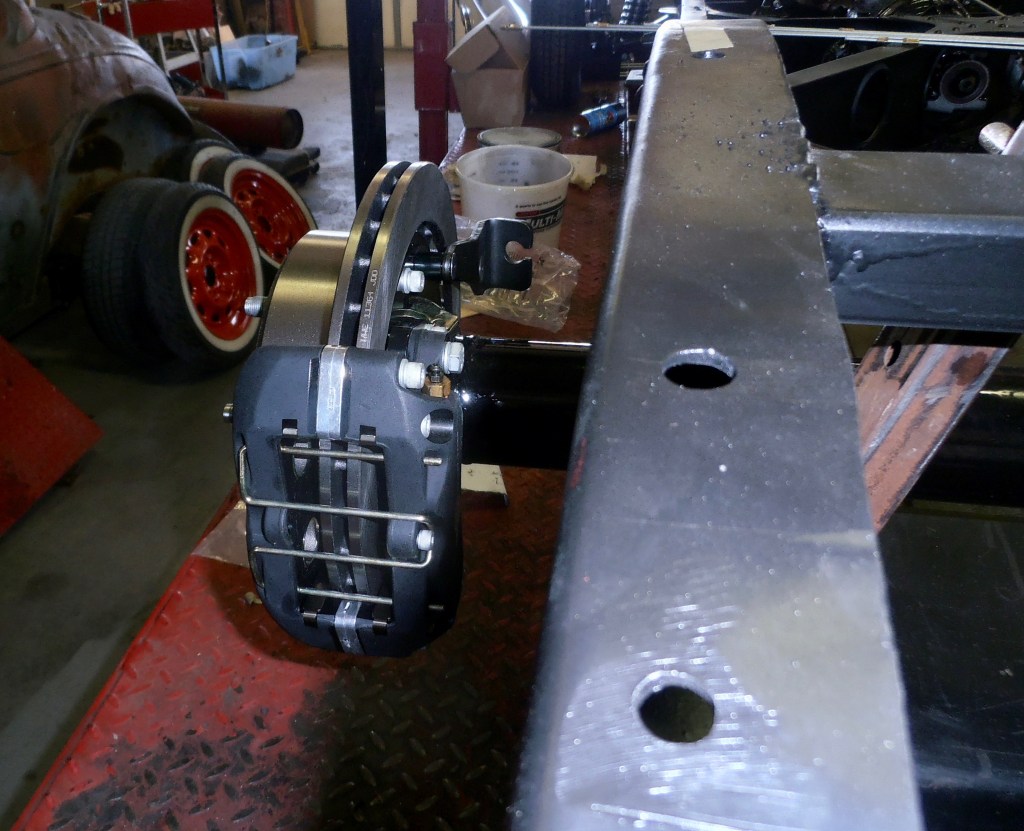
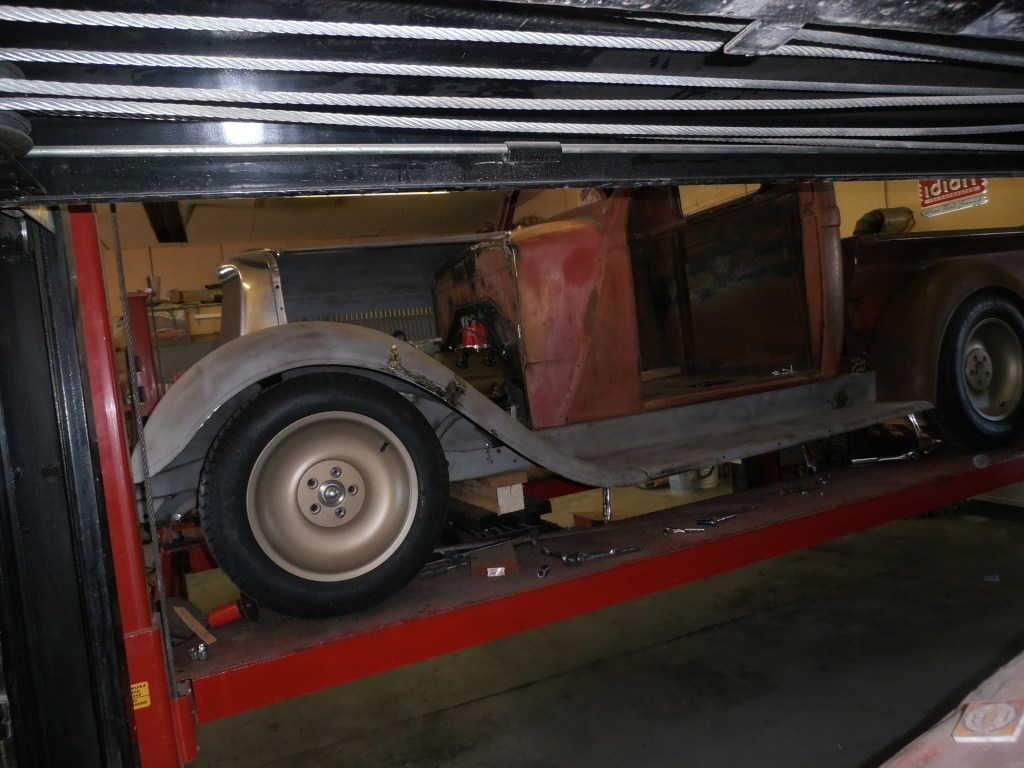
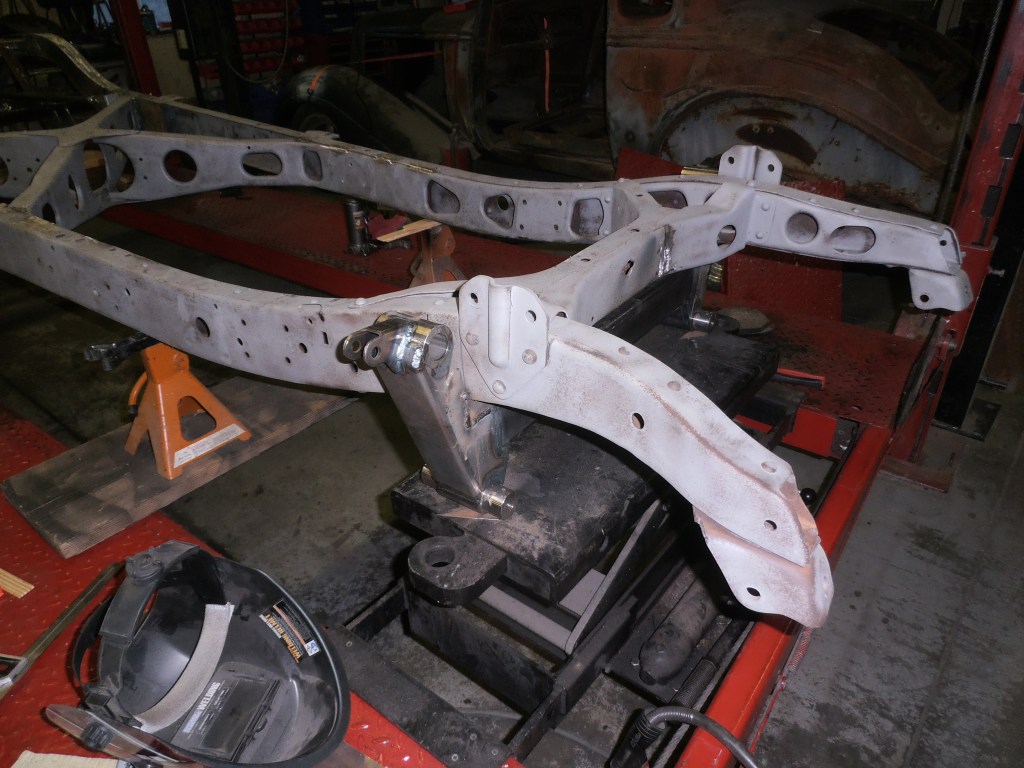
The entire suspension system is now new on the ’35 Dodge. It is all painted, and can actually roll around the shop floor. For the front suspension, we used a suspension system from Kugel. They’ve been around a long time. Ralph sends the exact measurements of the frame and other details and they send a kit with parts that bolt on. Some things are welded for safety. Everything is there, breaks, springs, shock absorbers, steering. It saves tons of time, and the ride will be smooth and safe.


In the rear, the suspension is still a straight axle but we use a system called triangulated four bar. It looks like this:

xtri4link.jpg.pagespeed.ic.X5C4dly_ng 2.jpgThe pieces come in a box and Ralph welds the several bits to the rear axle housing. Not shown are the very cool coil over shock absorbers.


Hemi

Since you have already seen the engine in my project Dodge pickup, I thought I should tell you a little more about it. Even before the truck was totally torn down the engine was being built. Taking this step early in the project life cycle was by design. Having the engine available for use in planning, all subsequent steps were assessed and retained or modified. As we will subsequently see, having the engine available for early trial fittings is crucial. Will it fit between the hood sides? The hemi engines, even this smaller or “baby” example from Dodge are very wide. We knew it would be close but it does fit. Will it fit between the firewall and the radiator? You might think from a quick glance at the long hood of the truck and the fact that a comparatively long six-cylinder engine originally occupied the space that the V8 would have no trouble fitting in that way, but it didn’t. In the end, we were forced to recess the firewall. Knowing how much power the engine produces is crucial in making other decisions about gear ratios and cooling.

Engine after final reassembly in Ohio.jpg
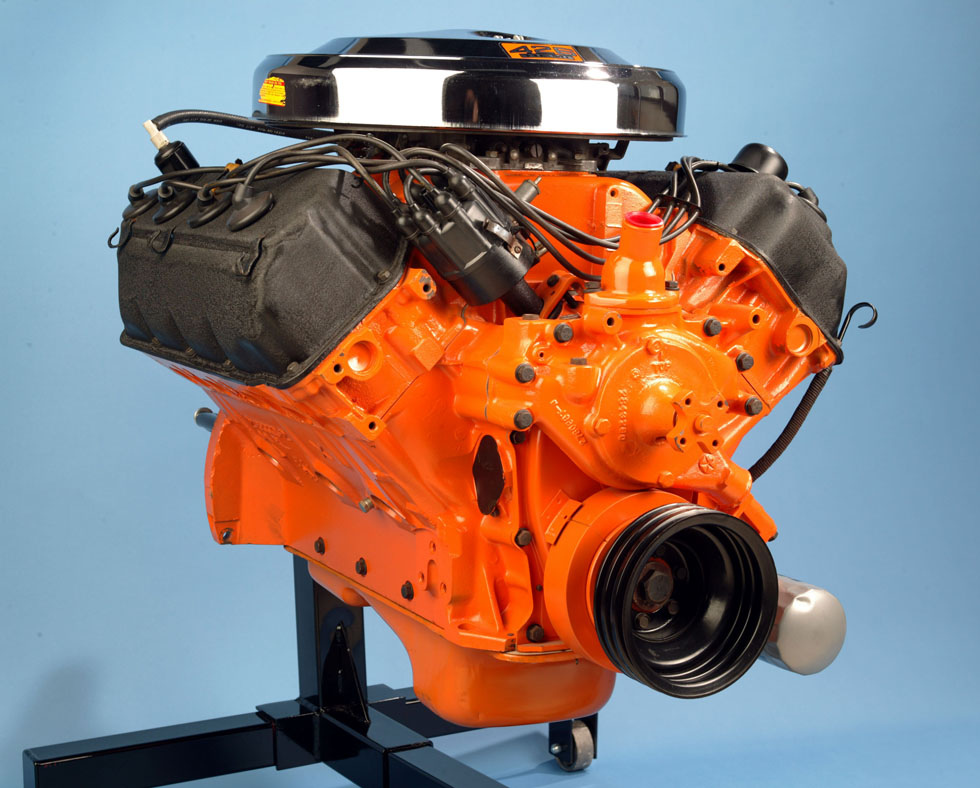
When I was back in the visualizing stage, I considered many options for the power plant. Almost anything would work. There were several options that would have provided more power for less money and were naturally tempting. But this pickup is a Dodge and, as it turns out, Dodge, a division of Chrysler, made its own small (241 and 270 cubic inch) version of the famous “hemi” engine. The orange one shown in the header is big one. Mine looks the same just in three-quarter scale.

The original hemi engines back in the 50’s and 60’s were designed for power. The big Chrysler 392 or 426 hemi shown in its orange and black racing livery was the engine everyone lusted after when I was young and acquiring hot rod culture. It obviously made an impression on me that lasts until now.

Engineers achieved this by creating a novel combustion chamber, hemispherical in shape. This allowed larger valves and better breathing for the engine—easier to get the explosive air/fuel mixture in and the burned gases out. They achieved this by creating a huge head for the engine block, much wider than the typical engine.

12827137154_69cf70818f_o.gif

The result was a more powerful engine but one that weighed more and took up more room up front. Hot rodders loved the engines. They not only were powerful but they looked cool—just right when shoe horned in an old car. When I was only 17, I owned a 1932 Ford with a hemi engine.

So I decided it had to be a Dodge hemi for this Dodge pickup. Where to find one? They have become scarce and pricey. They are difficult and expensive to rebuild. And when you are finished they don’t produce as much power as do many, more modern, V8 engines especially from Chevrolet or Ford. But I wanted a Dodge engine for my Dodge so the search was on.

Fortunately, there is one company in the land that devotes its entire existence to the V8 hemi engine. It is Hot Heads located in North Carolina. Not only do they have all parts necessary to rebuild the old engines (pricey) but they also maintain a website where devotees of the engine can buy, sell and exchange old parts. That was where I found an old, used up but complete, Dodge 270 hemi V8 engine. The so-called Baby Hemi for its overall shrunken size.

0.titleblack.gif

The engine was finally located–for sale in the classified section of the Hot Heads website. Following a period of negotiation with the seller in Ohio, I purchased the engine. The seller agreed to take the whole dirty, greasy mess to a nearby premium engine rebuilder by the name of Jeff Fowler.

polish_crank-crop-u7099 2.jpg

Fowler Performance Engines is a high custom race engine shop. They don’t take on many engines that are intended for street rods and use exclusively away from racing venues. But they were close by and themselves hot rodders at heart and couldn’t resist the chance to rebuild a hemi engine. I told Jeff to build it the way he would if it were for himself.

How difficult is it to rebuild a hemi engine? Well you can see for yourself. This short video shows the whole process in five minutes.  https://www.facebook.com/HellsGateHotRods

Finished engine 2.jpgIn the end I have a visually stunning, better ‘n new Dodge engine. I wish I had a dummy engine, too, made out of foam, that Ralph could use for dozens of trial fits. He has to be so careful using this one and it is so heavy! But it was all I could do to get this far. How powerful is this engine? Maybe 225 to 250 horsepower. Not much you say and you’d be right. But then, yeah, it’s a hemi!

Although it’s not mine, the good folks at Hagerty have posted a “first run” video of the 331 Chrysler hemi that they built. Fun to watch. Have a look here.

https://www.hagerty.com/articles-videos/Articles/2017/03/15/hemi-rebuild-engine-start?utm_source=MagnetMail&utm_medium=email&utm_term=donholsinger@gmail.com&utm_content=17-Hagerty%20Weekly%20News%2003-15&utm_campaign=Video%3A%20Rebuilt%20Chrysler%20Hemi%20fire-up%2C%2010%20cars%20poised%20for%20growth%2C%20and%20Amelia%20Island%20Gallery

Envisioning

The mind’s eye…you have to be able to see your street rod, visualize it in some detail and then capture it on paper to share with your more talented others. The image above of a gorgeous 1935 Dodge, not mine, is close to my conception of what we are making here. It won’t be a perfect replica of this rod, will have a different color, different engine and interior. But this is as close to what mine will become as I have ever seen. Goes to show you that very few things we imagine are totally unique. If you have thought of it, no doubt someone else also has.

The general wisdom on “how to build a street rod” is that before outlaying a lot of cash for a car or on parts, you should have a good idea, a plan, of what kind of street rod you want to build. The variations are enormous. If not a “firm” idea you will need at leastFit and refit body panels.JPG 
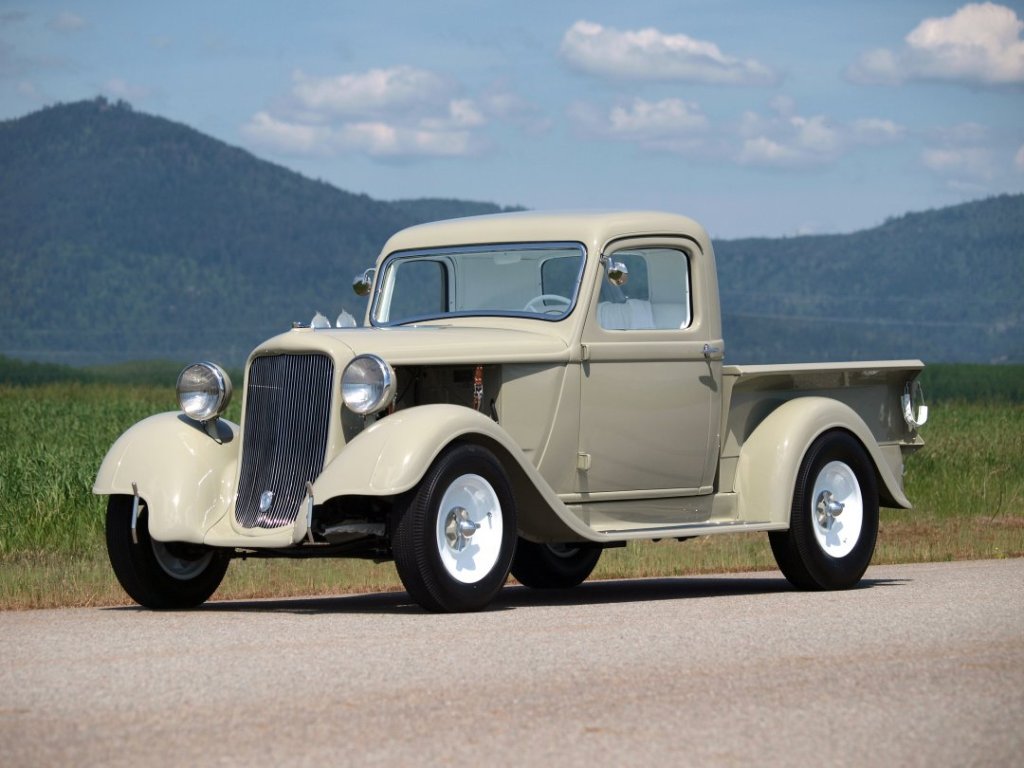
a “good” and doable and affordable idea. You should be able to see the car in your mind’s eye down to some pretty fine detail.

That’s not hard for me. My role here is akin to that of an architect. And I’ve been doing this for a very long time. My mind’s eye is often better than my natural ones. That particular quality can be problematic when it may result in cost overruns. Other advice includes:

  • Does your imagined street rod fit you?
  • Can you afford this—set a realistic budget?
  • How much of the work will you do yourself?
  • Set up a long-term time frame and be realistic.
  • Stick with your plan.
  • Spend more money to get a better car to start with.
  • Do the chassis first and the body second or it won’t fit right.
  • Locations of engine, transmission, pedals and radiator have to be fixed early on.
  • Pre-assemble the whole thing before painting.
  • If you want your wife to like the car insulate it.
  • Put the new wiring in before you paint.
  • Have fun!
  • (Don’t expect all your friends to like your plan)

filling the fender well.JPGTrial fit of the engine.JPG

None of this was either new or frightening to me when I acquired the 1935 Dodge pickup in November of 2015. I had been through the process at least five times before and with the same principal builder. Still I prepared a ten-page build plan and discussed it carefully with Ralph. We discussed, shared perspectives, used persuasion, and in the end agreed.

Ralph, about whom I’ll have more details to add later, of course has his own way of doing things. I play the roles of owner, visionary, architect and banker and Ralph is the chief technical officer, master metal shaper, welder, mechanic, photographer, reality checker and bearer of both good and bad news.

There are a couple of photos here of the left front fender. I knew what engine I wanted in this street rod and I wouldn’t change that requirement. But I could not foresee beforehand that the engine would interfere with a portion of the fender. The result is that the fender had to be modified slightly. This sort of total advance planning isn’t possible with a Dodge. If I were building a ’32 Ford that would be different. That car has been built so many times that a voluminous literature, if consulted, removes all guesswork and surprises.

Modification to fender for engine clearance.JPG

I am not going to paste my project build plan here—way too long and complicated. It is probably 20 pages, has dozens of photographs and illustrations, and names and addresses of parts suppliers.

Stick with your plan. I sort of do that but details evolve, the vision changes slightly, new products come available, unforeseen obstacles arise, things imagined in the mind’s eye occasionally don’t fit well in real world eyes.

Tomorrow: “Building a hemi engine!” Wow is it expensive! But it is really fun.