Thursday and Dean Shimmin wanted to see the Dodge. Dean is recovering from a terrible fall in which he struck his head hard. He is in recovering but now walks with a cane.
We decided to drive to Ephraim. Ralph agreed and we spent a couple of hours discussing progress and making plans for the next steps.
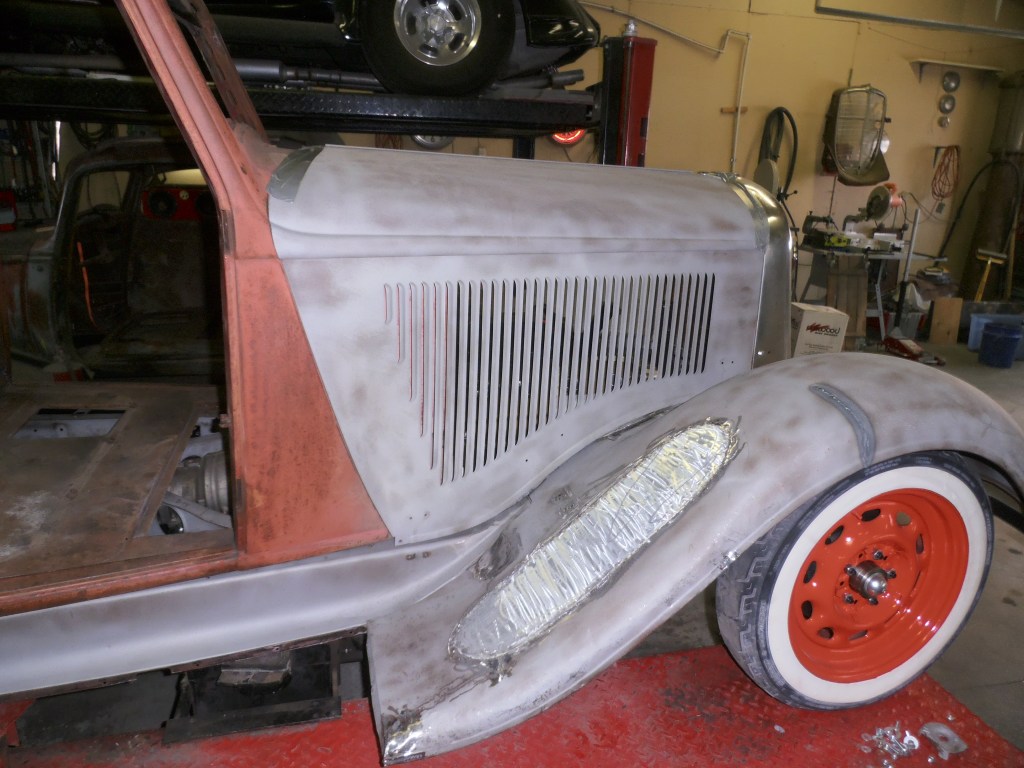
Front end sheet metal about finished–just final details now.
Full hood now on and working
Pin stripping finished along the belt line
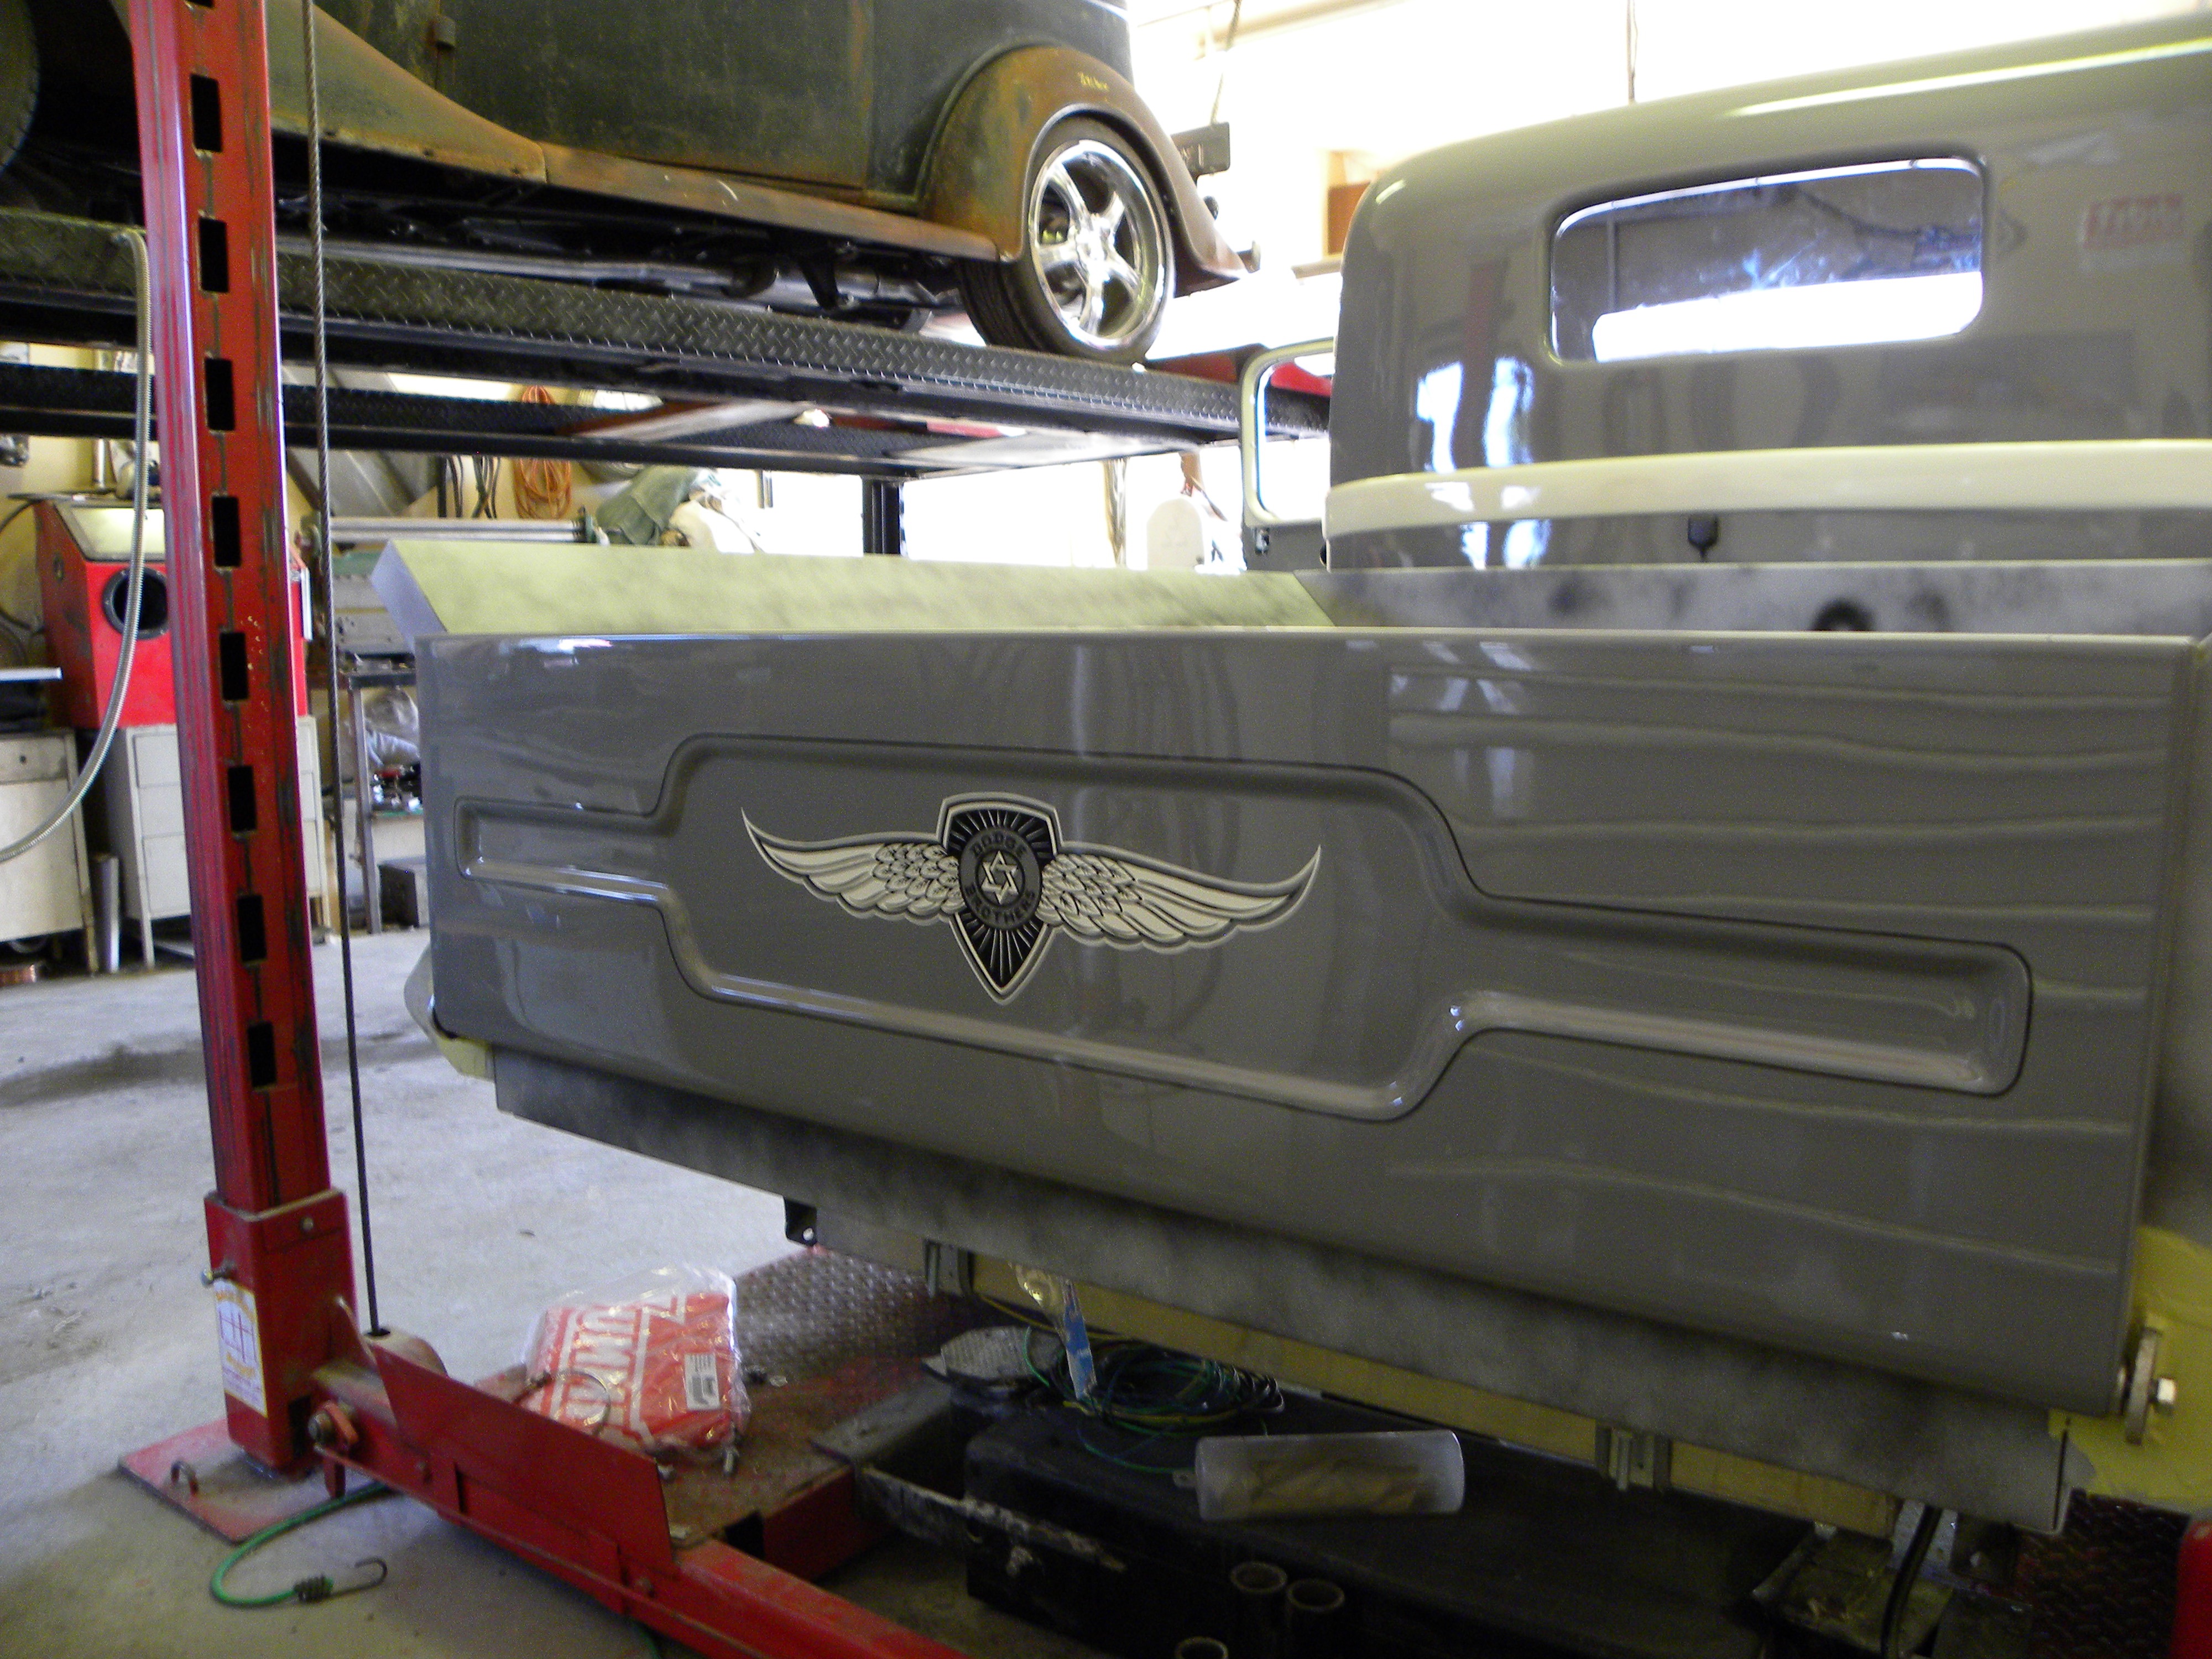
Bed is now painted and mounted–6 Sep. 2018
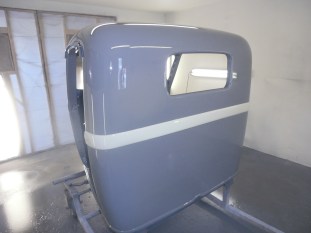
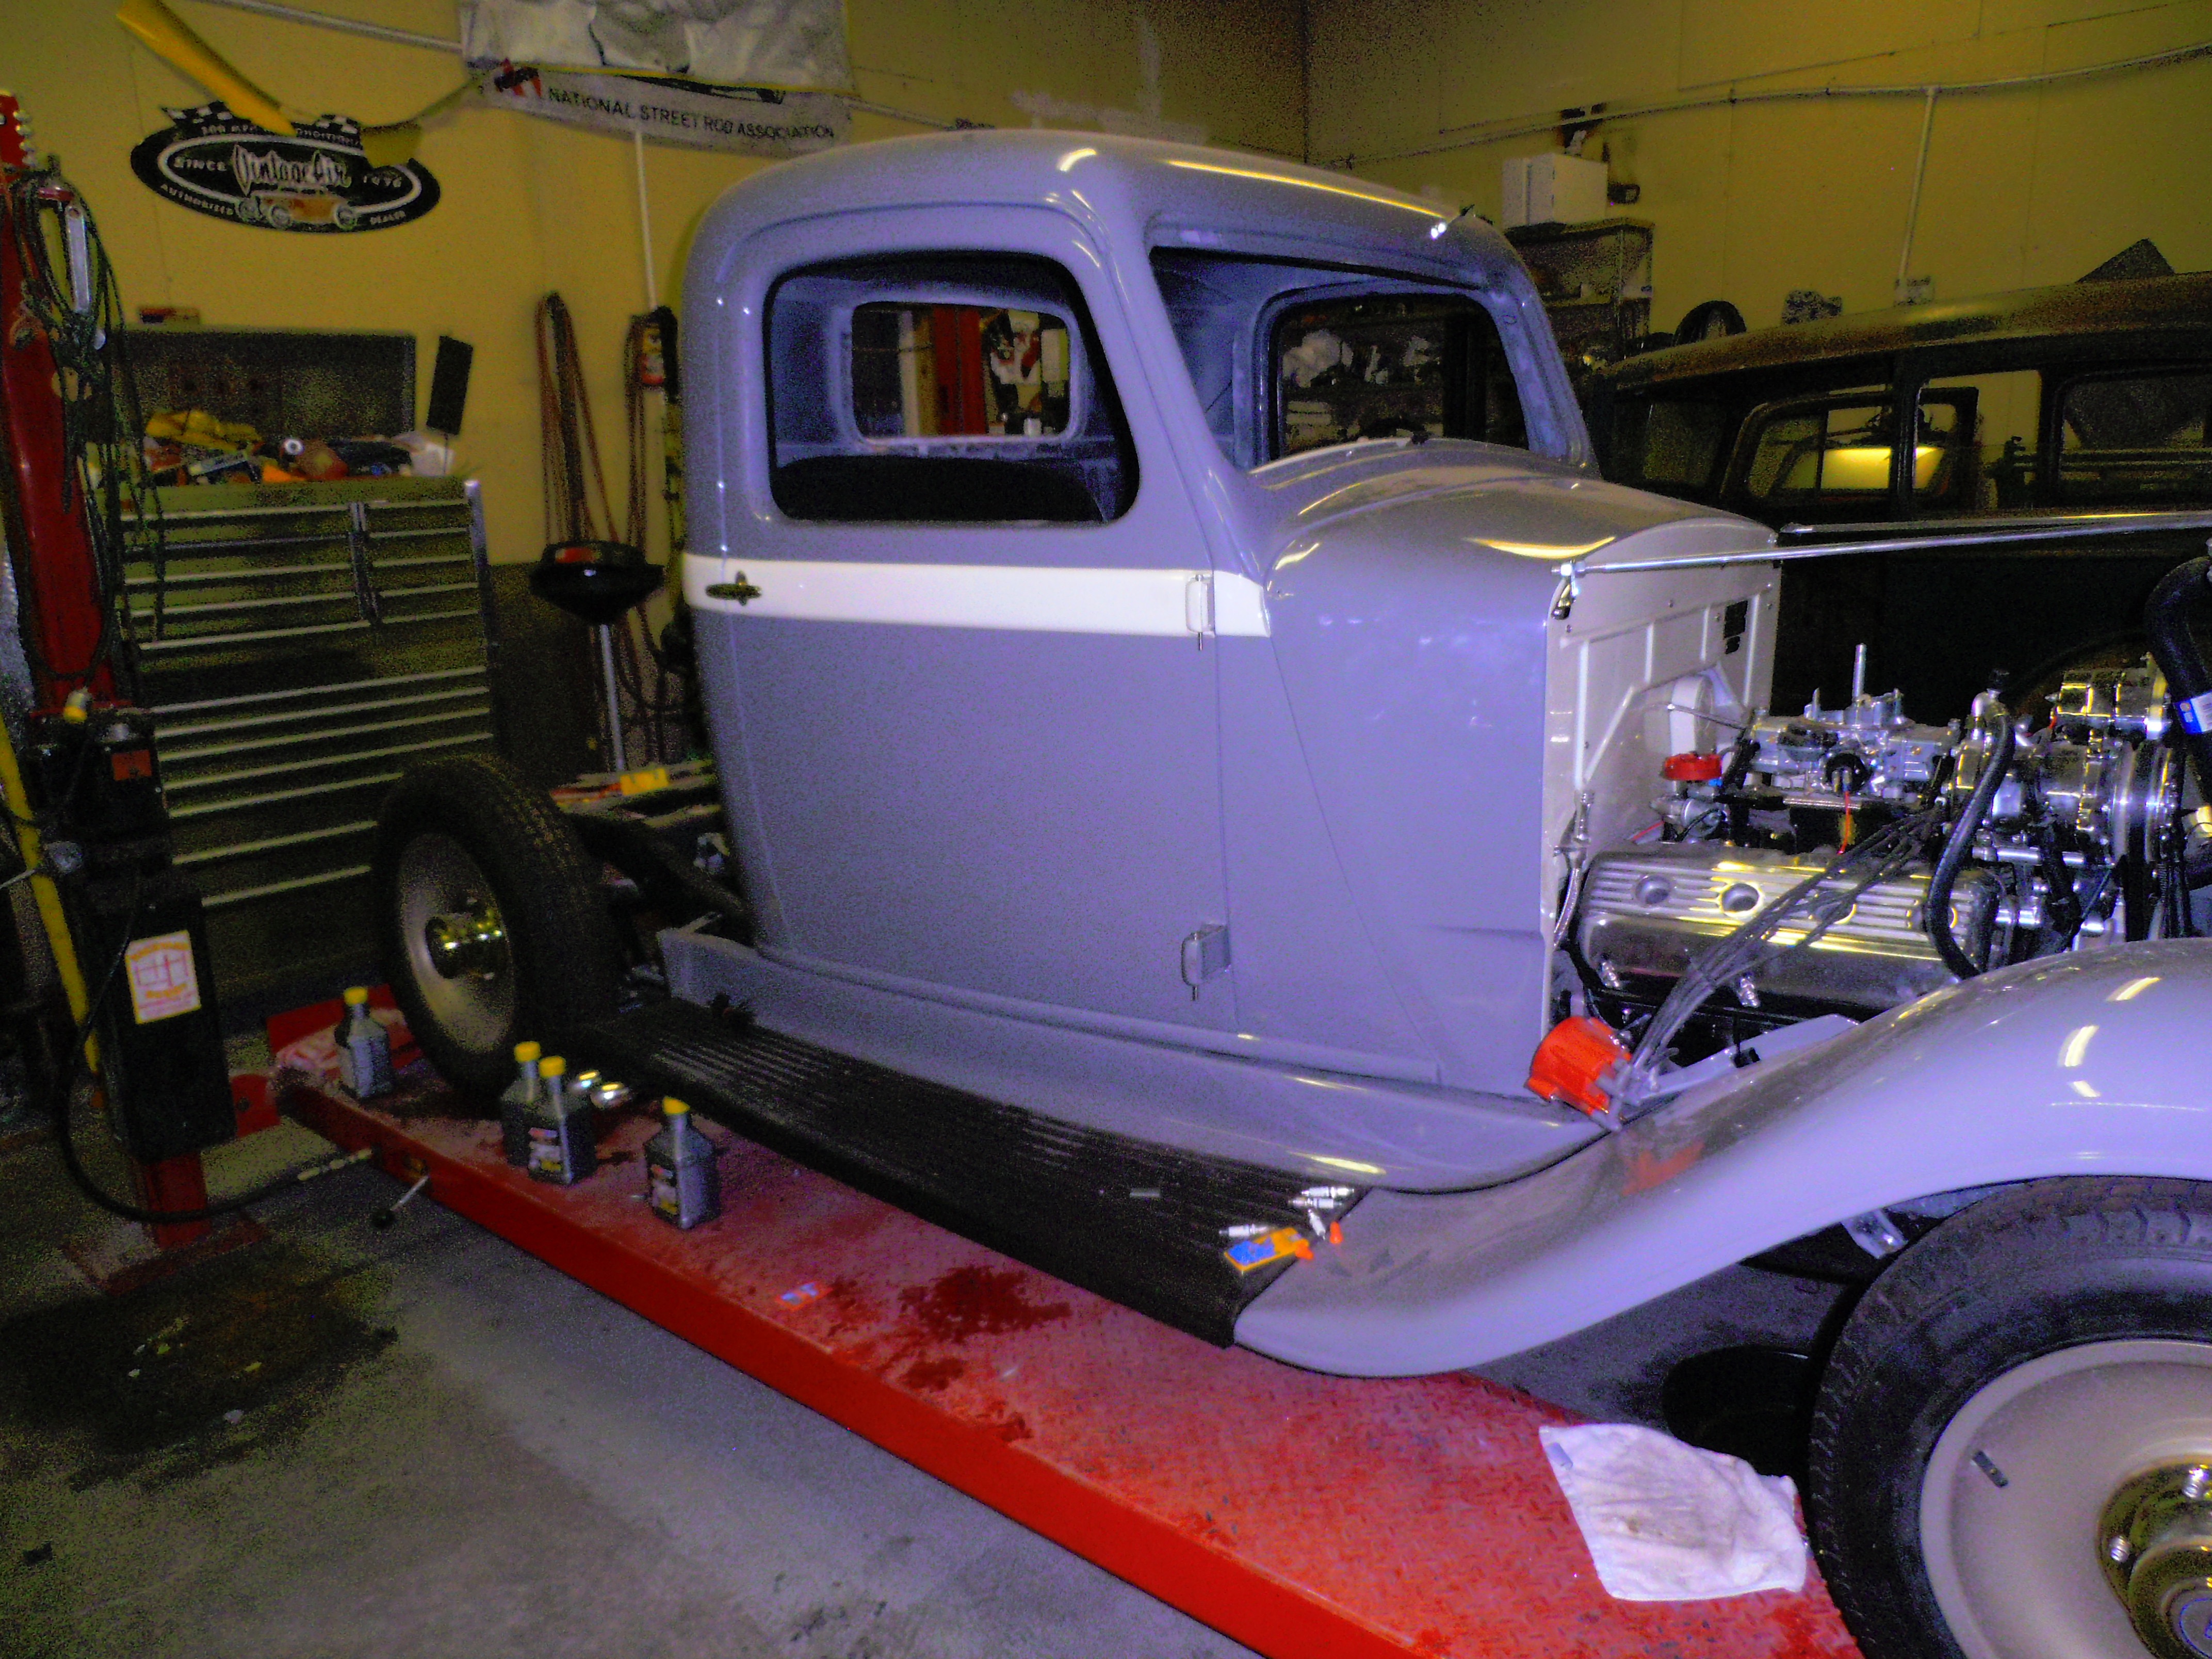
Exterior of cab and front fenders finished. High-quality paint. New rubberized running boards
Bedsides have been painted and mounted. Rear fenders are ready to be bolted on.
Looking proud 6 Sep 2018
Trial bed floor–much work to do. Now just three months later, the bed is finished with new graphics. I considered doing the bed floor in the old, traditional way. This would involve many strips of finished hardwood separated by polished stainless steel dividers. This technique always looks good but by now is so commonplace that, at least to me, it has lost appeal. So naturally, I had to go a different direction.
The graphic is a slight redesign of an existing Mopar design. It was done by a local Ephraim design shop and set on a big piece of maple wood cut and finished by Ralph. It is bold and bright and I hope everyone who sees it likes it as much as we do.
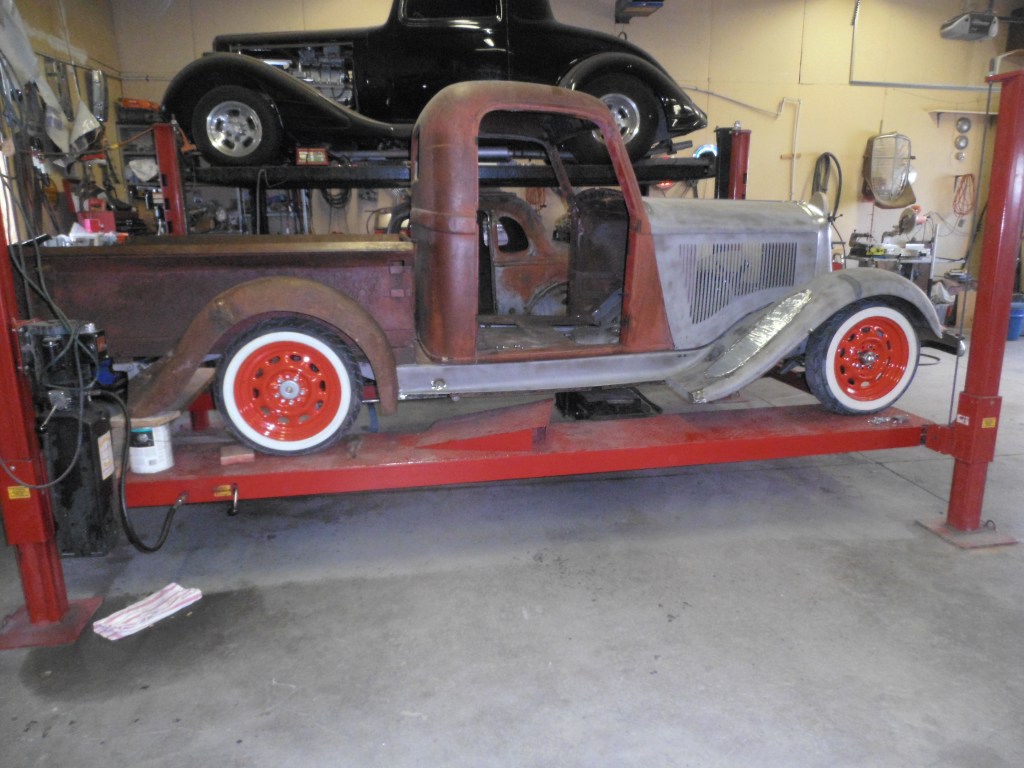
The most complete view of the old Dodge to date. Shot by Ralph on September 11, 2018
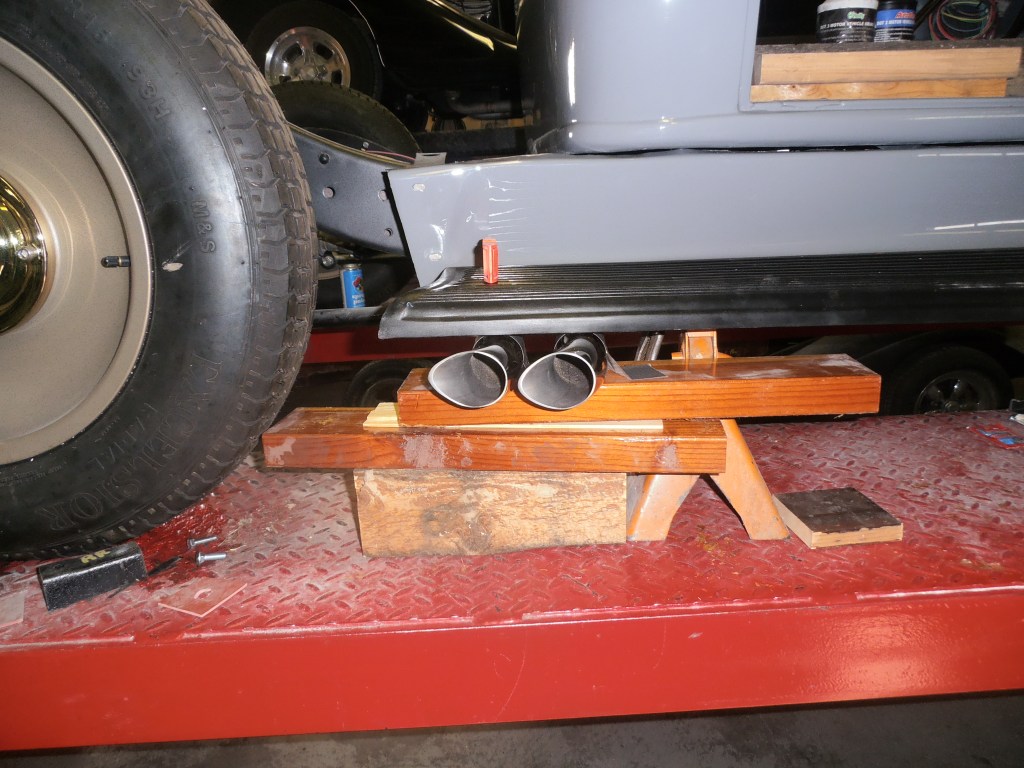
One of the many facets of building a hot rod is the creation of an exhaust system. Though header design is often left to professionals (the meticulous work and time required to make a great set of engine headers is cost-prohibitive), I plan to use a good set of cast iron headers. They look good, won’t corrode or discolor easily and will make a good sound and contribute to reasonable power output. The rest of the system will be assembled and finished by Ralph who has decent welding skills, a good selection of tools, and plenty of prior experience.
Designing the system and then gathering the right parts were the first steps for us. I wanted dual exhausts. The headers selection was easy–there was only one choice and I purchased them through the engine builder. The look good and cleared the frame rails and fire wall. But as we got closer to the time to actually fire up the engine, the rest of the exhaust system became important.
We don’t often consider what is underneath a car or that the real estate down there could get crowded. In fact there is a lot going on out of sight and often it isn’t pretty. But I have always wanted my cars to look good even when put up on a hoist and seen from below–a vantage point that is generally ignored in all but the most expensive builds. I don’t have enough money and hopefully too much common sense to order everything chrome plated. But I do like order, harmony, and good engineering.
In addition to the exhaust system, there are frame rails to be considered. You don’t want much hanging below the frame. That would be an invitation to disaster. So what we are talking about here is about a six inch slice. The battery is there, brake lines are there including those for the emergency brake, and various steering and suspension bits. In the case of this car there are really four exhaust pipes, two splitting off from each engine bank. One set of pipes has a muffler and the other is open. The exhaust is routed one way or the other through an electro-mechanical server controlled by a switch inside the cab. For a lot more noise and a little more power, I can choose the open pipes. To please my next door neighbors, I can choose to have the hot exhaust gases flow through a set of mufflers.
Mufflers, tube type and diameter, x pipe, cutouts
Another way to help rid the exhaust system of an irritating drone is the addition of an X-pipe, which directs the exhaust in two different routes. The benefit of having the exhaust pulses interrupted by crossing over into another pipe before the muffler is an increase in low-rpm power. A custom X-pipe was fabricated for this ride using parts from Patriot, and it is something that a homebuilder could do himself, along with the rest of the exhaust system, so follow along and see how it was done.
I was home in Provo for two months to take care of Geneva (Office for Human Rights Education) business and personal business. Looking after my 1935 Dodge project falls under the personal business heading. There has been a lot of progress since my last post and I will come to that. But first a setback. Into every street rod project, I’ve learned, a little rain must fall. I got soaked on this one.
After several months of thinking about the fine aircraft seats (see “seating”), I have accepted the fact that these are not going to work for this project. I thought, plotted, schemed, measured and diagrammed, but no way–they will not work.
And I am sad. It goes without saying (almost) that my efforts to diminish my own personal girth did not contribute as much to the solution as I had hoped. The fact of my physical contribution to this problem was, in the end, a happy but insufficient one.
But there is no point in this kind of project to letting discouragement ruin the whole effort. Sometimes you just have to throw a bad recipe and its inedible consequence into the garbage heap and start over.
The problem is that the angle of the back rest is too far back from a straight up 90 degrees. This has the effect of pushing the seat bottom so far forward that I hit the steering wheel, the clutch and brake pedals are unworkable, and so forth. I was stunned, then in denial, then disappointed, and then made a decision to start again with a different idea for the seats. The extraordinary aircraft seats will soon be for sale on eBay and I’ll be posting photos of the new seats in a later blog. But first to some good news.
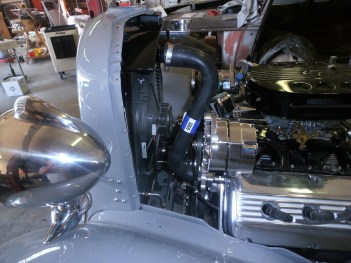
After a great deal of time and almost magical effort, Ralph has managed to squeeze the radiator, fan and shroud into the confines of the 1935 Dodge grille. But this could not be done without first bolting the headlight support to the grille. Then, of course, all had to be attached to the frame support. This is further complicated by the fact that there are two sides and they must both be fastened to the grille before the fenders could be attached to the headlight support bar.
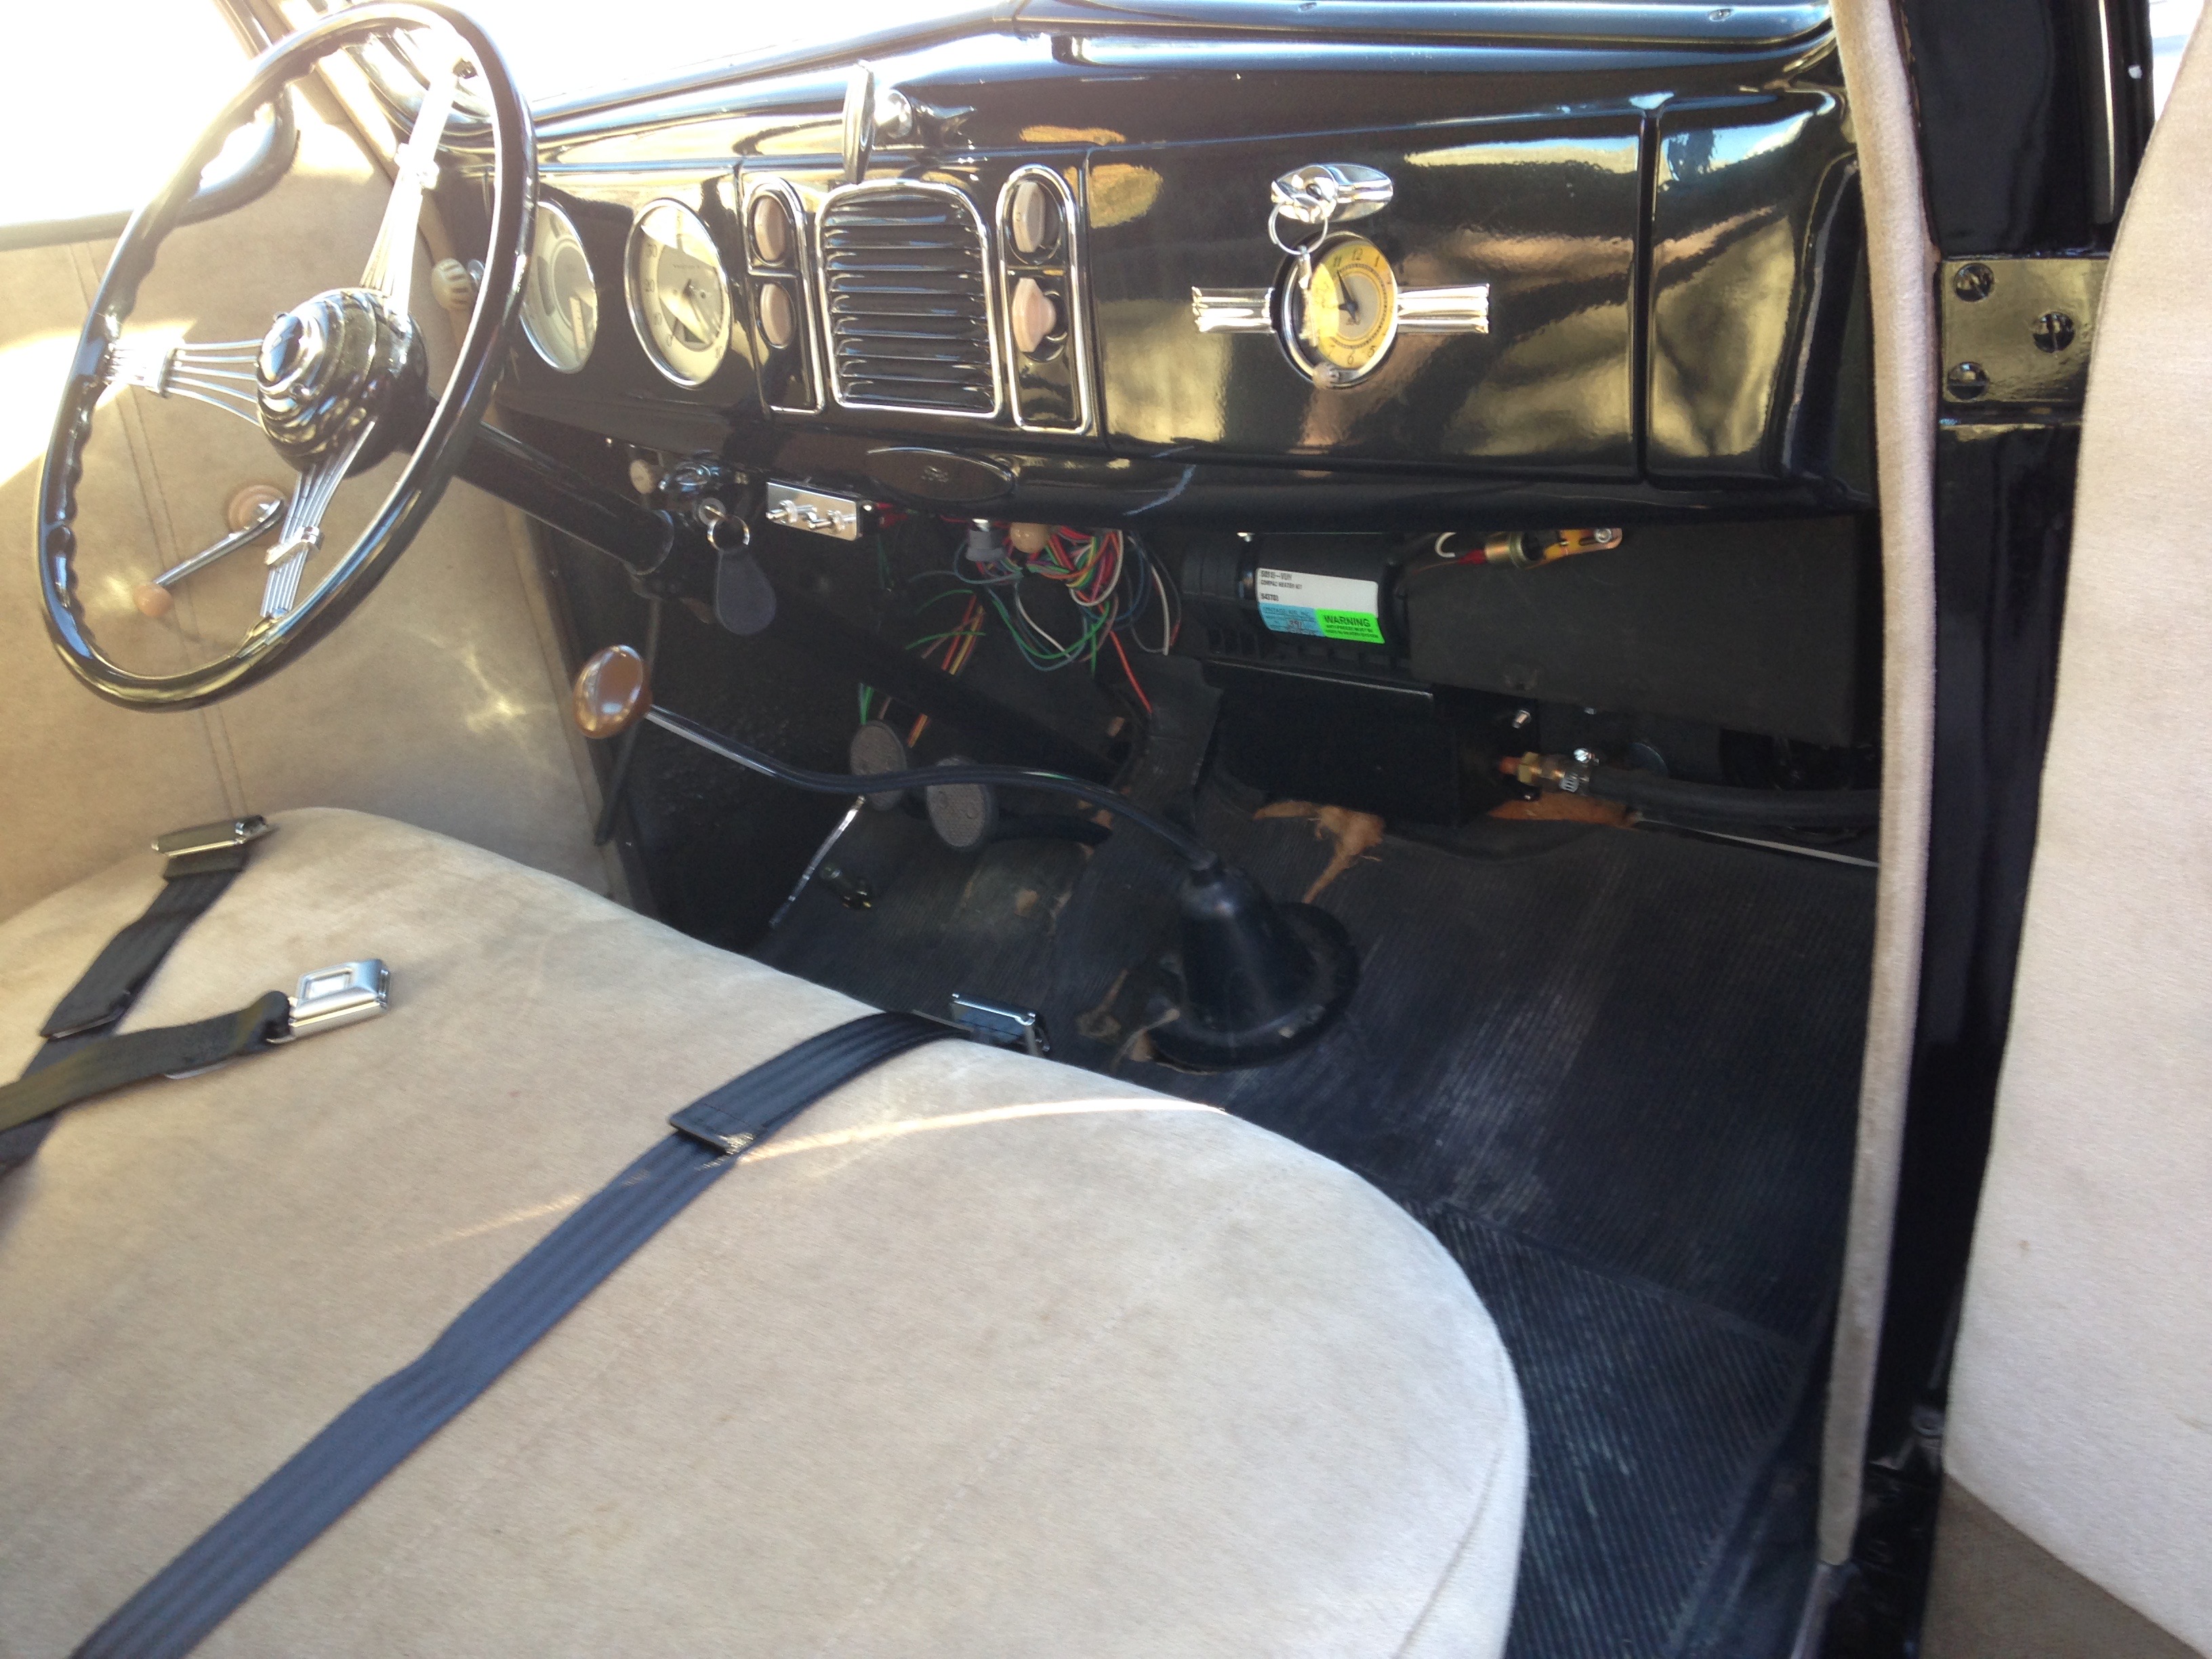
If you are following closely you will notice the addition of the air conditioning compressor and the radiator hoses. The hoses represent the opposite end of the luck spectrum from the seats. We were able to find off-the-shelf hoses that fit perfectly. You may also notice that the engine is sporting new valve covers. The old ones had been powder coated during the rebuild but the color wasn’t right.
You may also have noticed the new body color. Although it gives the appearance of the same as the grey primer that was used in the build to this point, this is a final finish coat without the sanding and clearcoat which will come at a later stage in the process. This is the Audi “Nardo Grey” that I agonized over for a very long time.
I hope you like the grey (or is it “gray”) as much as I do.
The Nardo Grey may seem like a safe choice, and maybe it is. And maybe it is a consequence of having spent so much of my recent life in Switzerland. I guess that 95 percent of all cars on the road here are somewhere between white and black with the majority meeting in what seems to be an endless range of grey shades. But this particular color is unique in two ways. First, it is an Audi color and apparently patented or copyrighted. Other manufacturers use various means to approximate the color. But I ordered this from a paint shop that claimed it was what Audi was using to repair damaged panels of this color. Second, this paint has no metallic flakes and no pearl additives to make it shine or change color under different light conditions.
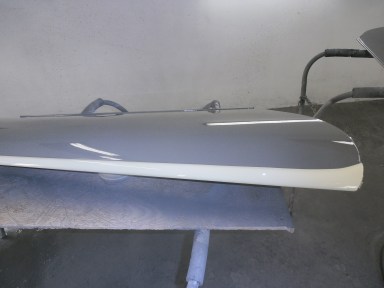
The white stripe is, of course, on the doors and will extend along the lower lip of the hood top. It is a BMW “Mini” color called “Pepper White.” It will also be used inside on the dash and seat.
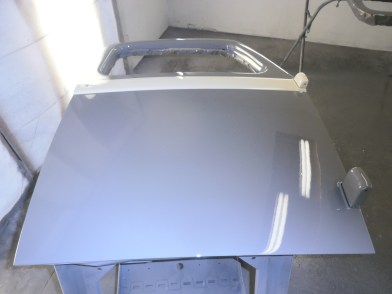
Here is the view of the full hood top. The white stripe continuation is visible here as it makes its way from the door, over the cowl area and ending at the grille.
The door stripe is seen in the final photo and it goes right over the hinge.
The plan is to include to narrow black accent stripes to the top and bottom edges of the white stripe similar to the stripes found on the BMW mini.
You have a few options when it comes time to decide what you’re going to use for a seat in your hot rod pickup. I could have tried to resurrect my original seat but the rusty old pickup didn’t come with one. I could scrounge the wrecking yards looking for something close and then modify it to fit my ’35 Dodge. I could buy nice new seats from one of the companies advertising in Street Rodder magazine. Or I could ask Ralph to build them from scratch. I didn’t do any of these but here’s what I did.
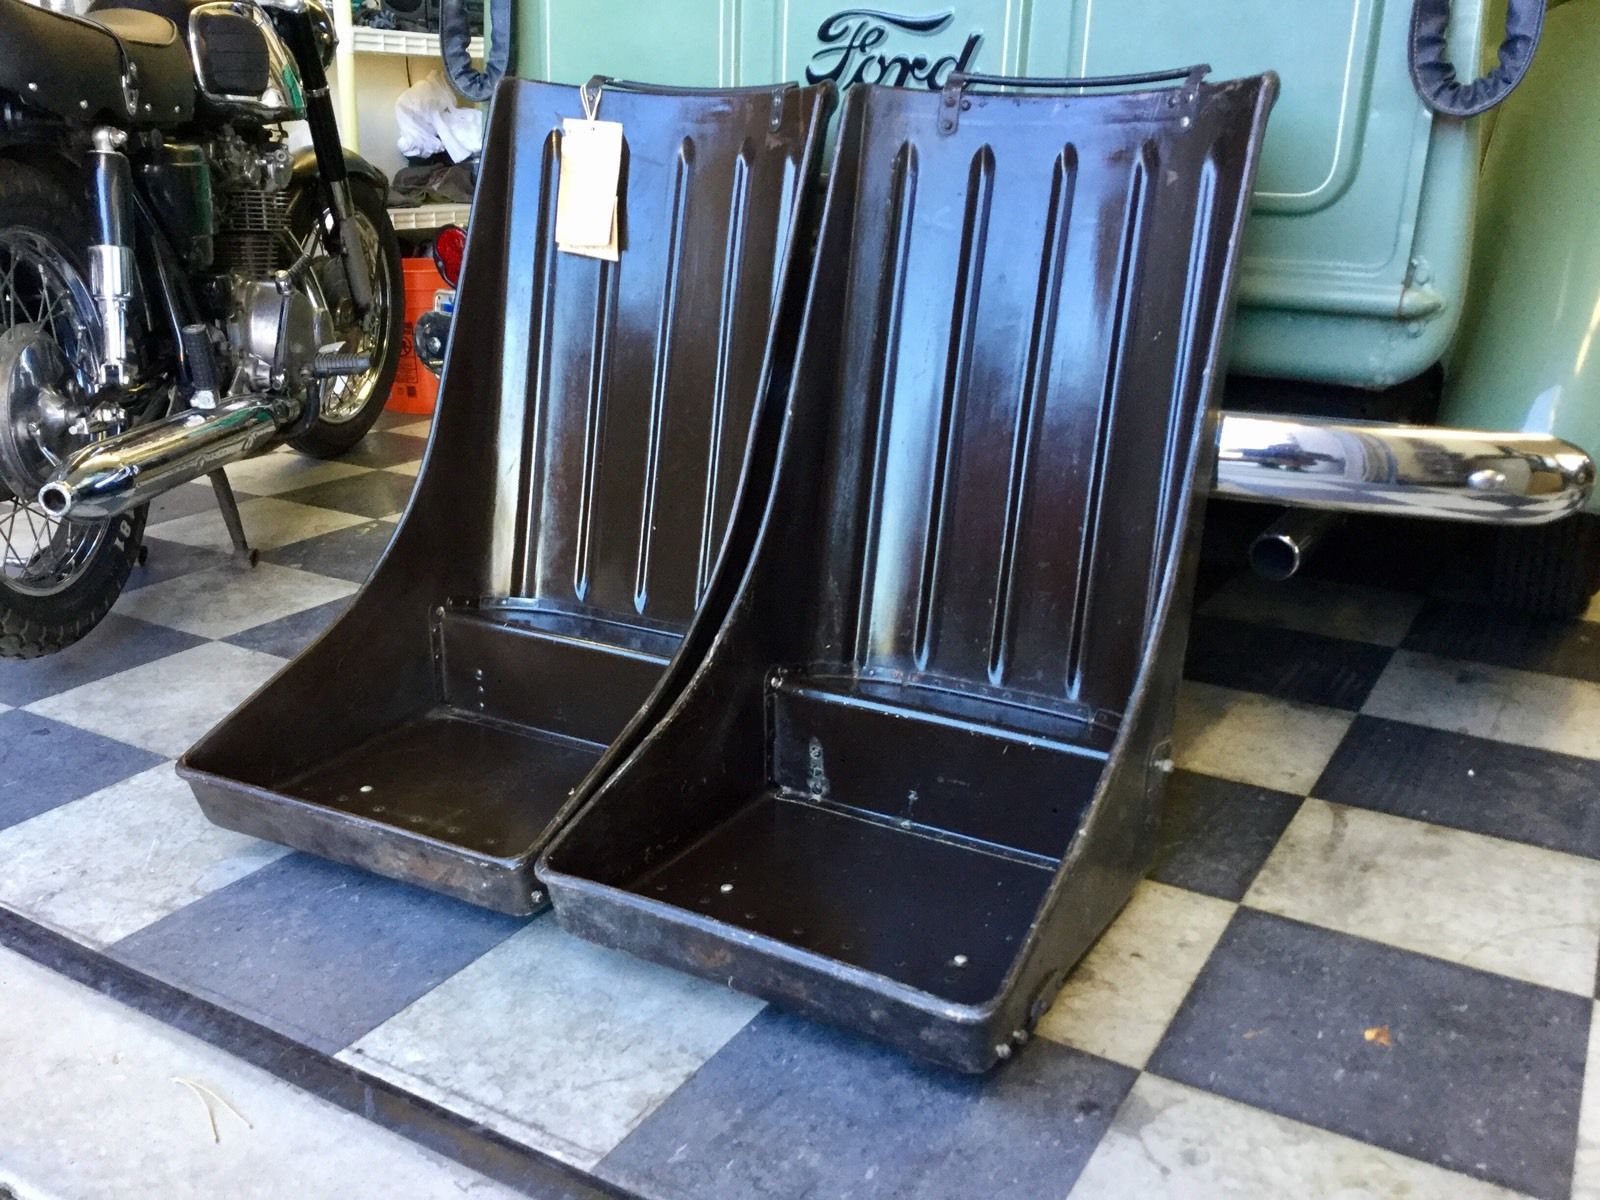
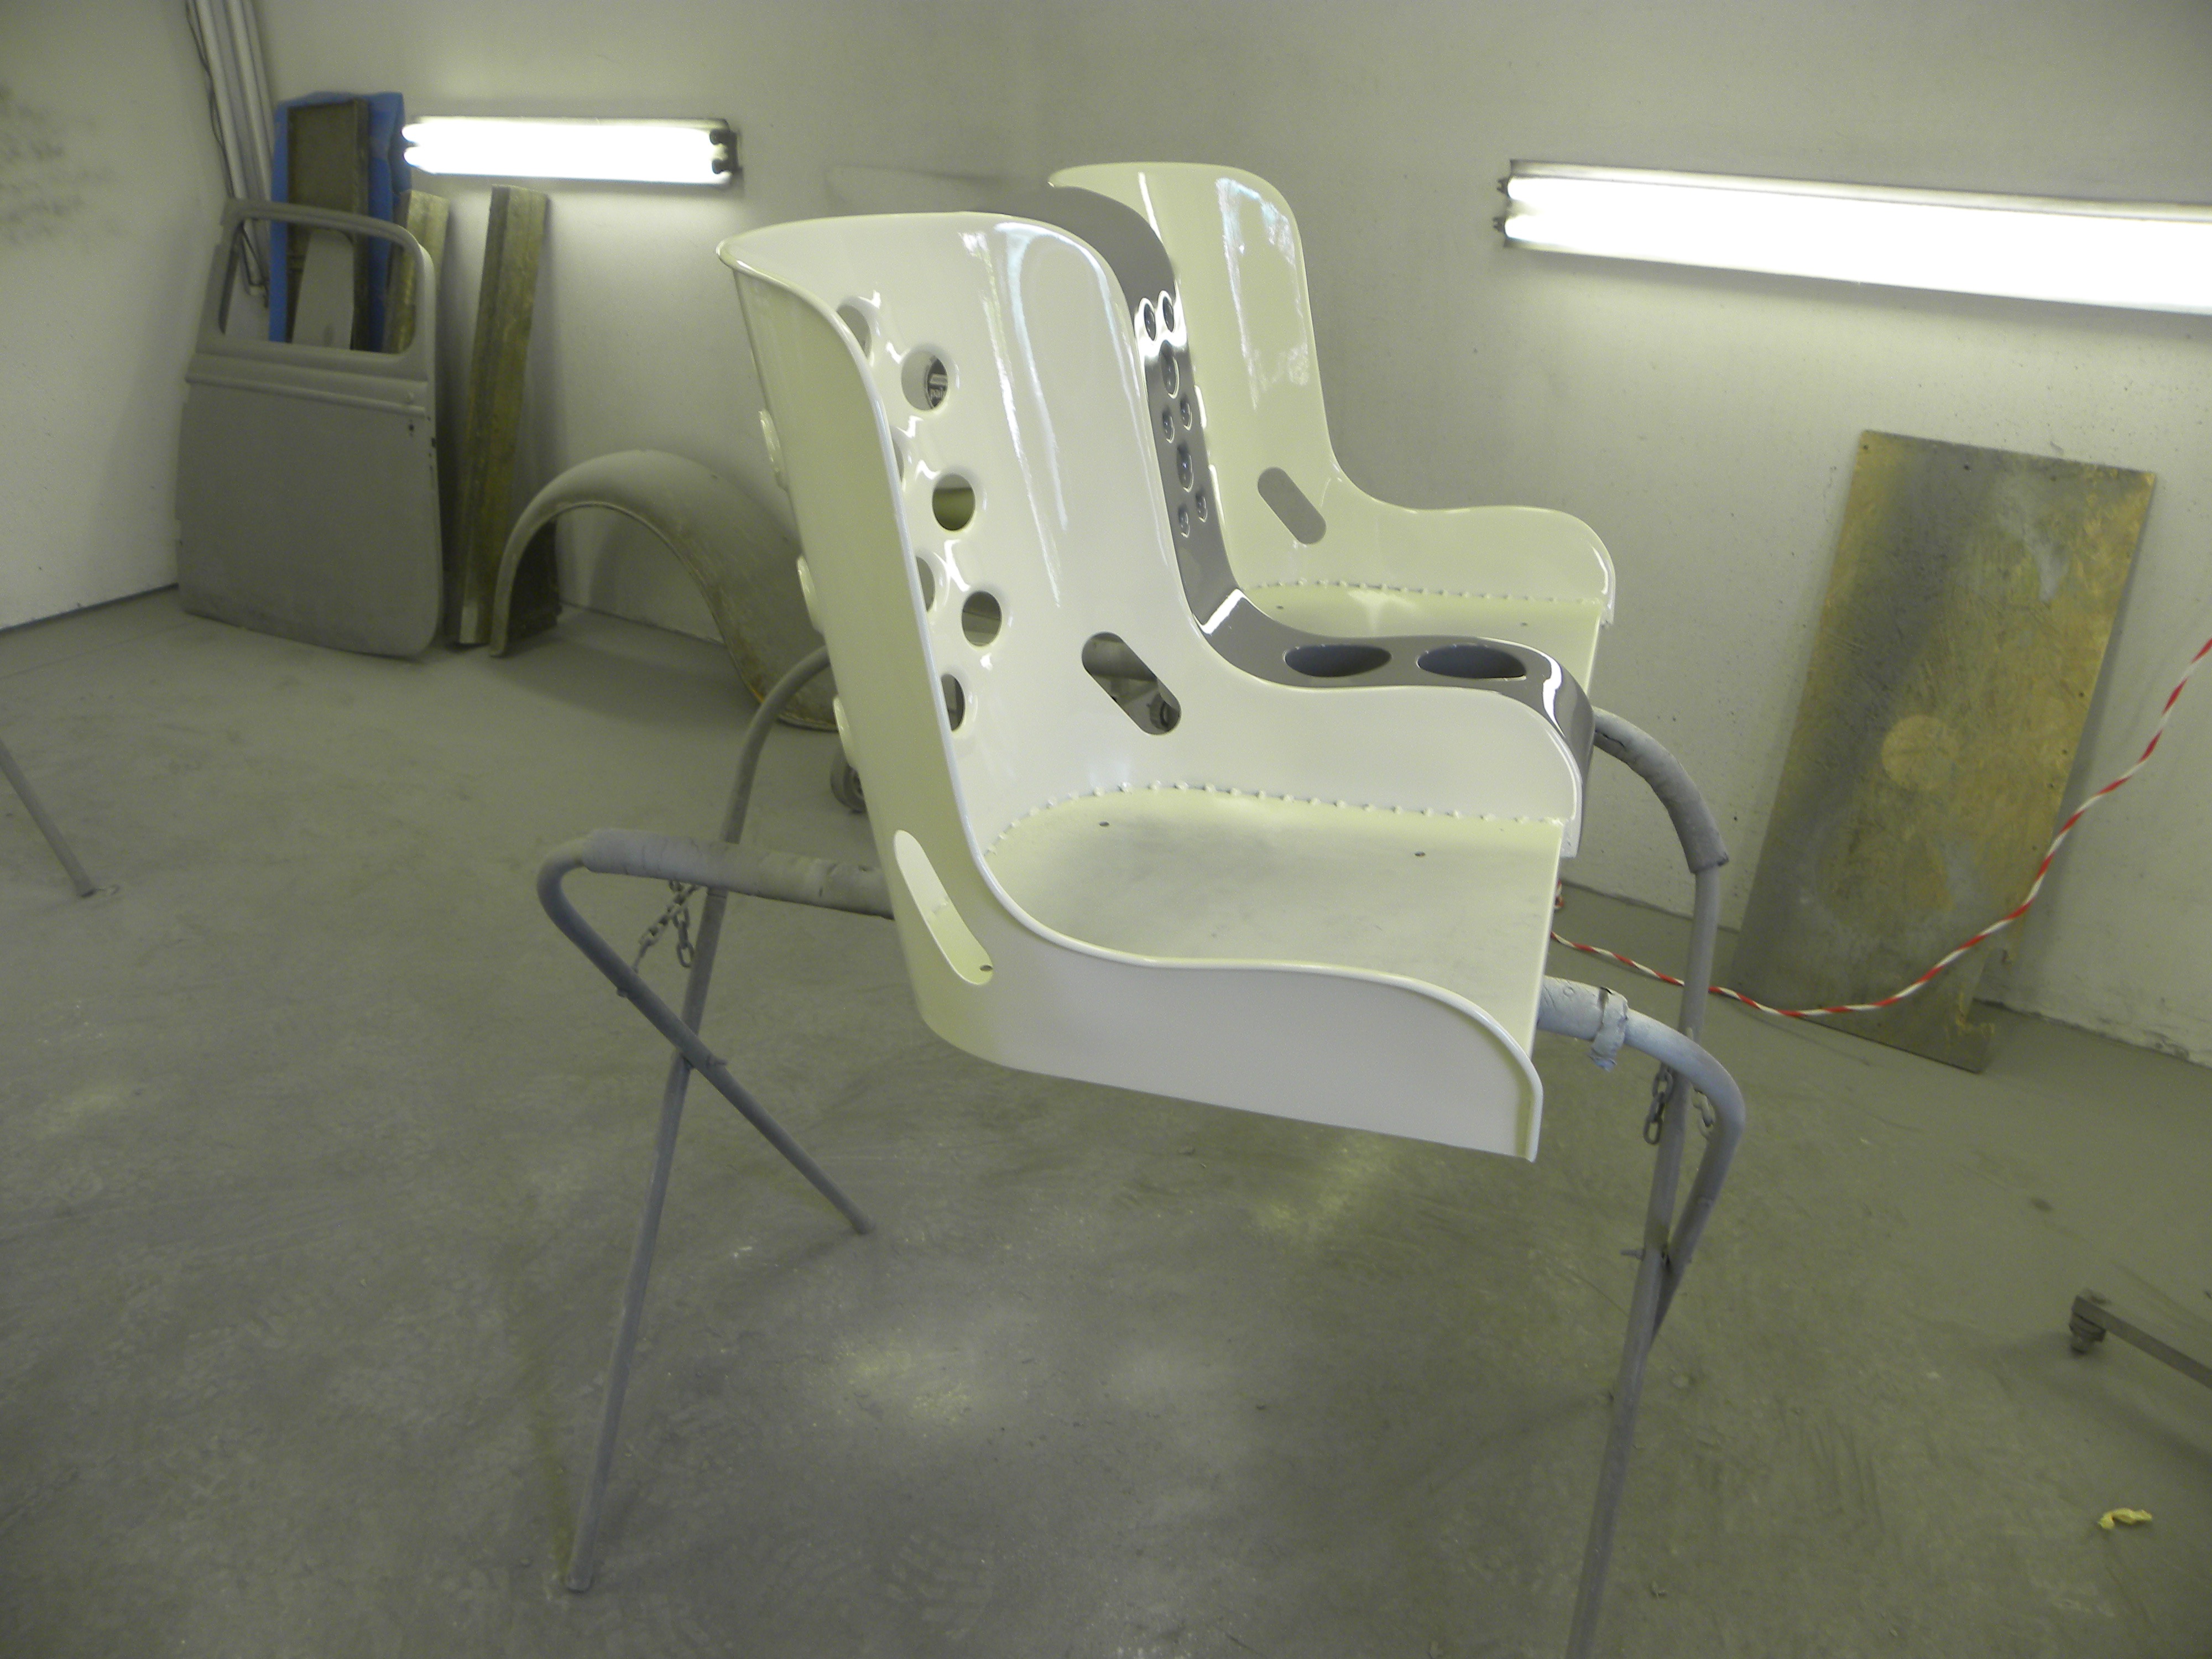
Bomber-style seats have been used in street rods since the ’40s, and “back in the day” most of these came from military surplus yards. Lately, these seats have become enormously popular, and now we are seeing a lot of newly constructed bomber seats in hot rods.
I thought about this photo from Street Rodder when I found some almost identical ones on eBay. They were advertised as being made of an unknown, lightweight composite metal material. They were said to be rare. The seller claimed perfect condition. I bought them like most everything else, “sight unseen.”
I thought these would look cool in the Dodge. And they should fit inside the cramped pickup quarters, they were lightweight, and they would give the custom pickup a purpose-built look with an aircraft flavor.
Most true aircraft seats are riveted together and these are. I get both straight lines and one graceful curve and that’s okay as the old truck has lots of straight pieces with the dashboard being a visibly curvey exception. The rivets aren’t especially visible when the cushions are in place but no one will mistake these seats for factory originals or custom made replicas.
The composite material from which the seats are made undoubtedly was meant to shave off valuable weight. The weight issue is not so important for a street-driven car, but still, I really like the look of these genuine aircraft seats.
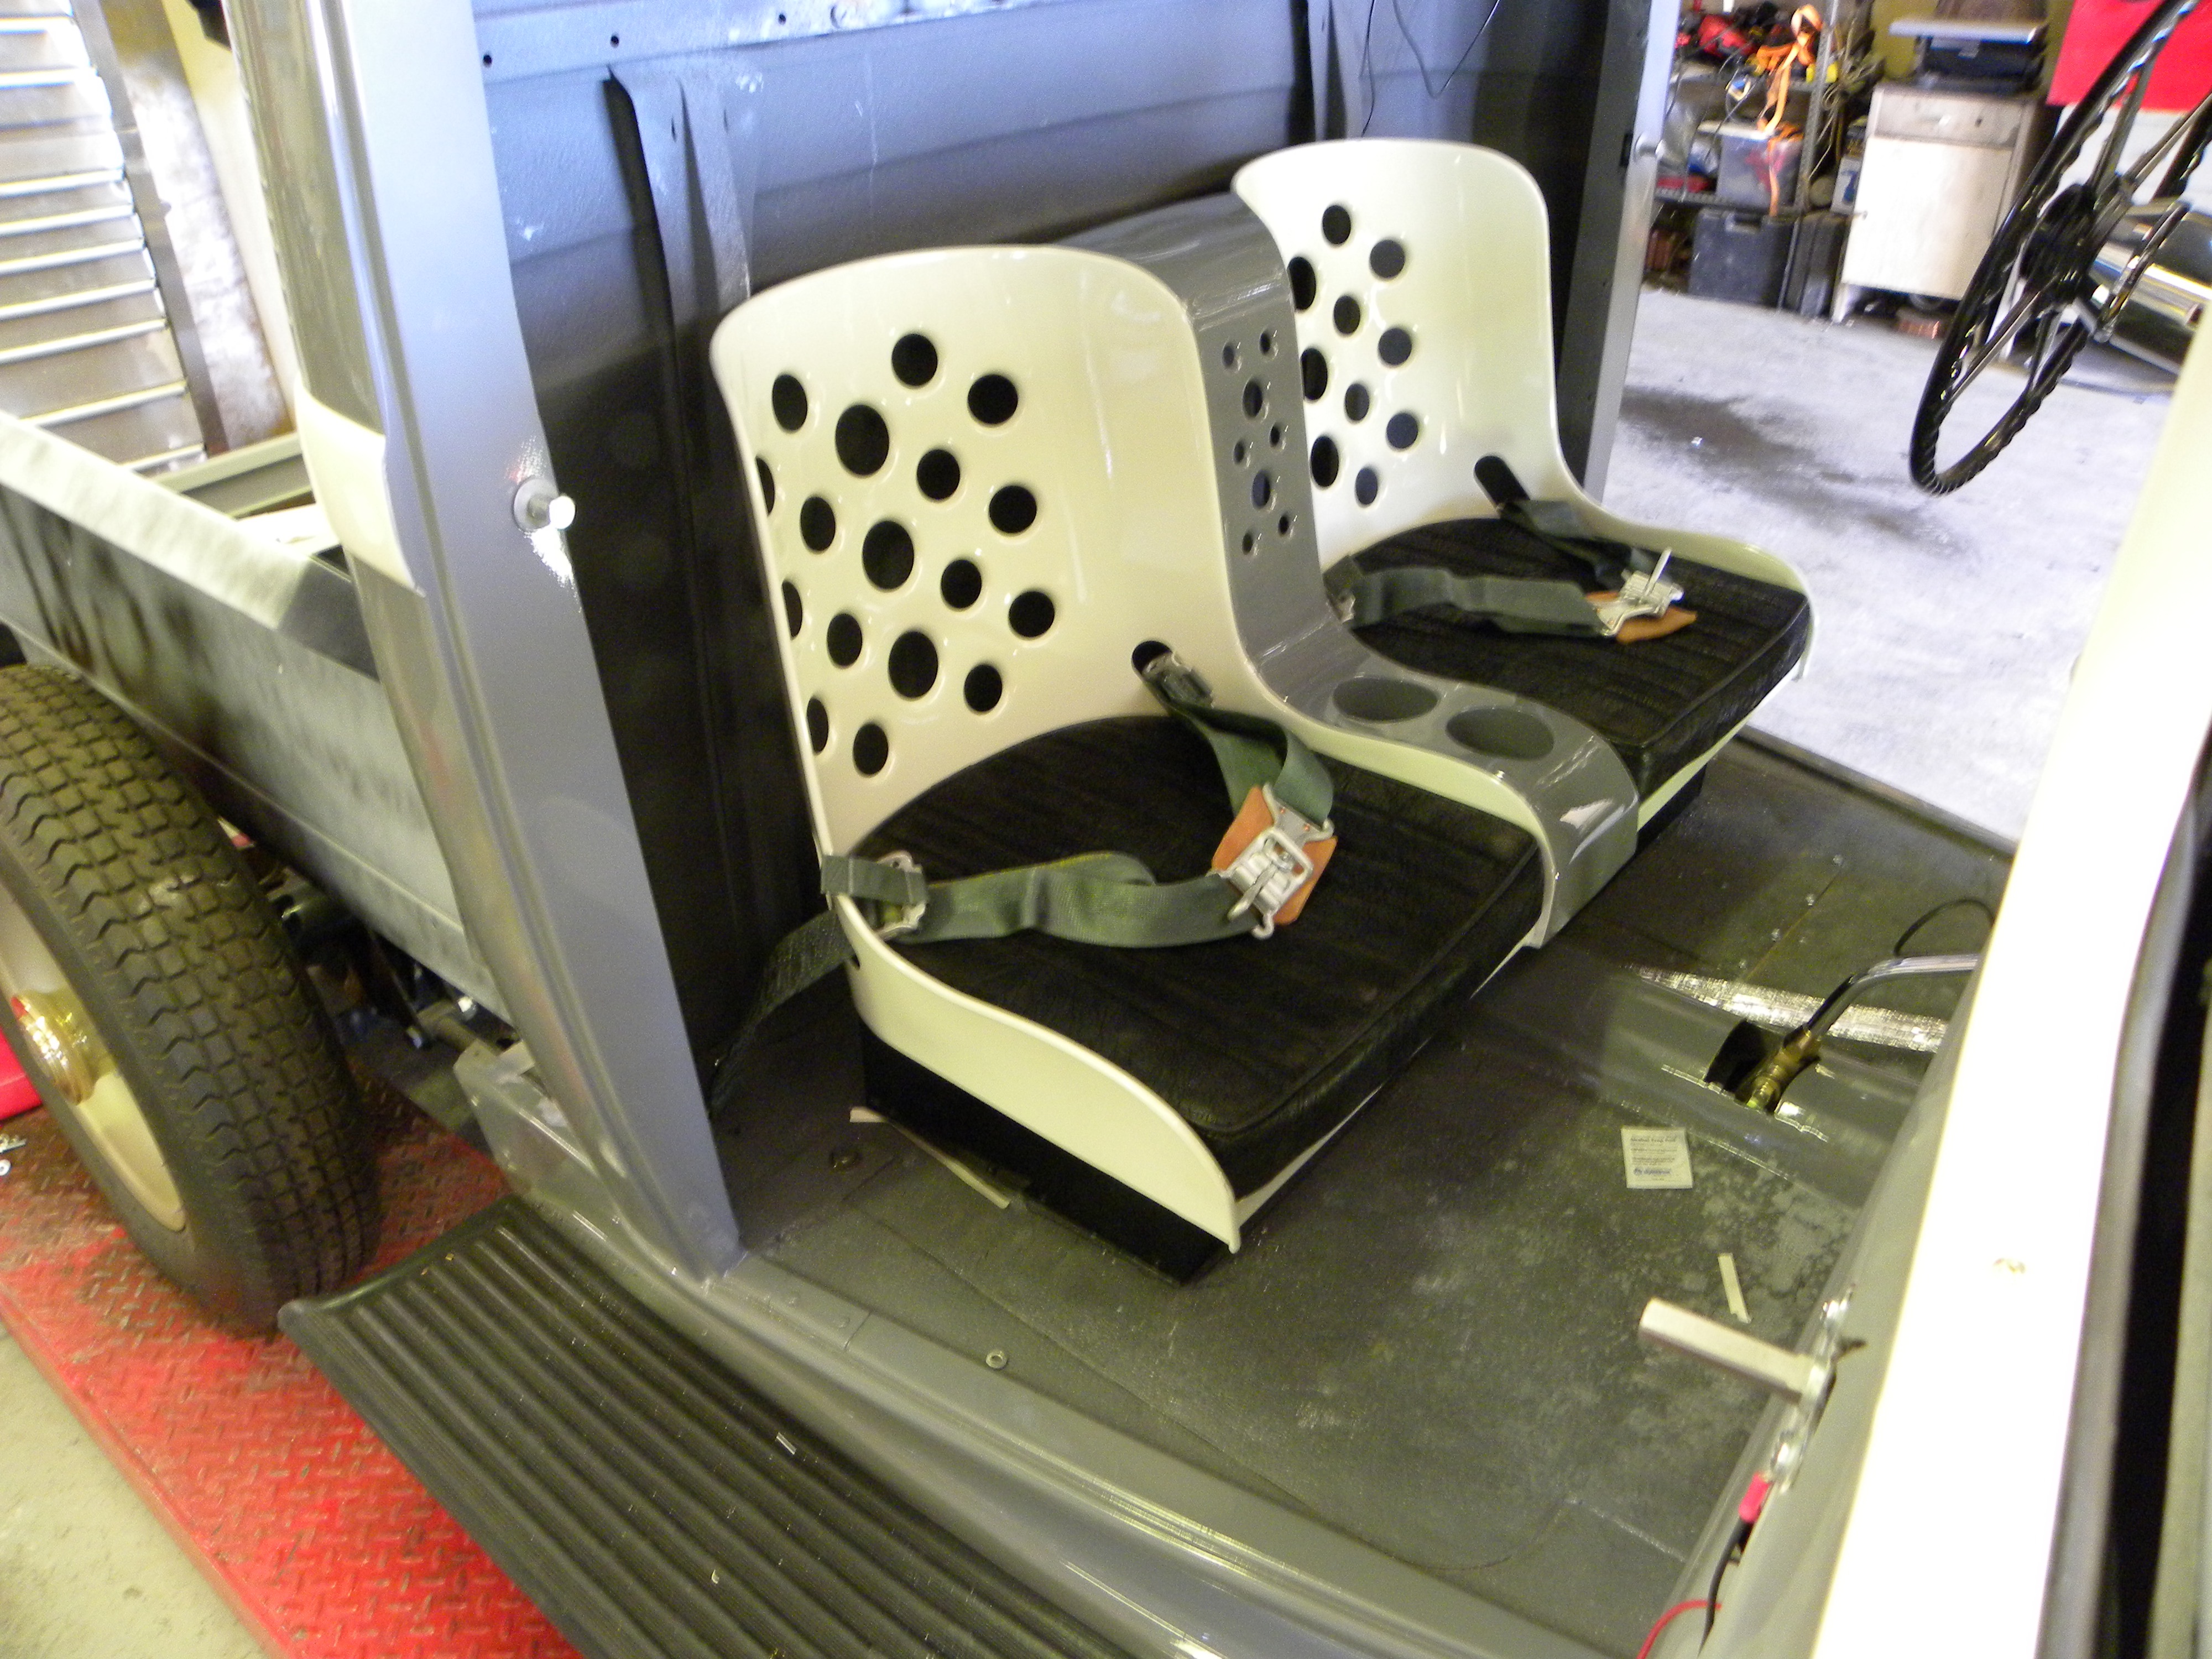
I didn’t chop or channel this pickup so the interior dimensions remain true to original factory specs. But early pickups were designed for work, not driver comfort and there is not a lot of room in the cab, in any direction. This is relevant when thinking of the cushions.
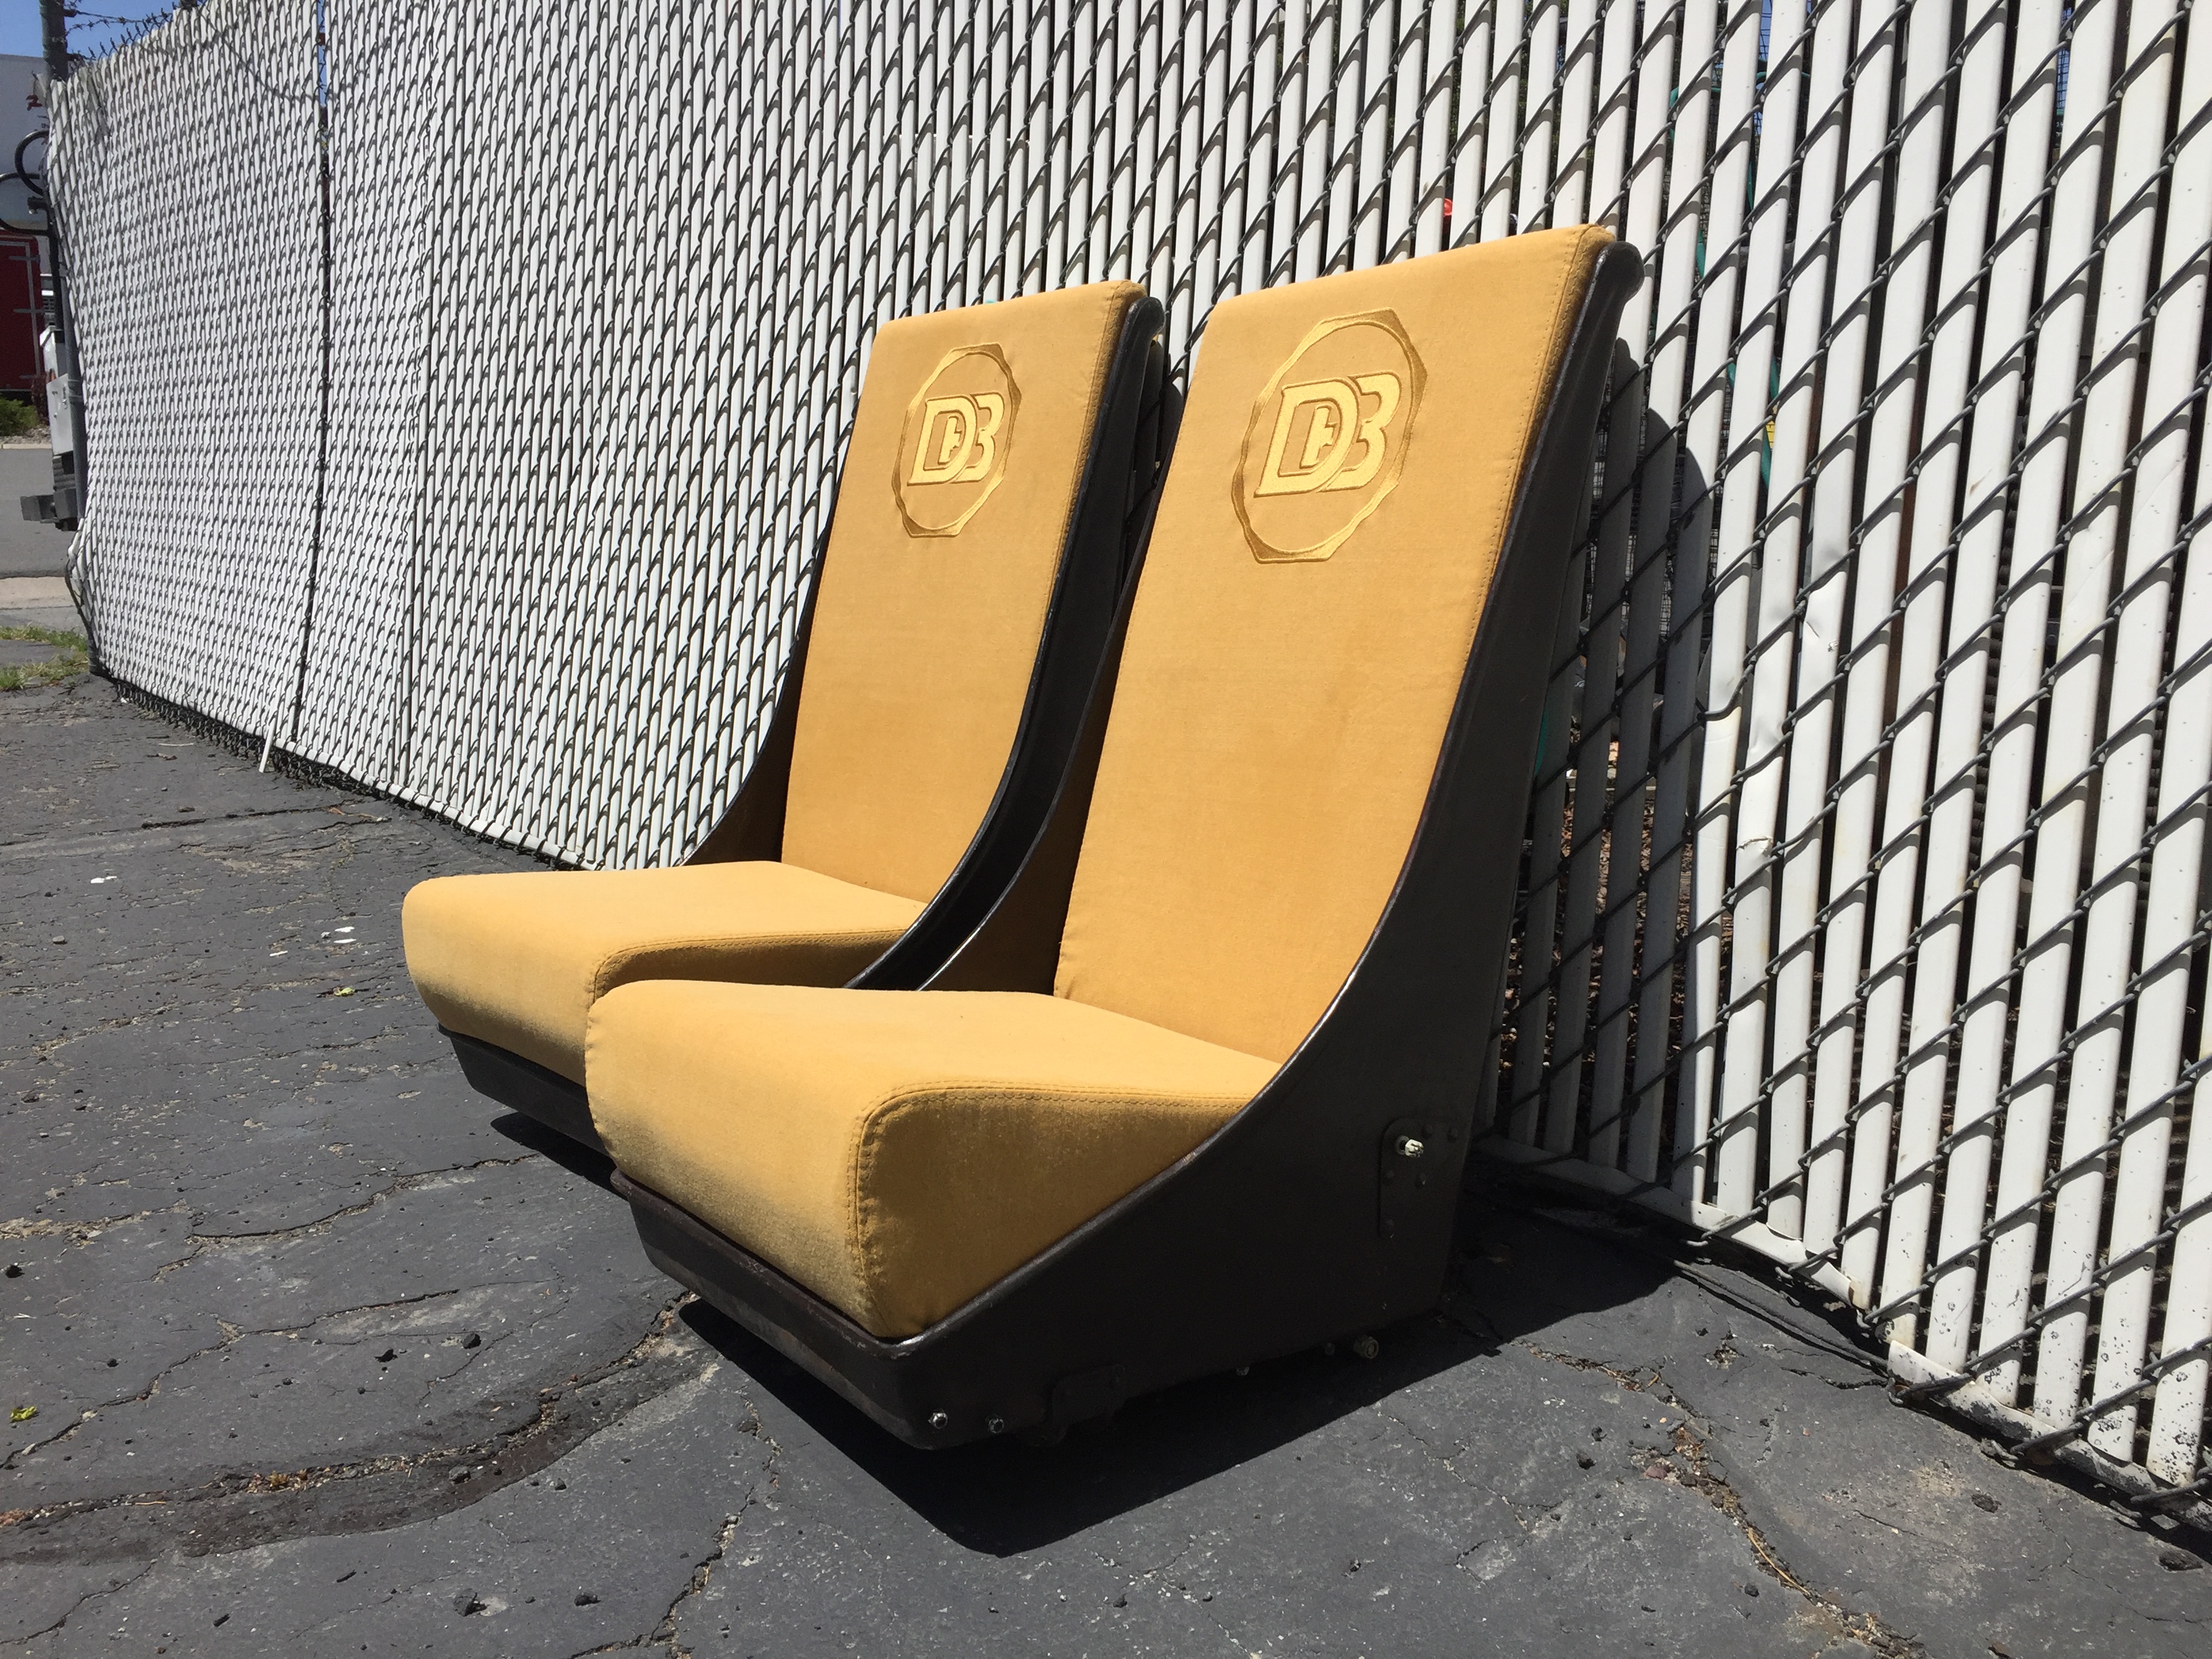
The seat height could be somewhat variable because of built in adjustments provide by the seat riser that connects the seat to the floor. I wanted the seats to be comfortable as well as adding to the allure of the truck. I decided to use canvas seating material similar to that found in military aircraft. I just ordered heavy duty, military canvas. I had a 12 foot square piece sent to the upholstery shop.
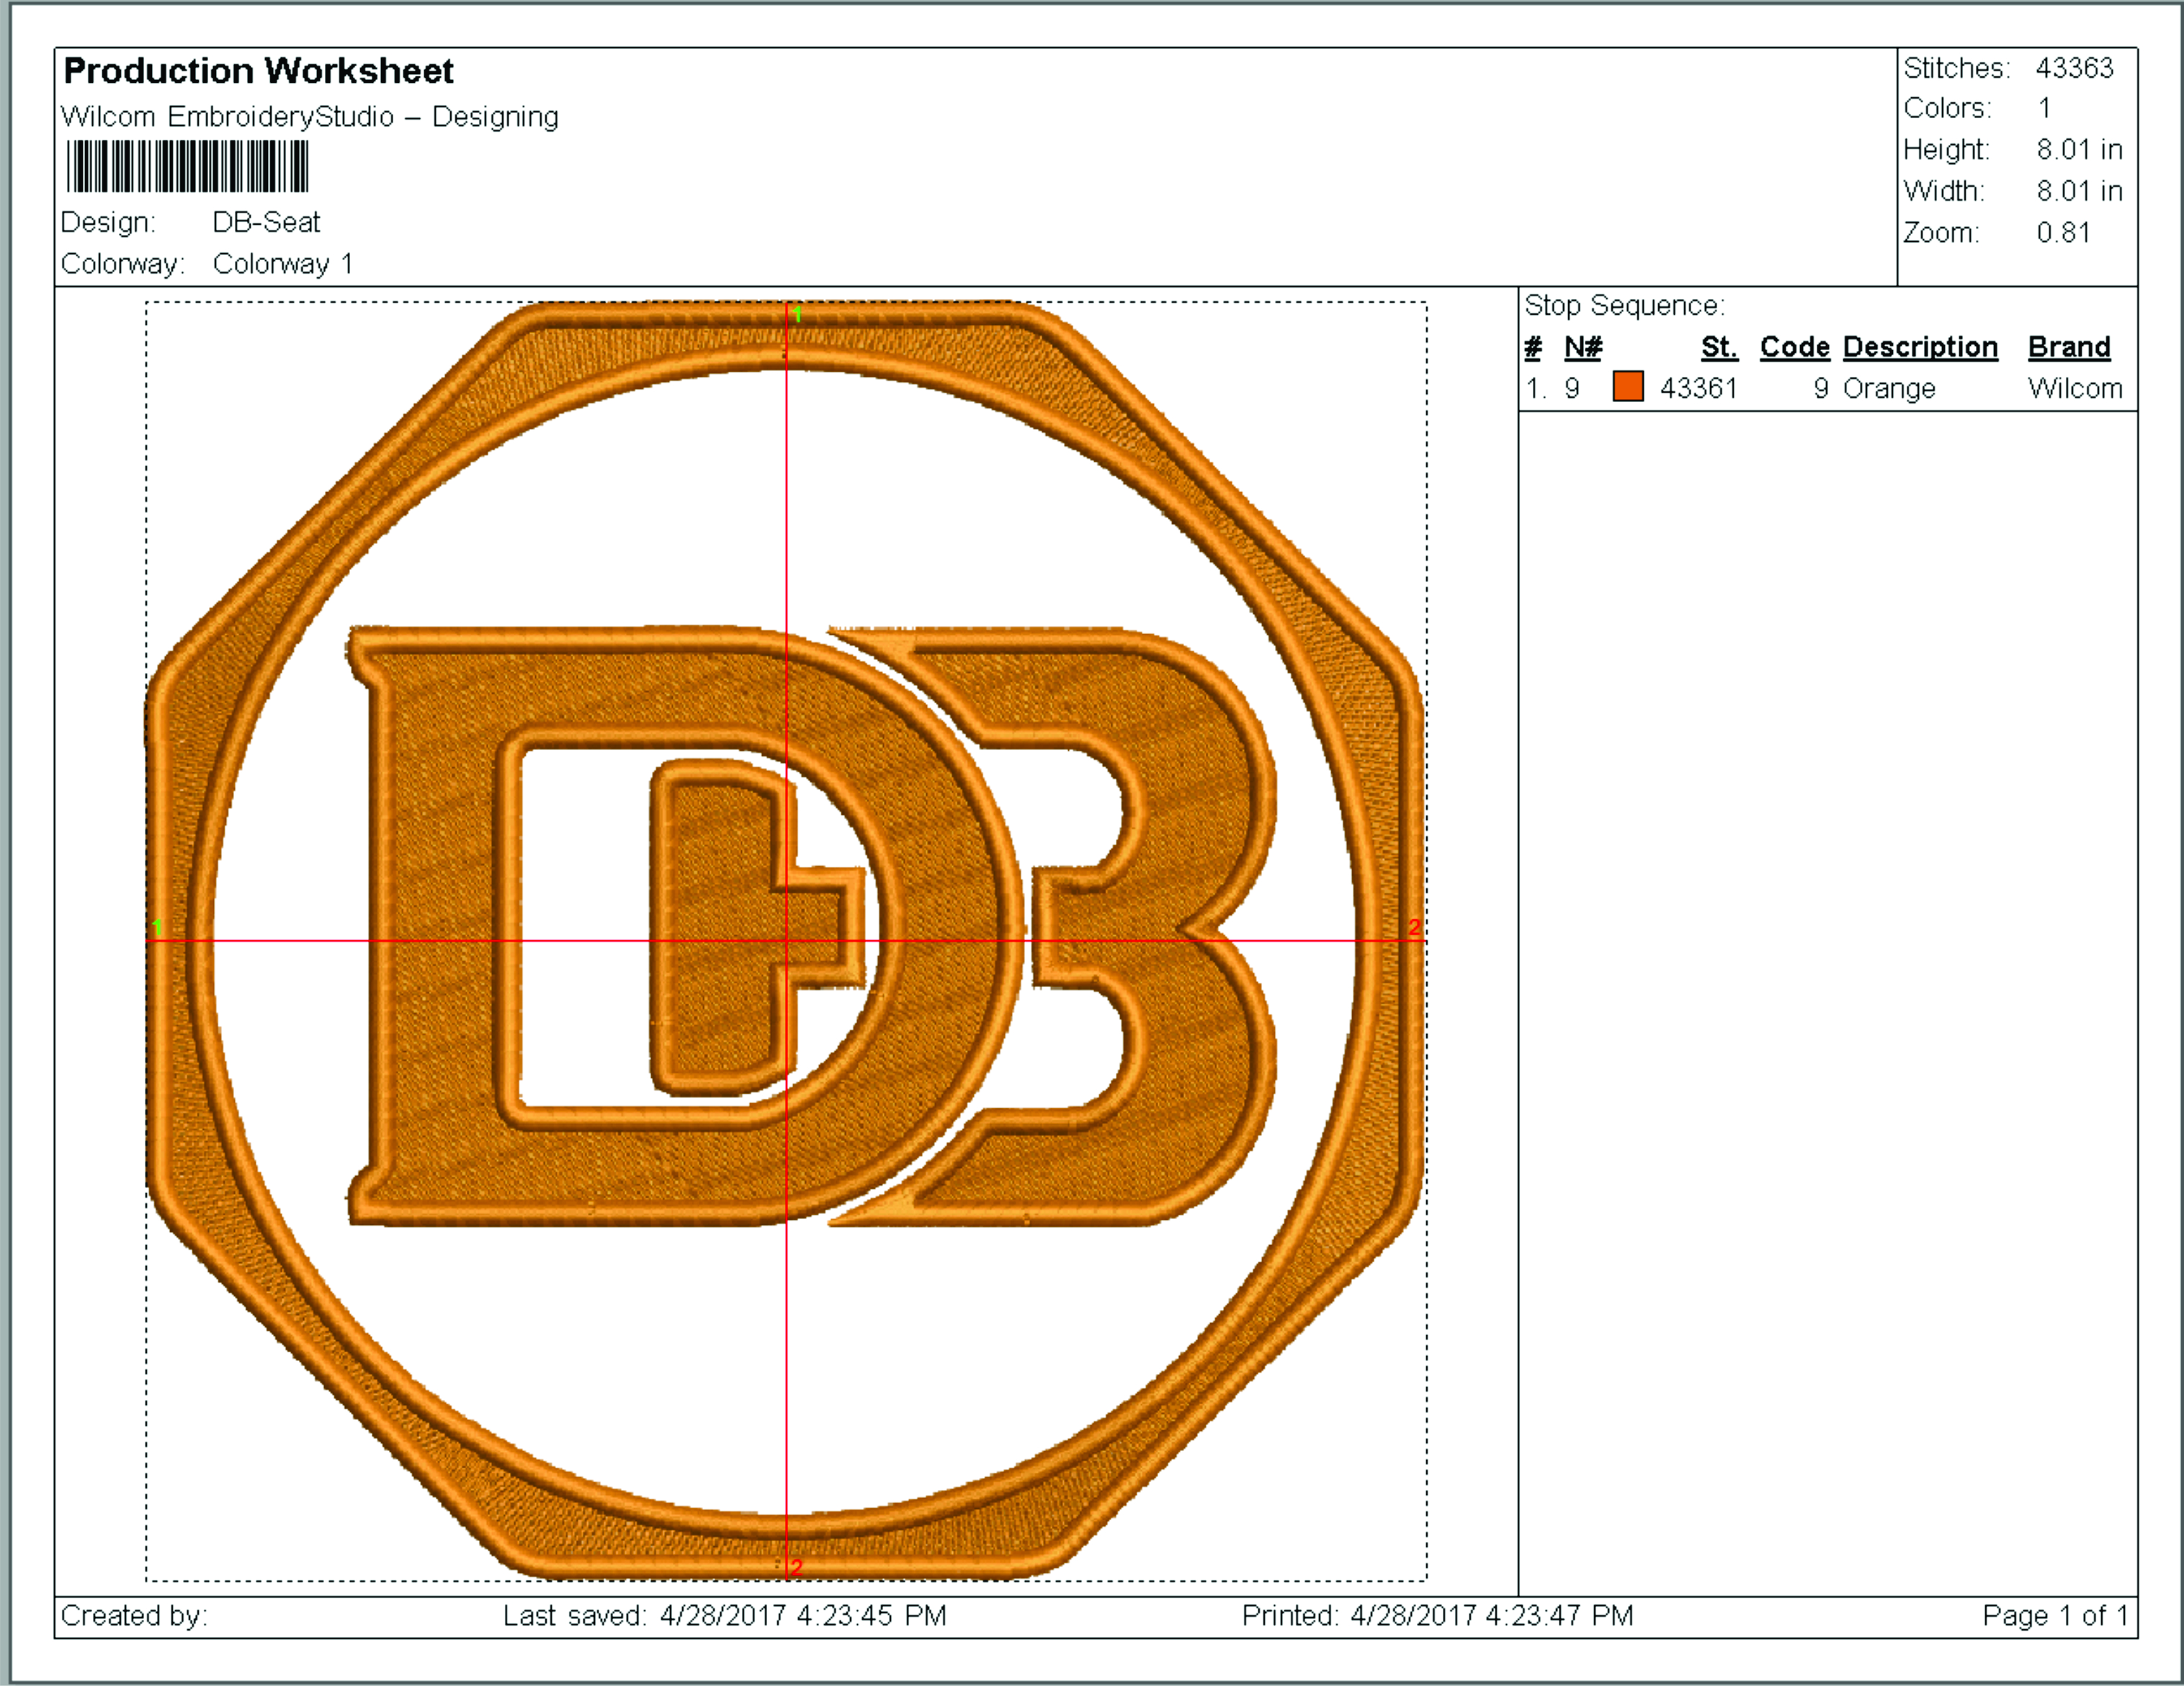
I added the Dodge Brothers logo courtesy of a very hi-tech embroidery shop in Reno.
The upholstery shop I selected to make the cushions was located not far from the guy who sold me the seats and was happy to deliver the seats to the upholstery shop. I said I wanted the cushions to be thick and of the highest density foam available. I haven’t sat on these yet but they look thick and heavy-duty. All the stitching was done, as requested, in “French” double stitch style. The upholsterer, in turn, took my heavy canvas material to the embroidery shop. Great collaboration among these three made this three-step process easy for me to manage at a great distance from the action.
I am pleased with the way the Dodge Brothers logo turned out. May also stand for Donald Bruce, my given names. I know this sort of stuff isn’t for everyone. But I kept it subtle by having the embroidery done in the same color as the canvas.
Here is a good side view of the seats sporting their new cushions. I think the military aircraft look is preserved and the cushions cover up all the hard bits.
We can adjust the seat height about two and a half inches up and down and fore and aft. These commercially available risers make easy work out of what used to be a complicated trial and error, one-off metal craftsman’s job.
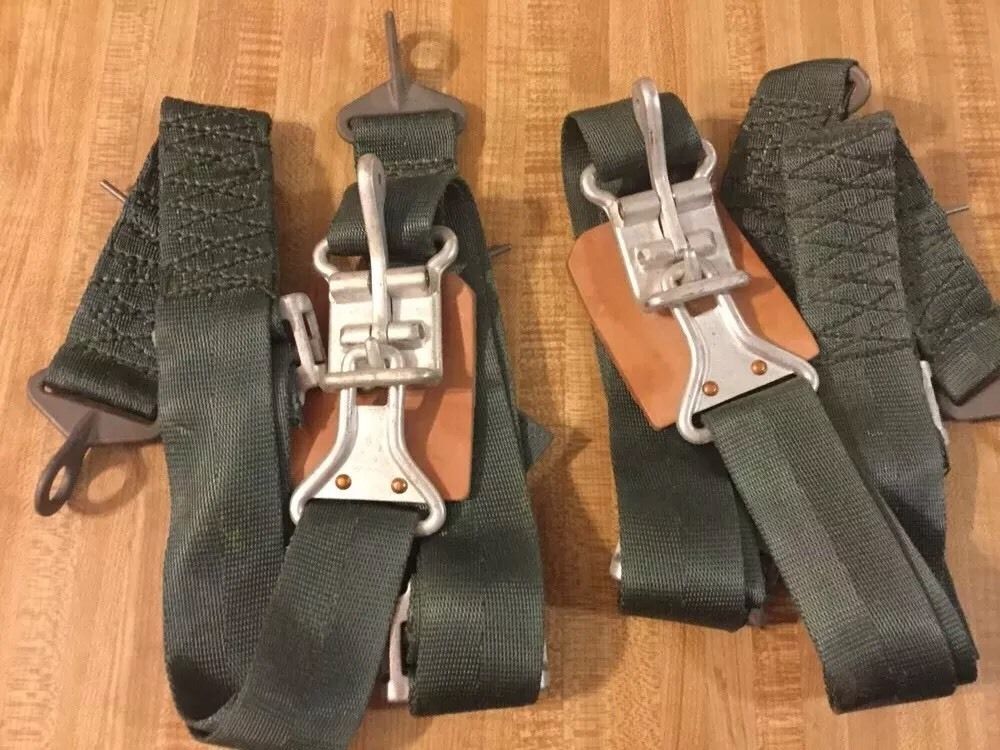
I spend a lot of time and money planning this pickup project. Ralph spends a lot more time building it. So, in addition to choosing mechanical components, dress up items, paint colors, seats and so on, a good set of seatbelts shouldn’t end up being an afterthought.
Along with good looks and wow-factor, safety should be up there near the top of the list since this pickup is destined to carry friends, spouse, and our children and grandchildren. These aircraft quality seat belts should do the job. They look good too and will match the theme of the seats.
Update as of September 15, 2017. Despite my best intentions, I have had to accept the fact that these seats will not work. There just wasn’t room inside the tiny cab of the pickup for both me and this seat. Or, me on this seat when the seat was provisionally installed in the cab. What a colossal bummer! And this despite my newly acquired svelte profile. Let’s don’t dwell on this topic. Okay, into each hot rod project a little rain must fall. That’s just how it is. But the tears have been wiped away and I’ve moved on. I’ll be posting a blog called “reseating” or similar very soon.
I sold the airplane seats and canvas on eBay. What a bummer. But if you are easily discouraged by setbacks then hot rod building isn’t for you. This is a custom one-off machine. There is no guidance and despite the substantial experience shared between Ralph and me, mistakes are made. I take responsibility for this one.
So why this seat? There are a couple of reasons. The most important one is that it picks up about four inches of much-needed space between the back of the cab and the steering wheel. It does that by offering no back padding at all and by not reclining much.
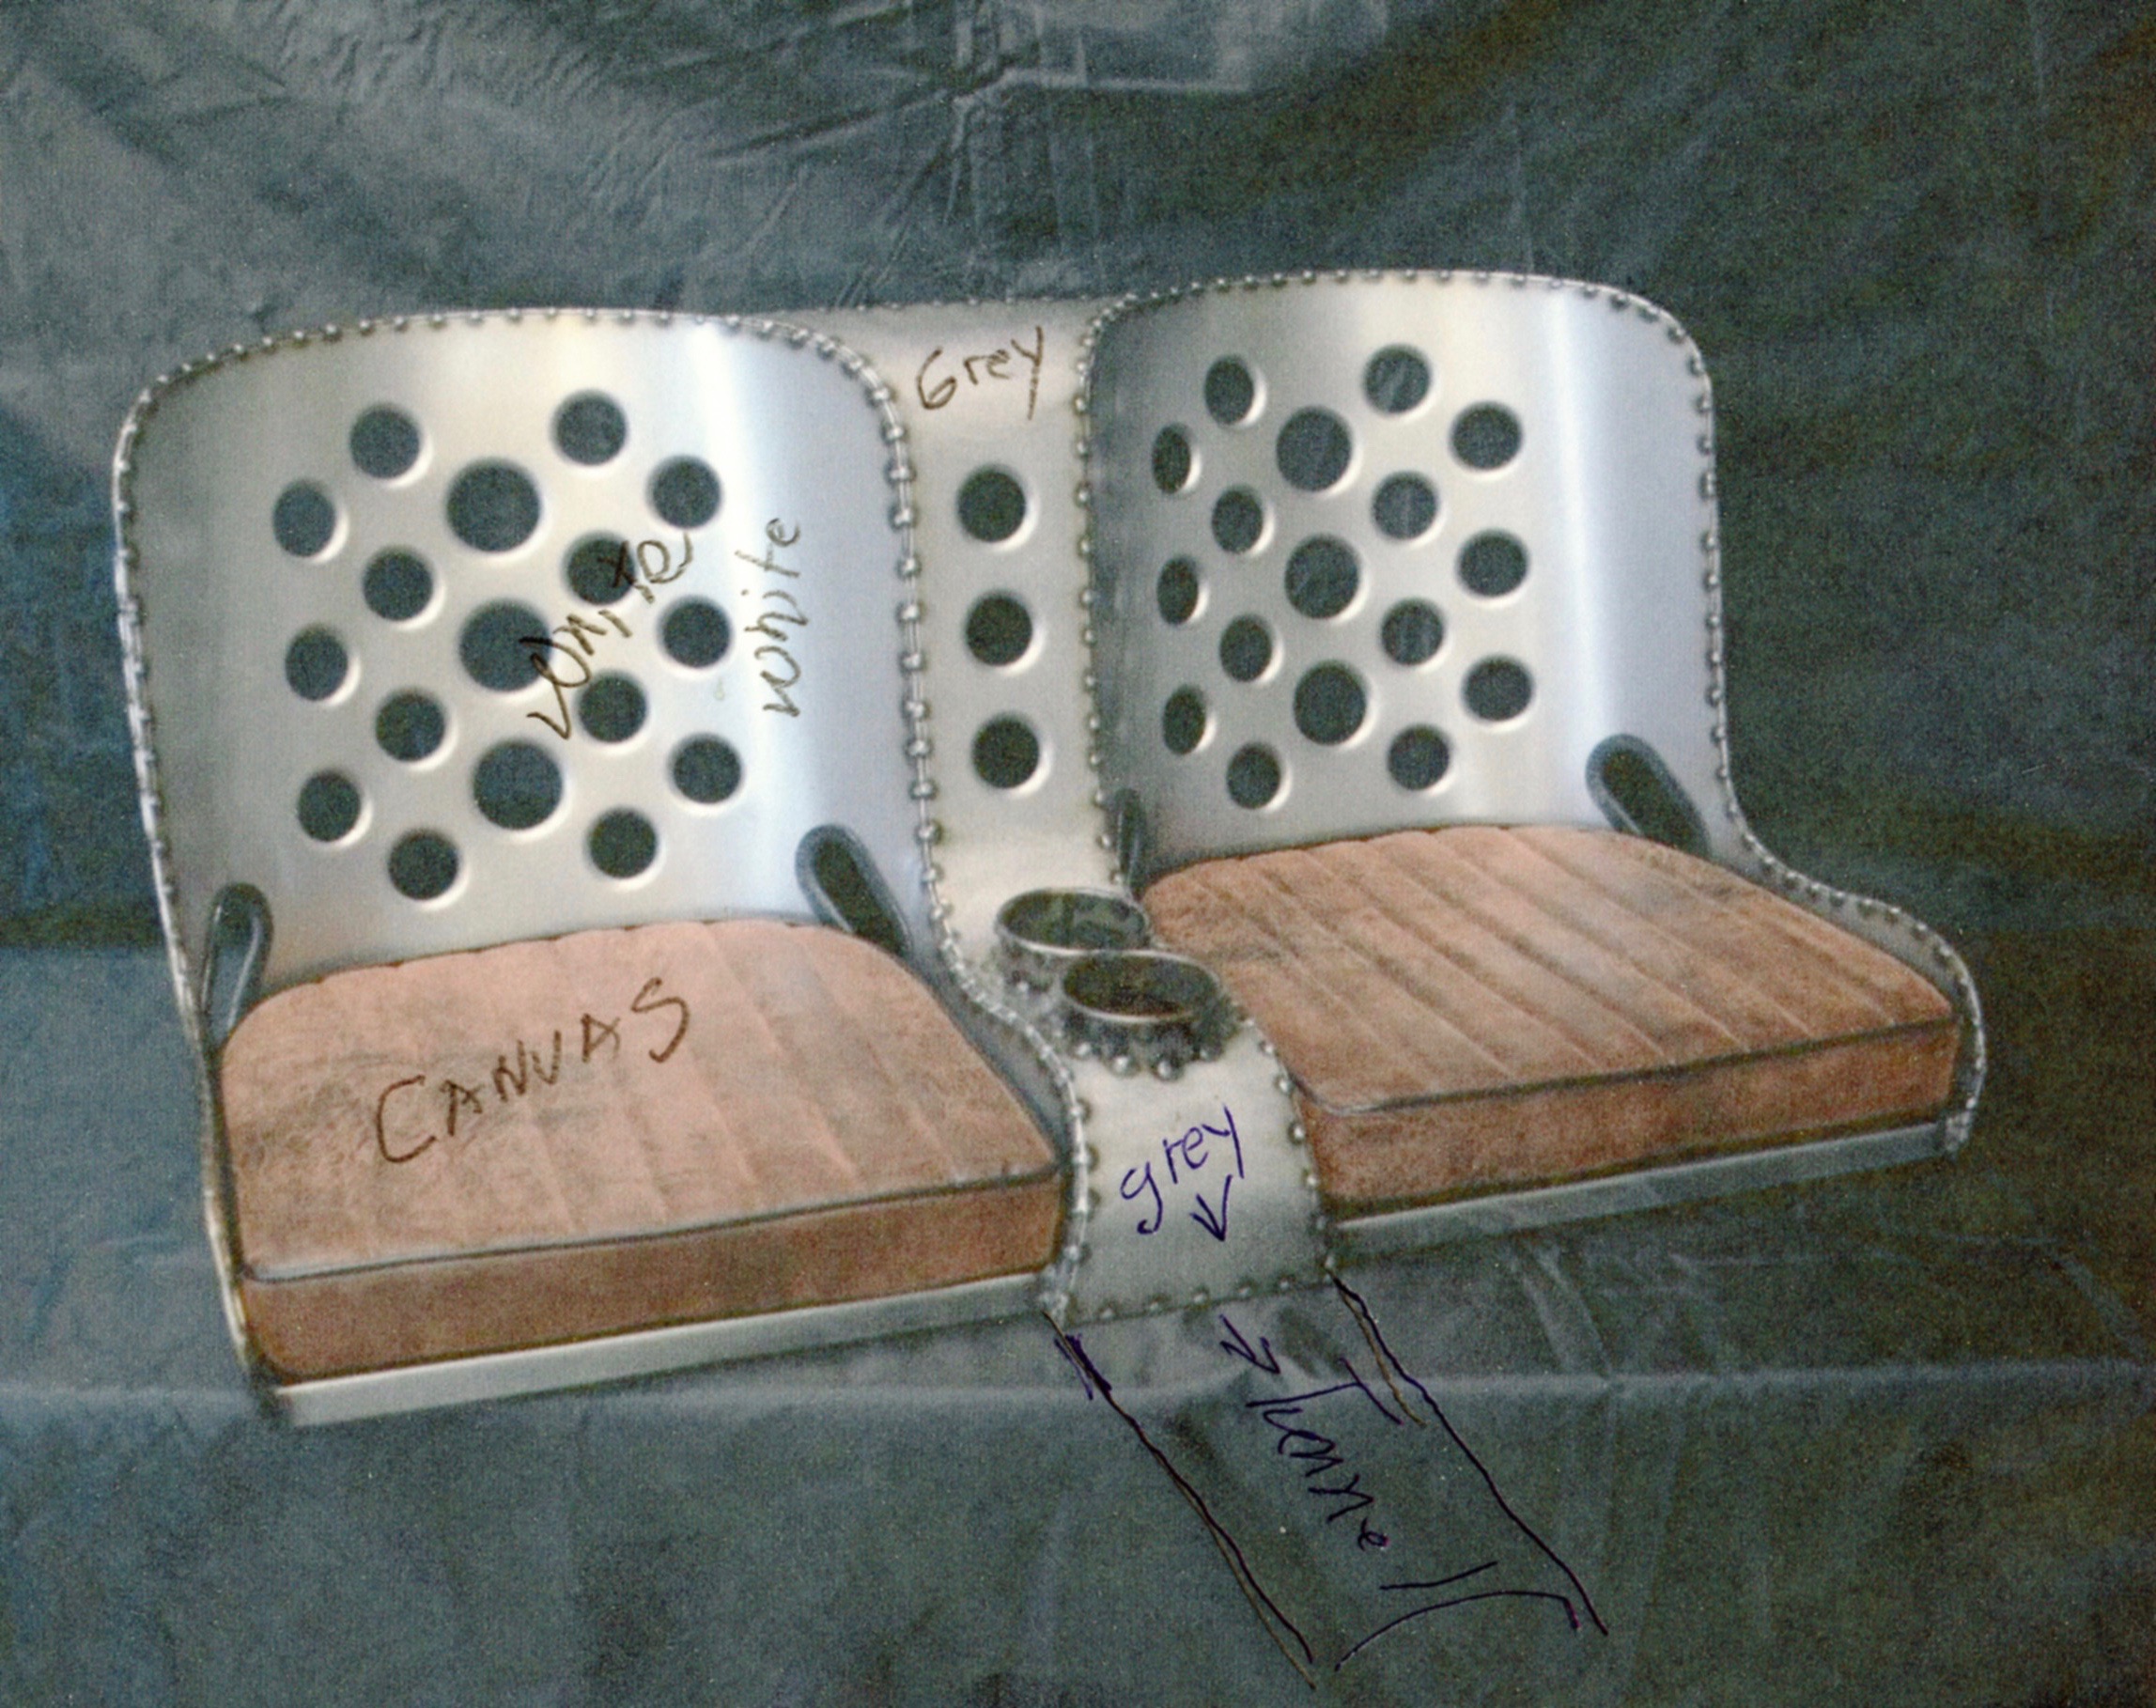
But I am not satisfied with the way it looks. I offended the fabricator (inadvertently, of course) by asking for a different kind of weld. “I like the stacked dime look of one continuous seam.” He said, “Well you know this spot weld with the little burn marks is sort of my trademark.” Hmmm…. So I am going to have the seats rewelded. It will give it a very different look. And the seat will be painted as shown in the diagram. Not sure what to do with the canvas “airplane” theme. I need to take this one step at a time.
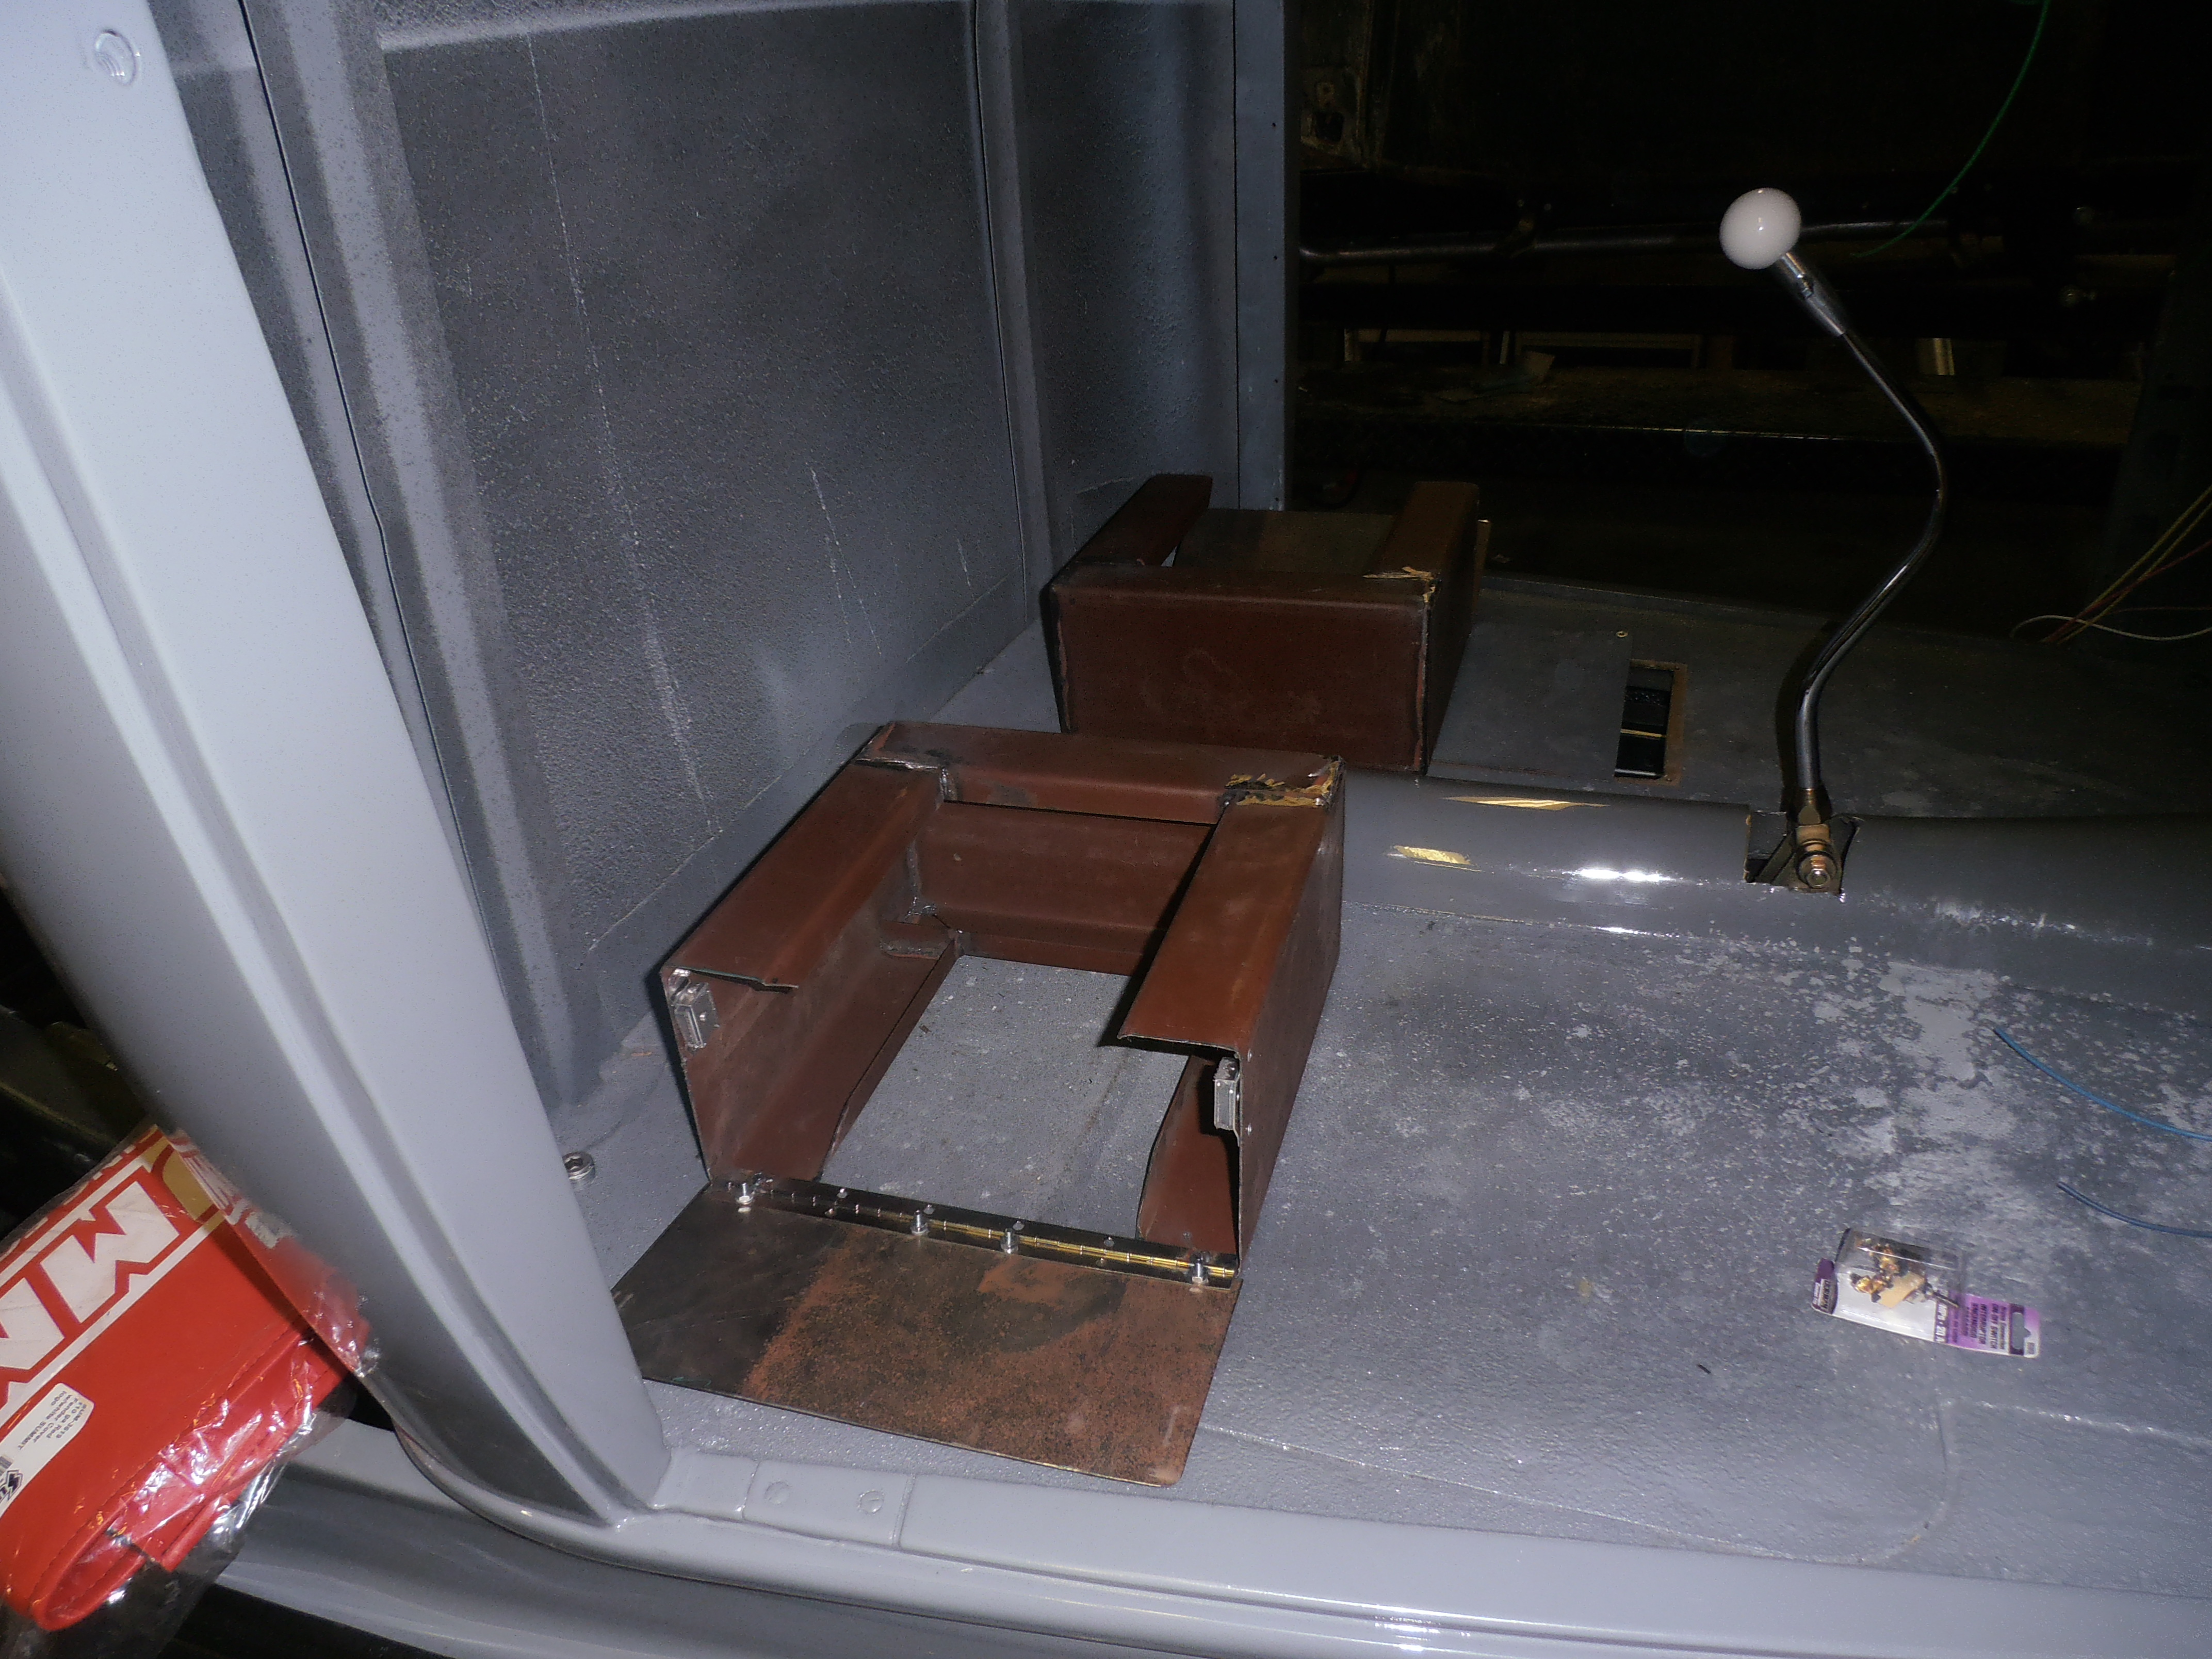
Meantime, as work on the cab progresses (February 2018), Ralph has fabricated 6″ seat risers. These will be either welded or bolted to the floor. If you look closely, there is a hinged door that can be accessed on the side making this under-seat space usable as a “glove box.” We lost the dash glovebox to the AC unit that needed that particular space.
Here is a view of the seat inside the cab and resting on the new risers. The seat at this point has neither been welded nor painted. But we are trying to do in our amateur fashion what real ergonomic engineers do in a serious way. Will everything be reachable, operable, comfortable?
We are a wee bit better than merely hoping it will all fit together and look good. But there will be a lot more fine-tuning required in the near future.
May 25, 2018. This build is taking a very long time. But that is the usual way of these matters. The “one week builds” you see on TV are fictions that cannot be repeated by ordinary people. They are done by behind-the-scenes crews with enormous budgets. So none of that applies here and there is no better example of how ordinary problems, like a seat, can consume large amounts of time and resources.
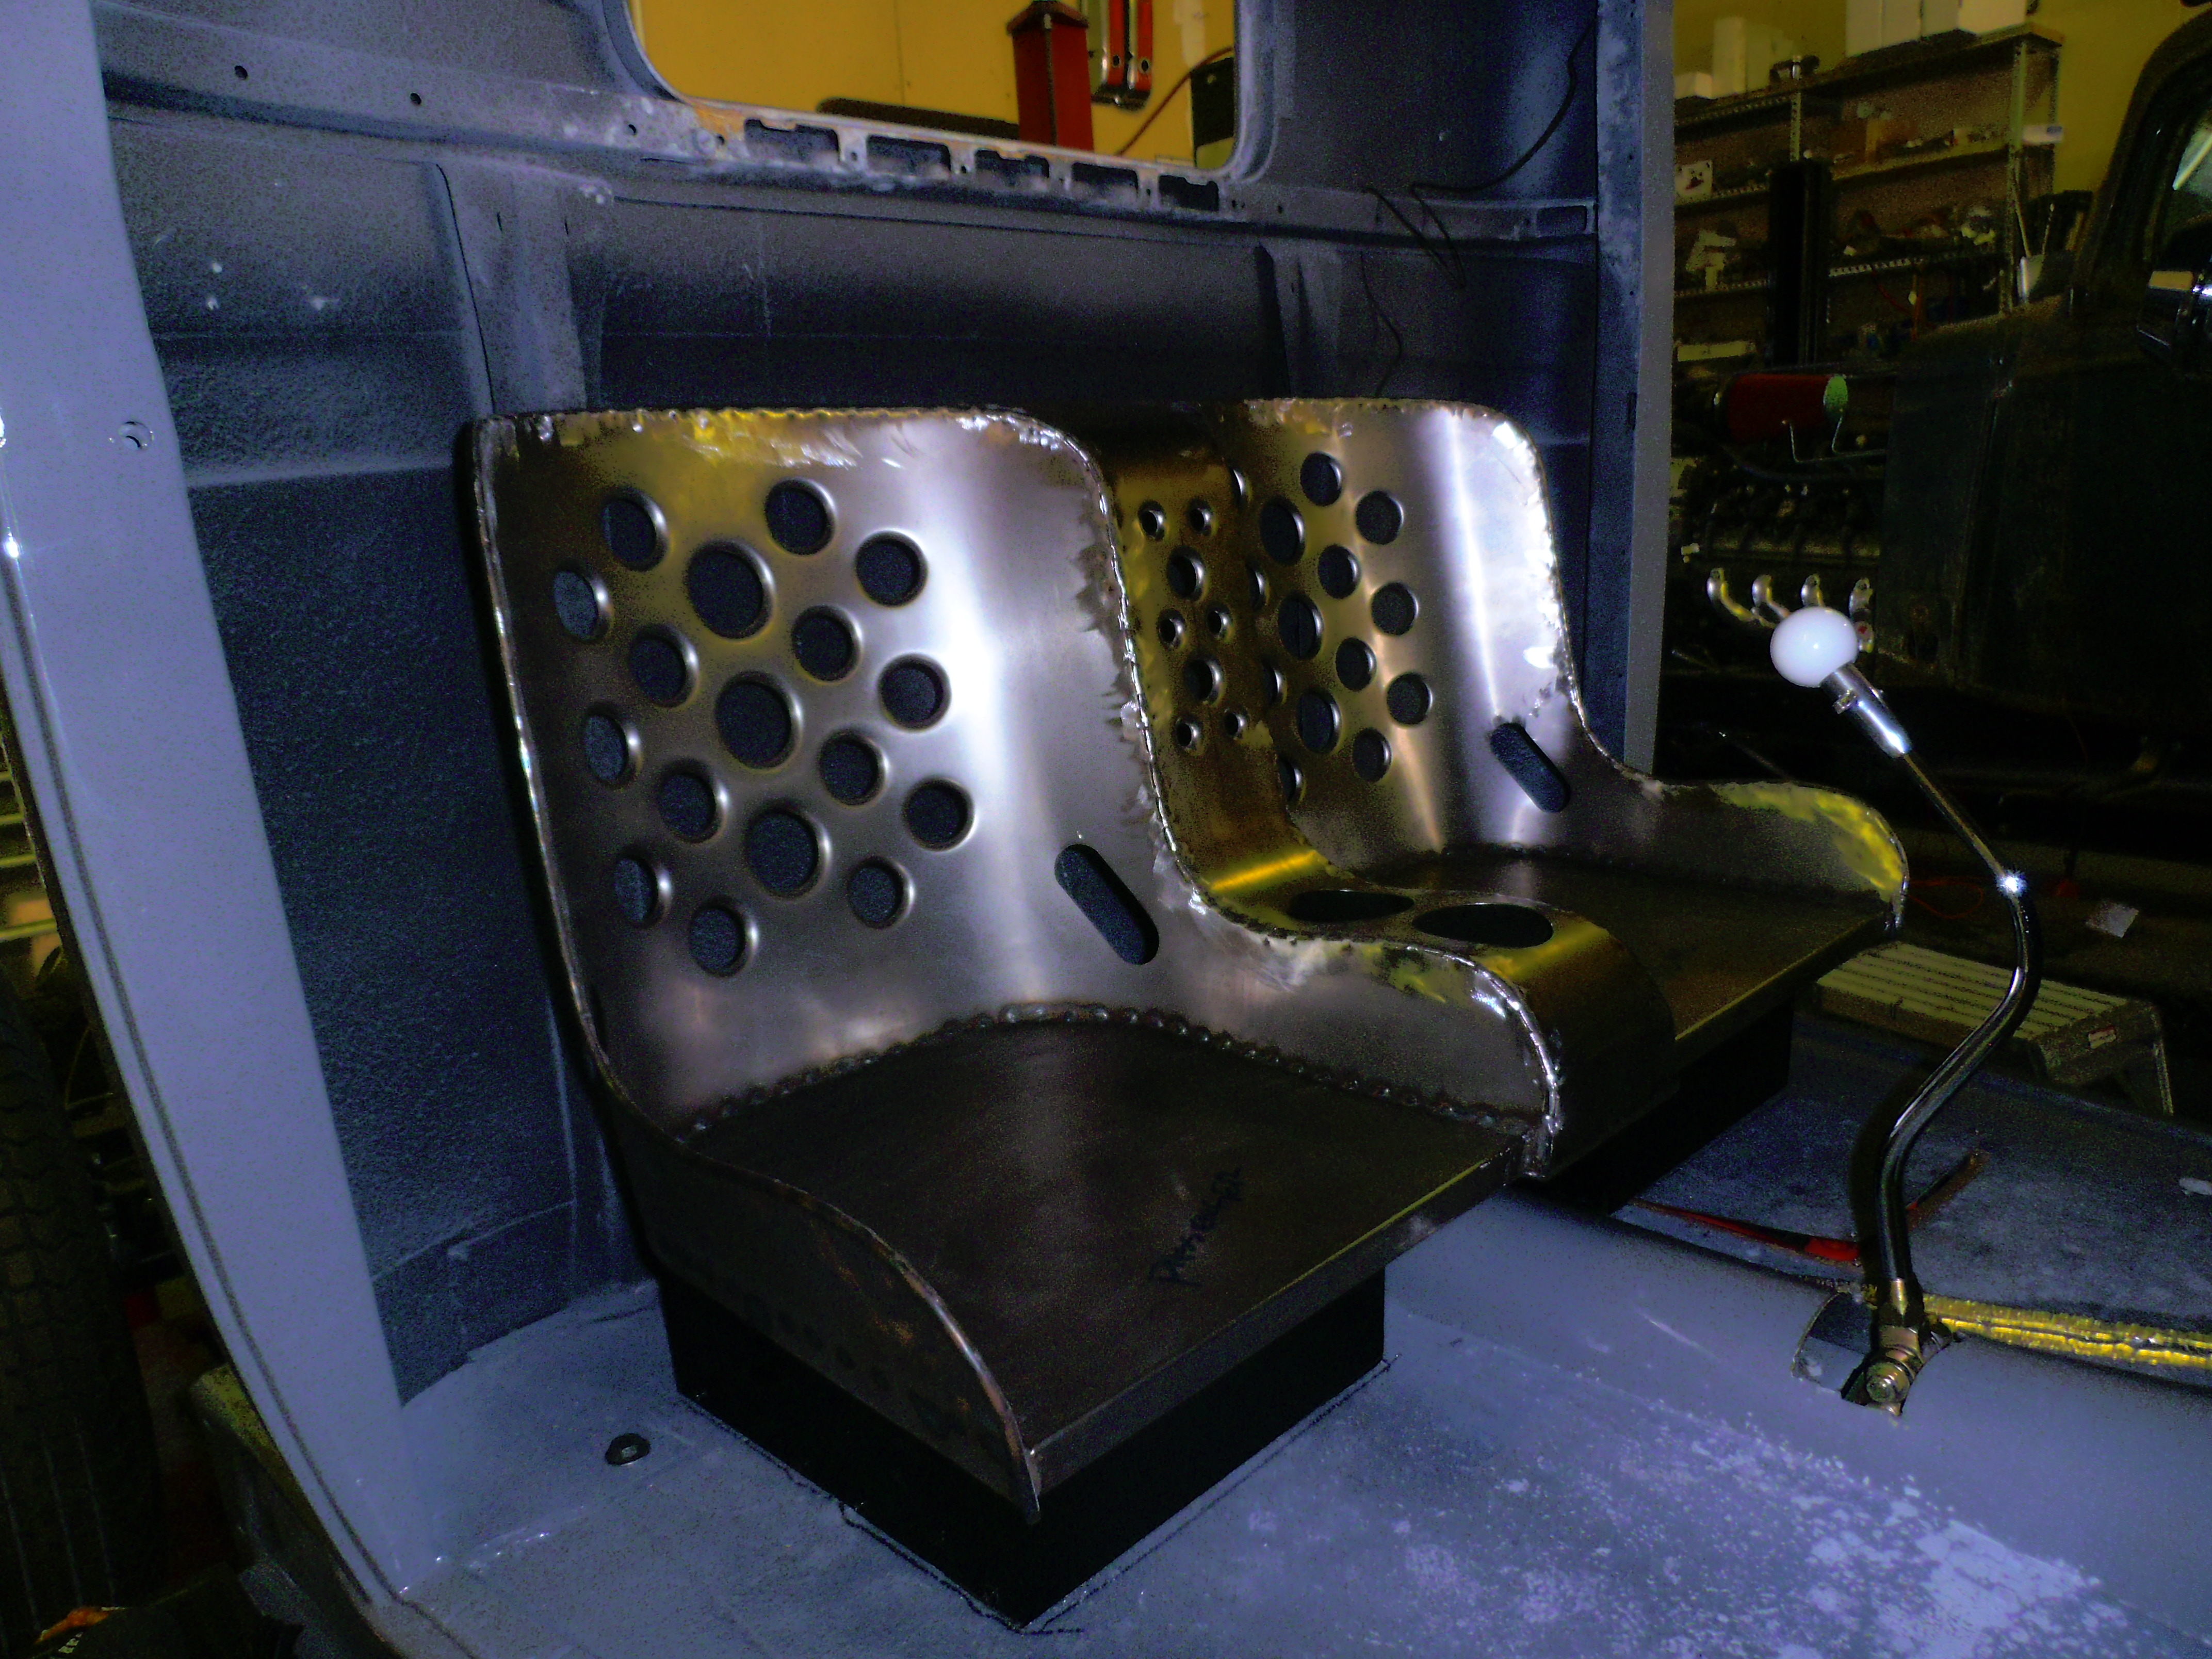
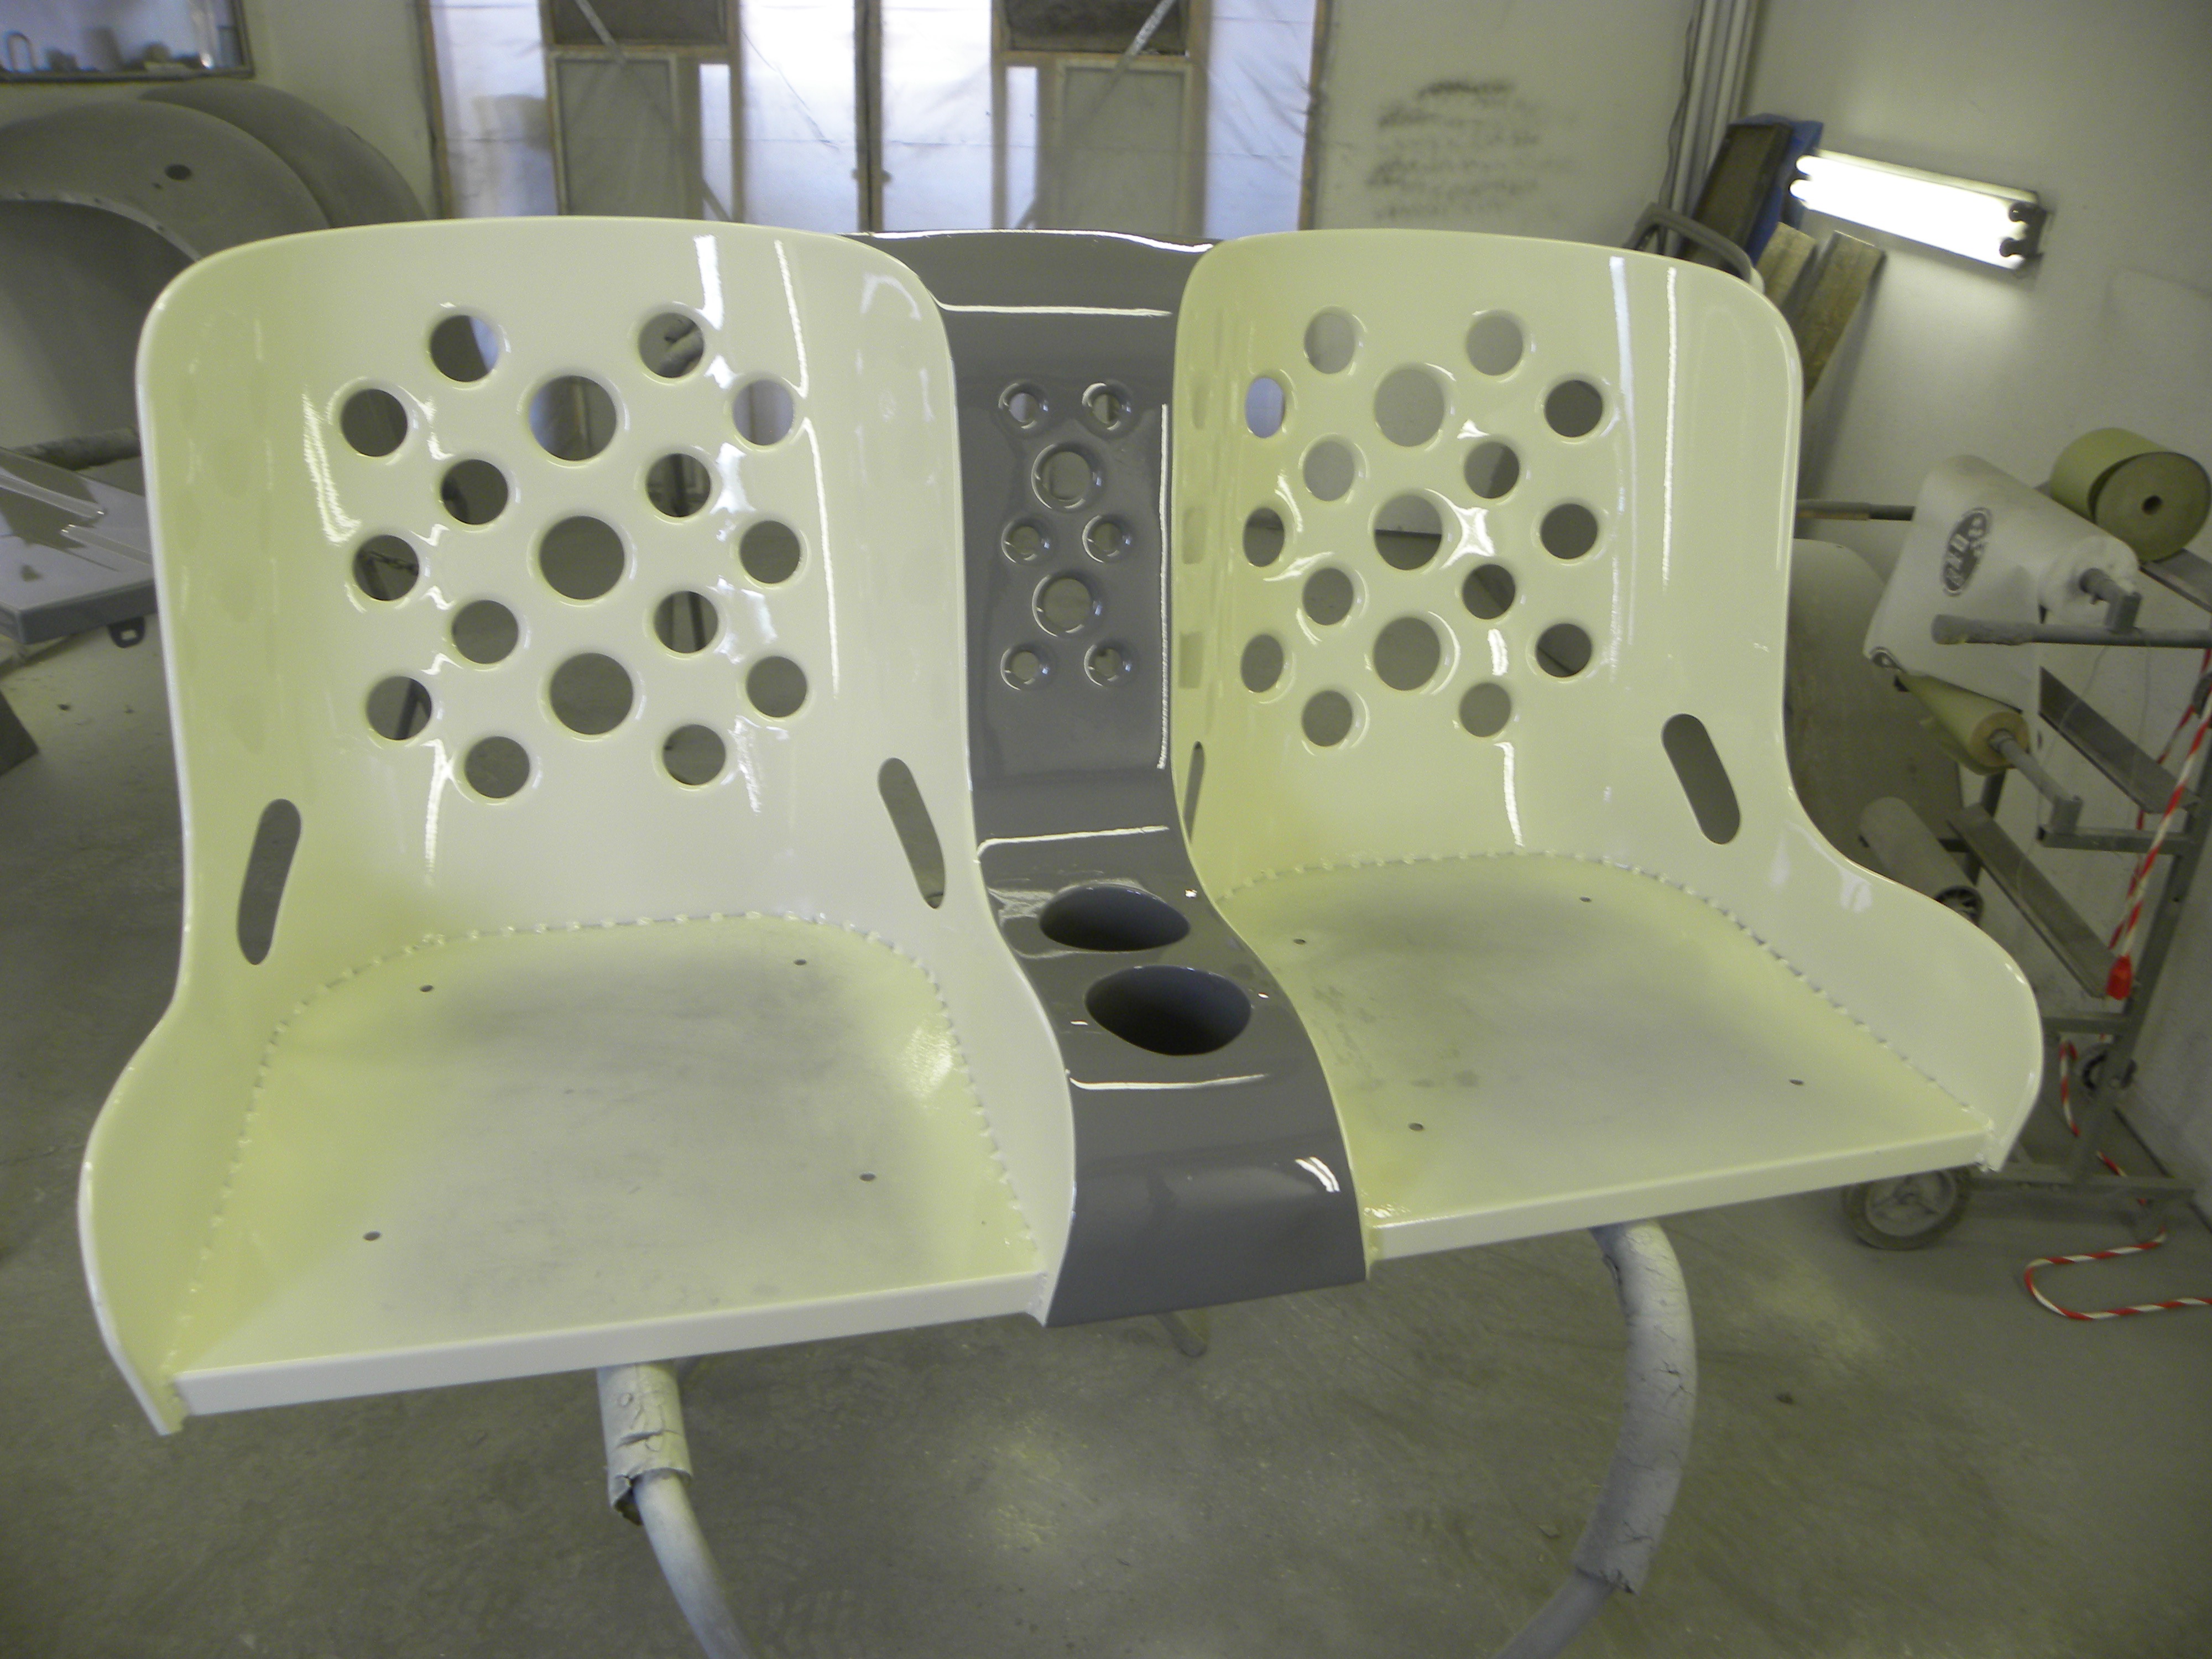
Here, at last, are the new seats. Clearly, they have been painted. But what goes unseen is the huge amount of welding, grinding, and smoothing that went into this before the painting was complete. The seats are steel not aluminum and that fact is both good and bad. They weigh a lot more and welding on steel is different in ways that complicated this particular design. But never mind. Notice that the center section, between the seats, is the same grey color as the transmission tunnel cover and it should flow almost seamlessly forward across the floor.
The image on the right shows off the sides and the back of the seat to a better advantage. There is still a lot that we haven’t planned concerning the interior. But a clear theme is now established. The lower seat cushions will be black distressed leather. The seatbelts are heavy aircraft-style (see photo above) and will be added soon. Finally, we have turned an important corner. I think it will be a stunningly beautiful interior for a different kind of hot rod than I have been involved with before.
New seats are in and on risers with seat belts attached. It all looks unfinished at this point and it is. But this represents a lot of progress. If you are still not convinced I only ask that you suspend judgment a little longer until the rest of the interior comes together but the seats are in and it is time to move on.
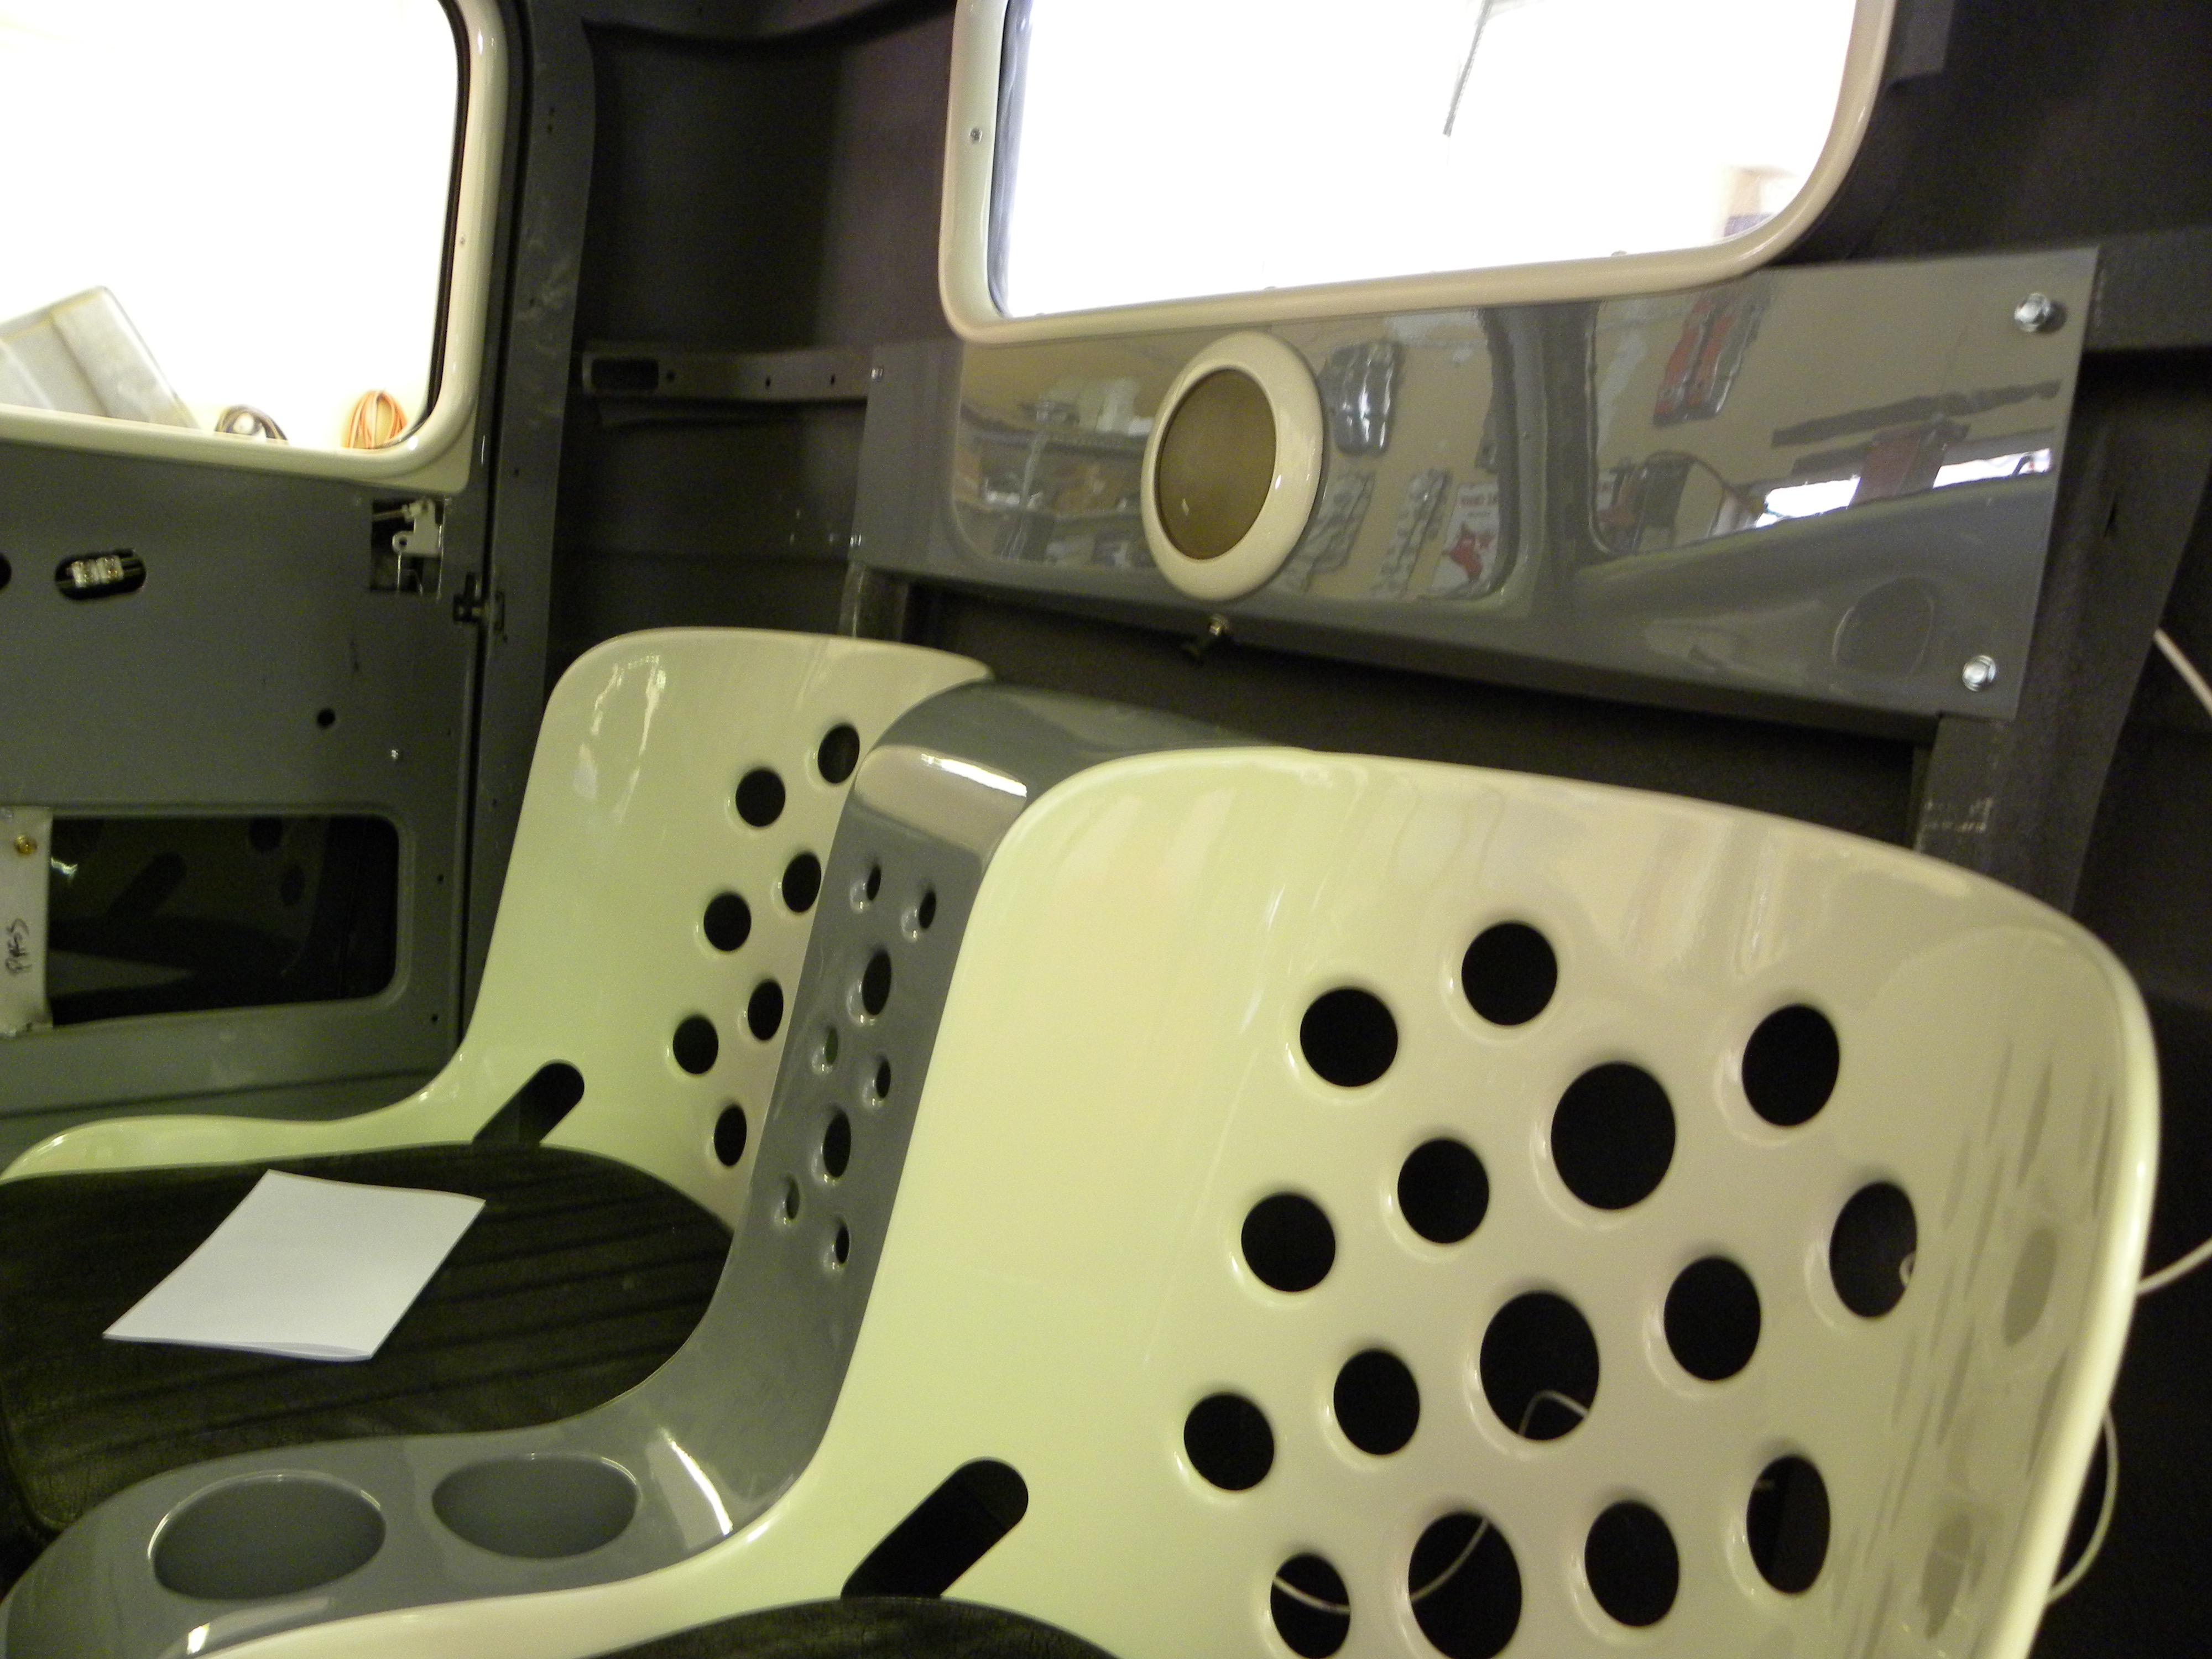
As the interior has slowly taken shape, small additions have been made that add to but don’t complete the final anticipated look. Below we see the insertion of a body-colored panel that provides support for the interior light.
December 9, 2019. Yes, it has been a long time. We are still on the topic of seating but under an enlarged sub-heading “upholstery.” The Dodge went into Justin Stephens Upholstery in Salt Lake City about ten months ago. This is not your average automotive interior shop. They fancy themselves as catering to an elite class of customers. I may not belong to that class but the truck is and there just weren’t many options open to me. I choose them because they were close by. Most customers choose Justin Stevens because he is famous, turns out great products that are associated with the Kindig Auto Shop which is part of the same industrial complex in Salt Lake.
But it was a mistake. The shop is first rate but they can’t deliver on schedule and don’t keep their promises. In early October of 2020 I discovered that the interior was just about at the halfway mark.
The little JS did was of top quality.
As luck would have it, I found a young man who has done high quality automotive interiors in California for most of his adult life. Candido is a pro and the Covid19 pandemic has brought him to Utah and I was fortunate to fine him.
Not sure what this material is called but it is a sort of underlayment
Ralph will deliver the Dodge to Candido on election day, November 3. We have decided to use off white ultra leather. Should be stunning.,
It doesn’t matter how beautiful your car is, how well it’s built, or how fast it goes. If there’s some tiny defect anywhere, that’s what everybody, including you, is going to look at. It’s not fair, but it’s reality. The doors are critical. They must look right and open and close correctly.
My all-steel, full-fendered, ’35 Dodge pickup is the kind of street rod that should draw all kinds of attention. Not that I am an attention seeker or anything remotely unsavory like that. But I am seeking attention-grabbing good looks from an old work truck. If you think gravity does a number on your body, imagine if it were a bit older and made of tired steel. A lot of sagging goes on. ‘Nuf said about that.
There are so many variables involved in hanging doors that it scares a lot of people away from the job. The trick is to isolate the problems before the final paint is on and when no one is afraid of scratching a mirror-like finish.
Then making small changes, one at a time, until each problem is identified and sorted, and the old doors are correctly re-hung.
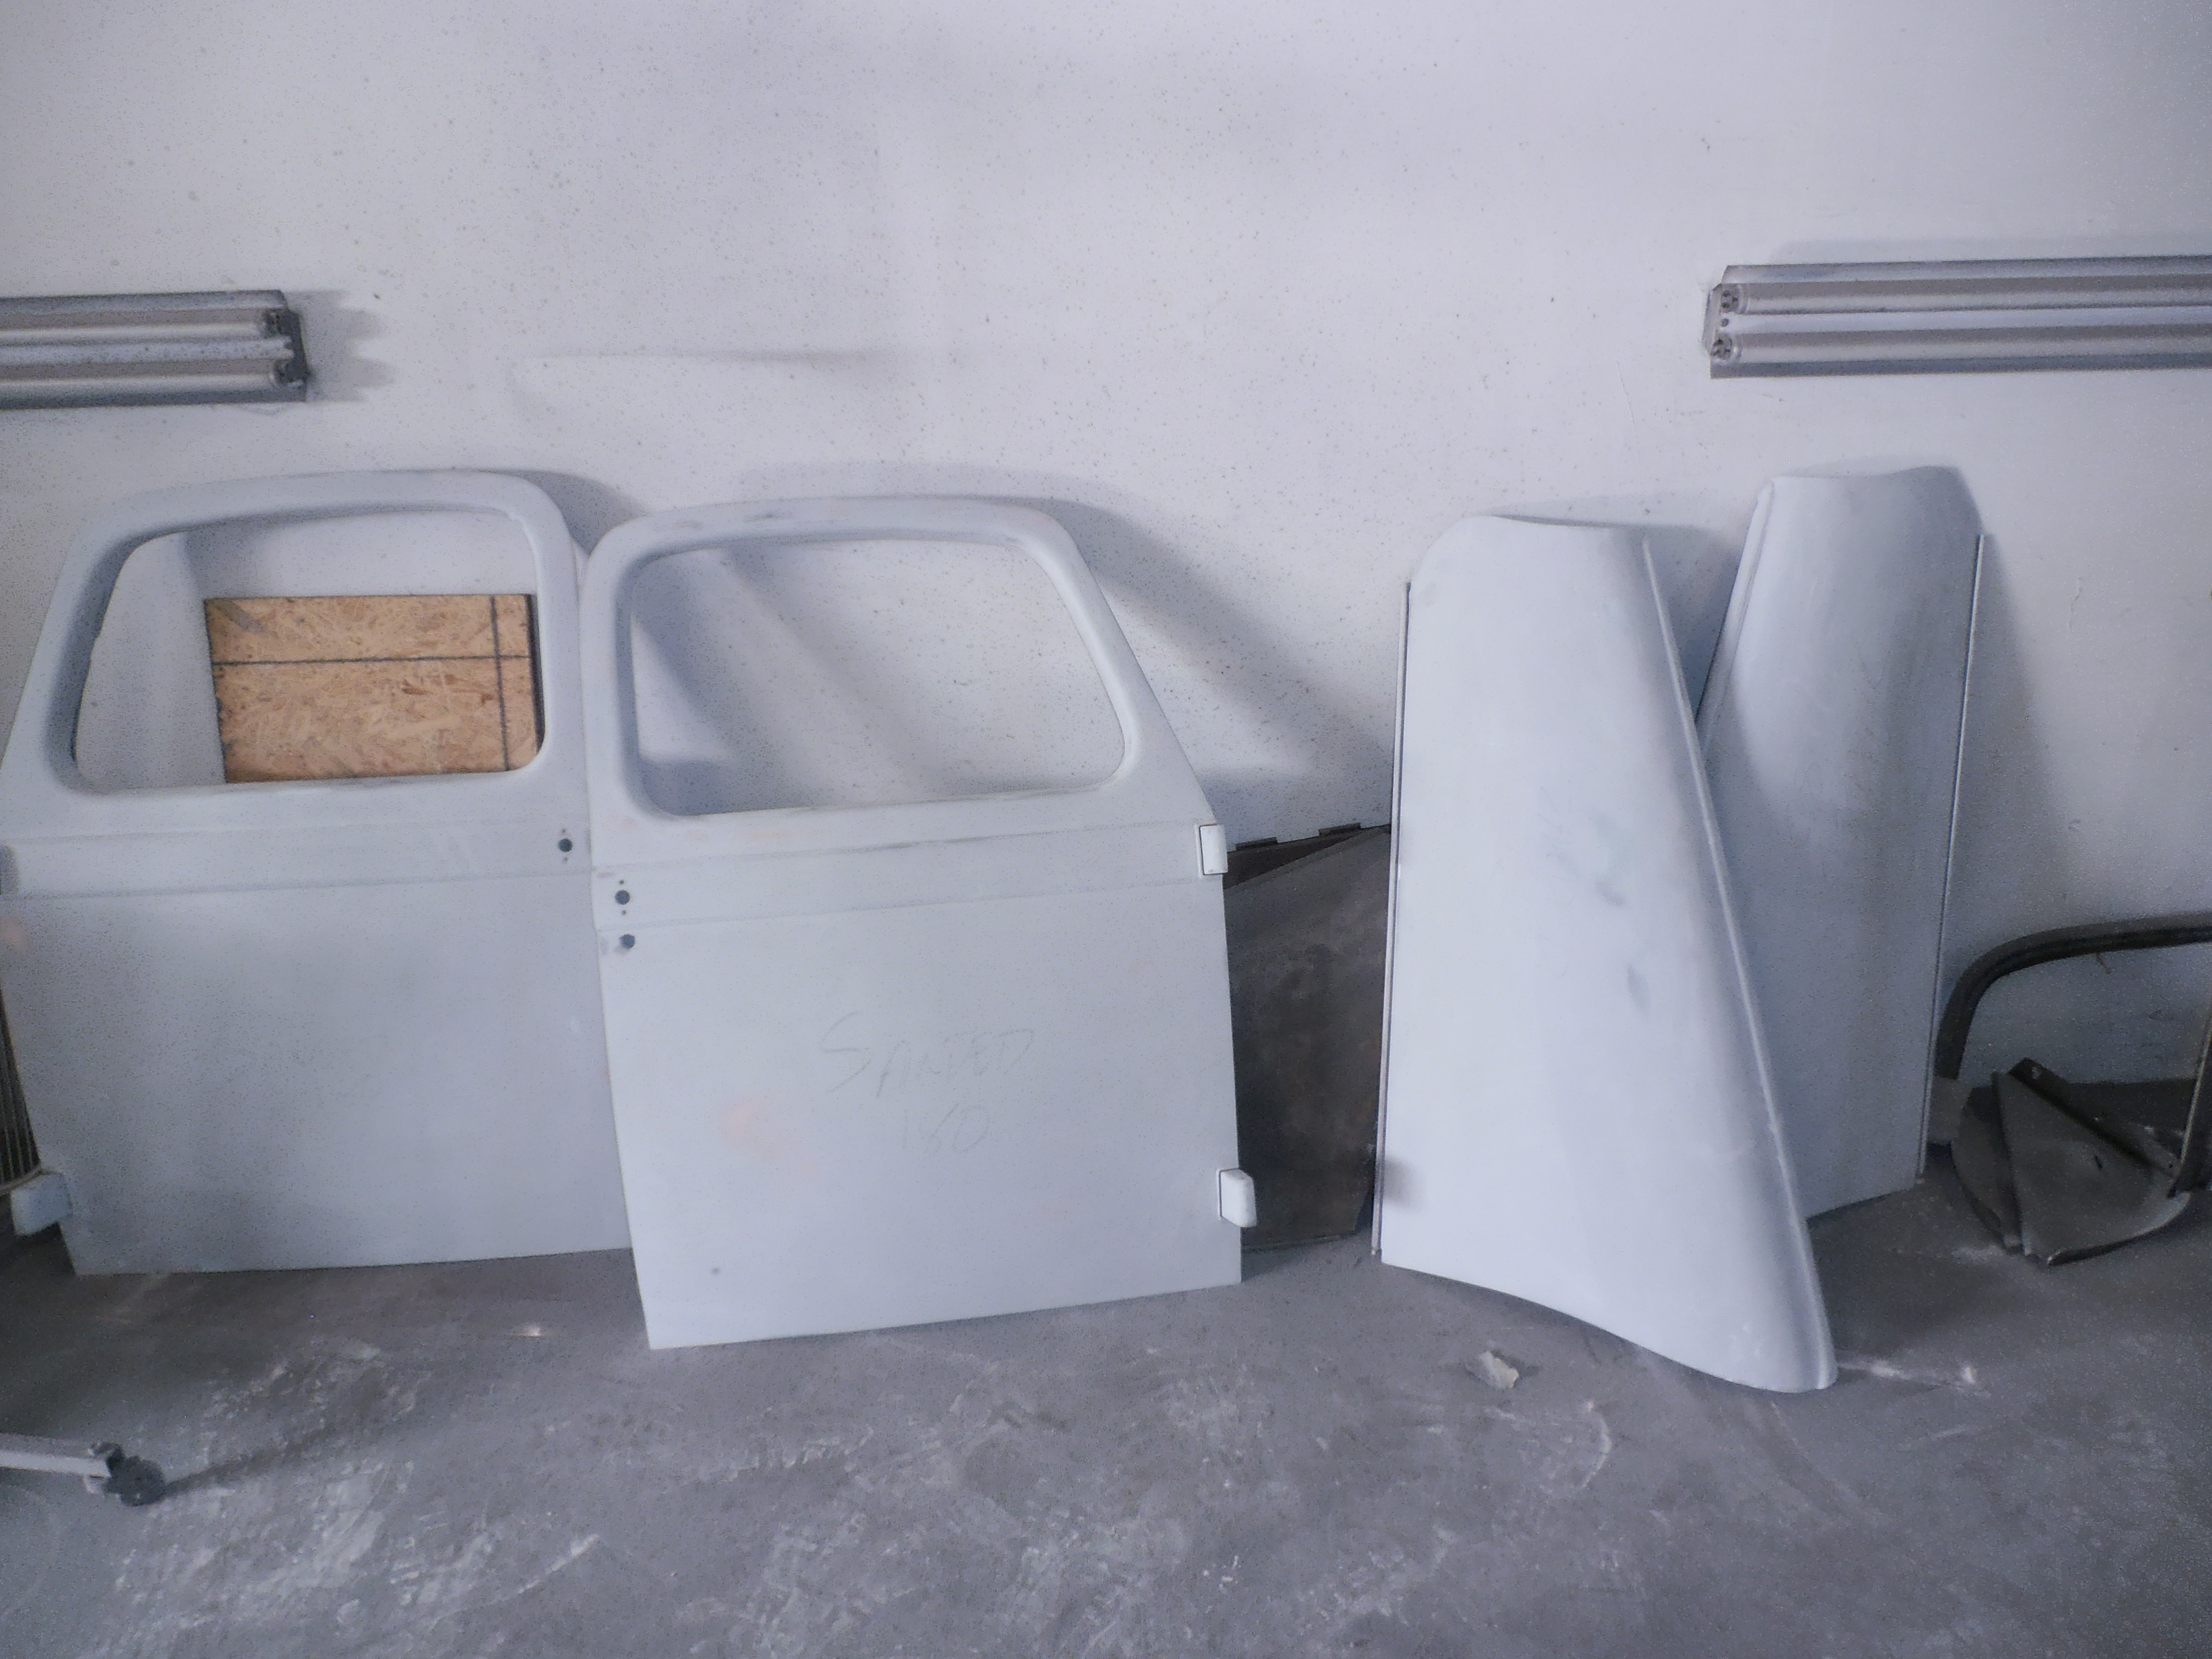
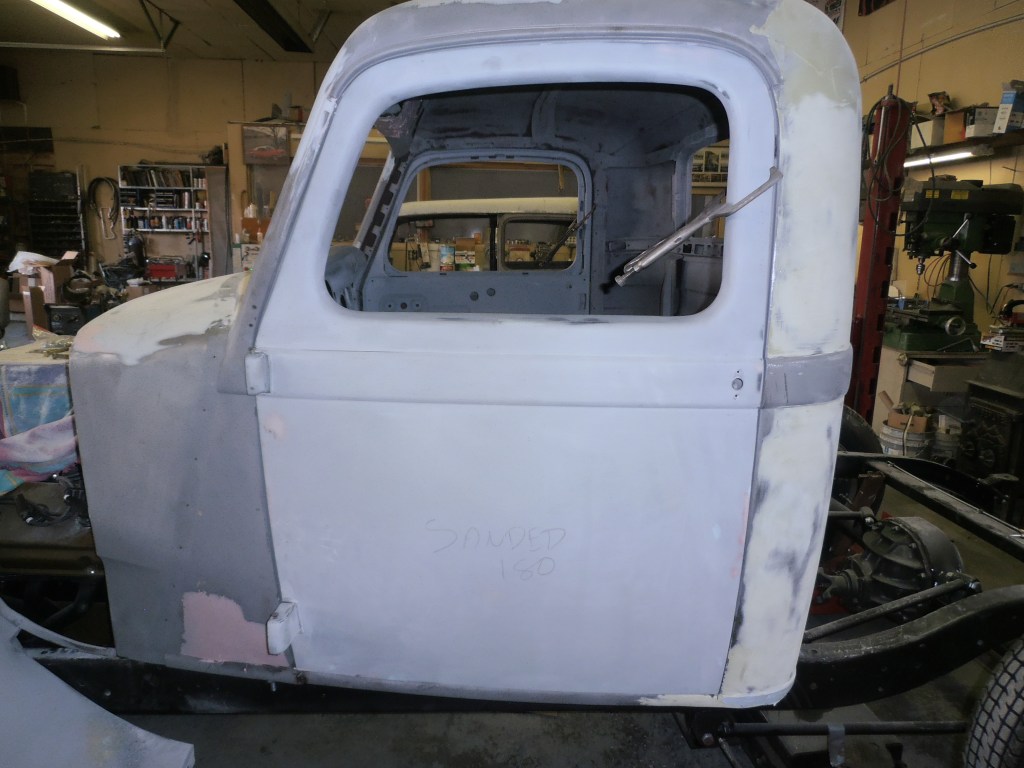
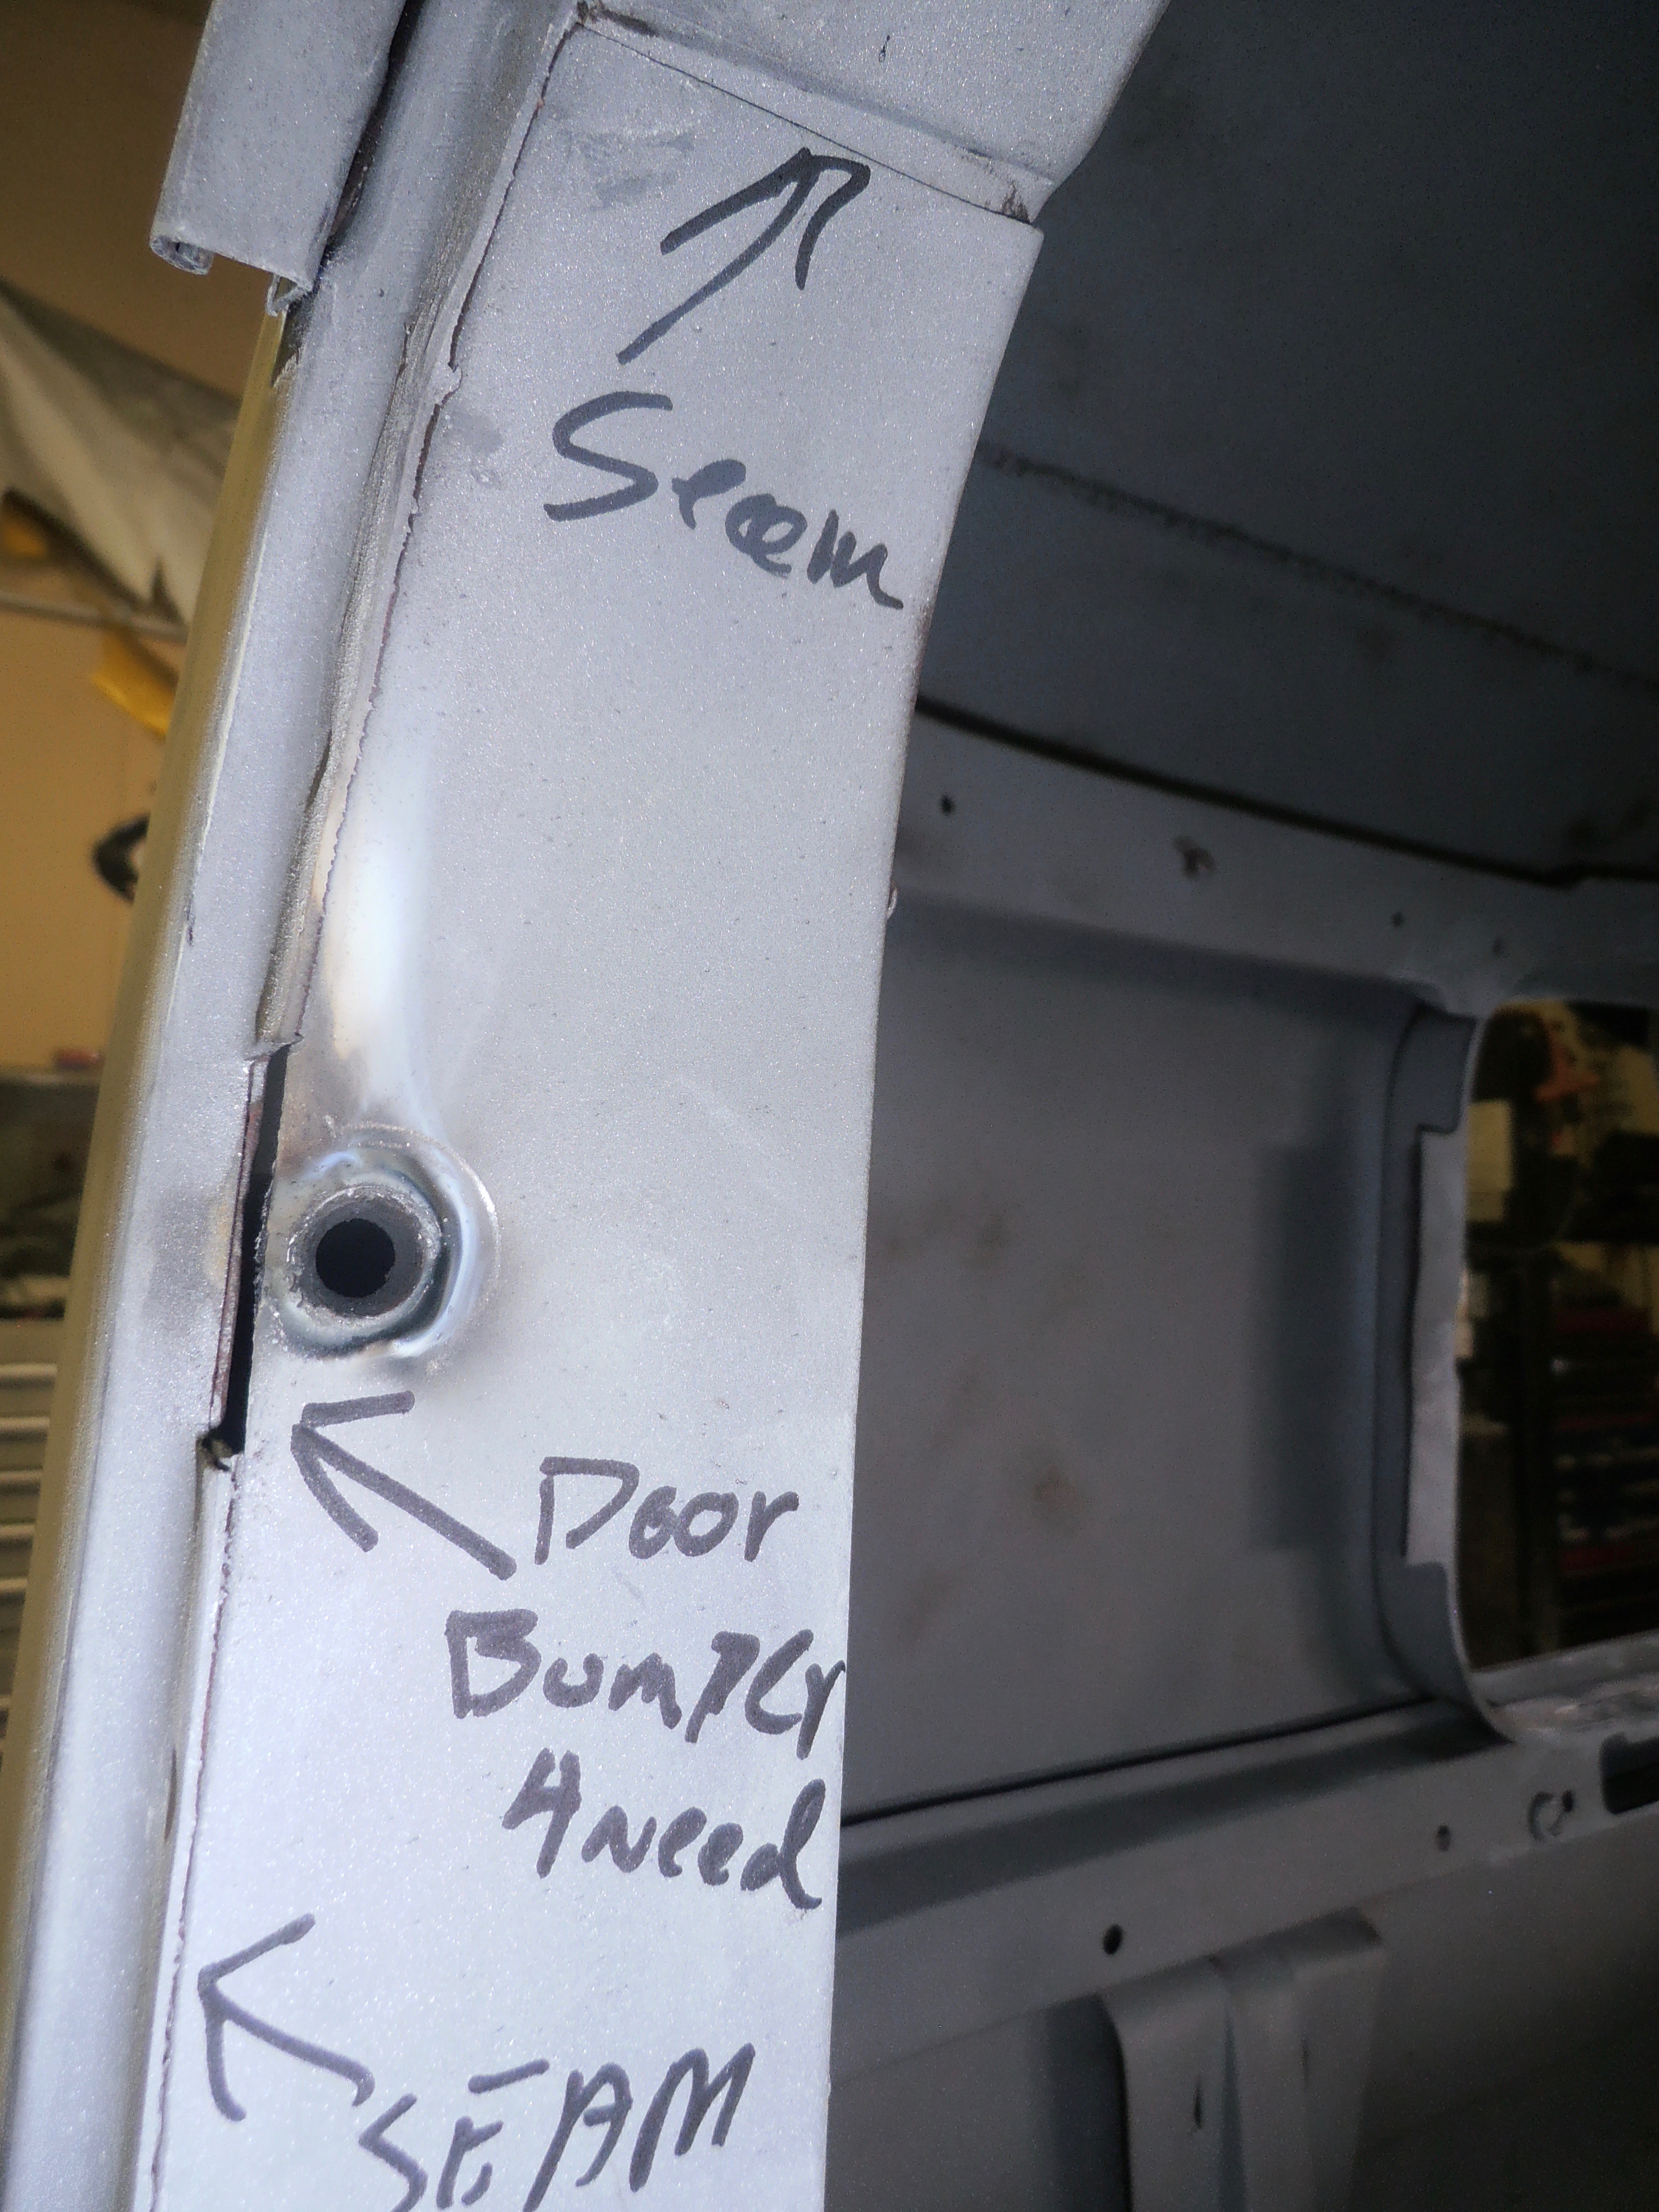
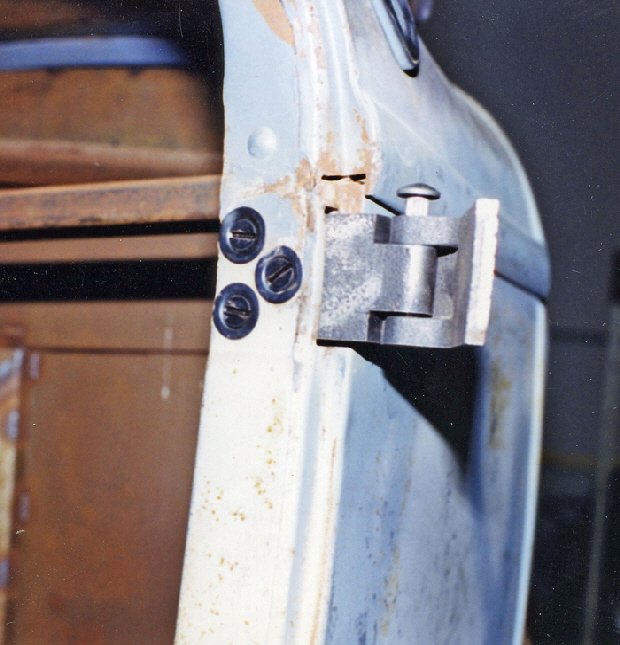
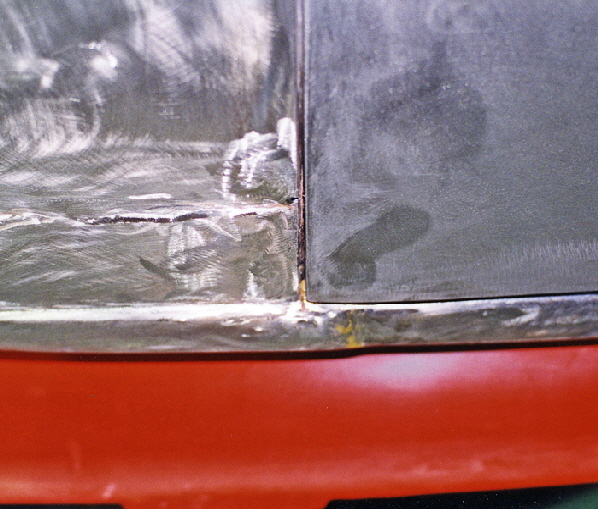
After solving the problems with the front fenders and cowl area, expert builder, Ralph Derico, fitted the doors on my pickup. Technically you “hang” a door. These are the original doors and so Ralph had to re-hang them. Plainly visible here are Ralph’s identification of areas needing attention.
These doors required careful adjustments to make them fit the newly cleaned up cab. Once body parts are separated, sandblasted, and moved around, a lot of shifting occurs. A little like pieces to an old puzzle that have been stored in humid climates. They should all fit but they don’t quite.
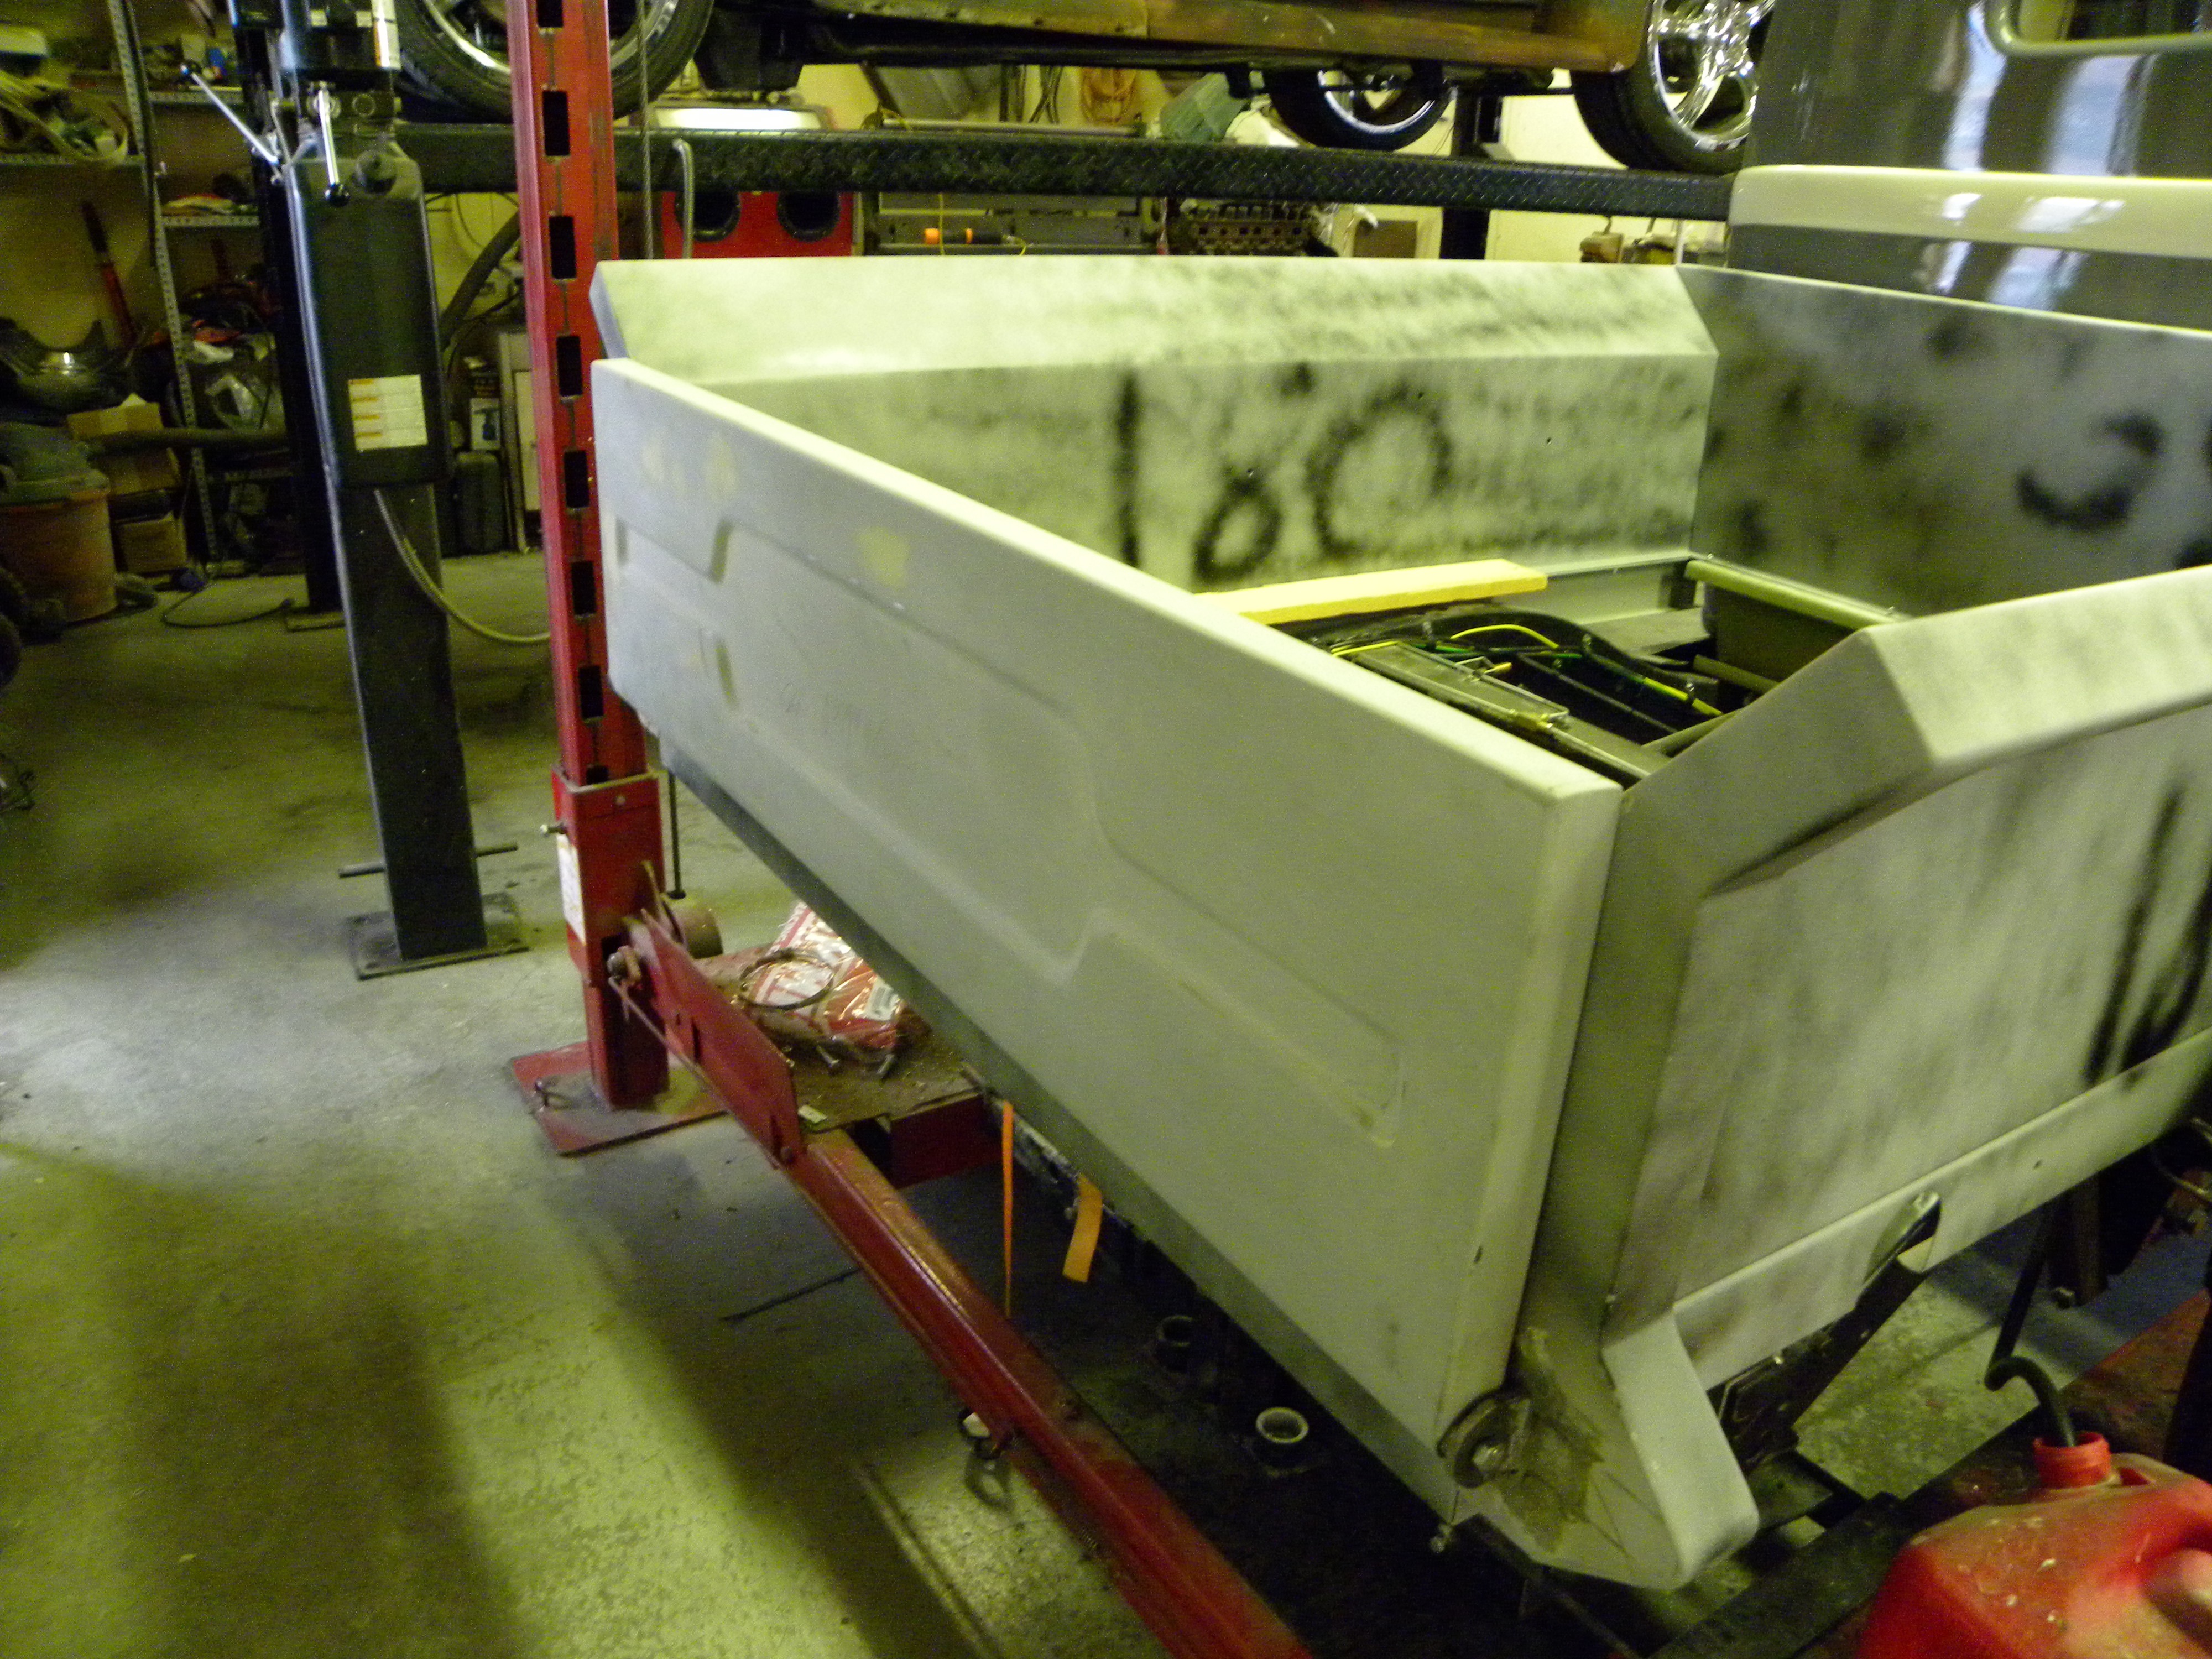
If you look carefully at this photo you can also see that Ralph has installed the steering column on the dash. If you look at the angle you can see that it is pointed almost horizontally straight ahead. You can also see that Ralph marks each piece of the body with the stage of sanding last completed. This door is marked “sanded 180” meaning that the last sandpaper used was 180 grit.
A big issue in the process of door hanging is door latches. Once you swallow the condition of the doors and what it’s gonna take to fix them, it’s time to realize that it’s not only the cosmetic portion of the assembly that has seen better days. Just like the rest of the mechanical pieces involved in the truck, the latches and striker plates are pretty much shot as well. After years of use, the latches have lots of slop in them.
When the old, original bear claw latches wear out several problems ensue. For one, when the door isn’t sucked up tight into the weatherstrip around the jamb it allows for all kinds of wind and road noise to seep through the gaps. Couple those noises with the clanking and banging of the door itself against the jamb and before you know it, you got a symphony of sounds pouring through the cab. Another area that is affected is door alignment. A key point in aligning the door is utilizing the latch. When the latch isn’t securing a strong bond it can cause misalignment of highly visible body parts. l
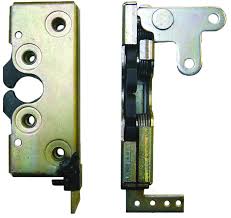
The miracle elixir is to install late-model-styled bear claw latches and new hinges. Fortunately for the modern street rodder, the aftermarket has made available replicas of these old pieces, usually with improved mechanical bits.
New hinges have no mounting holes in them. Once the hinge is positioned properly they can be drilled, tapped and mounted. Note the small raised reveal around the hinge opening.
When we say that a lot hinges on this thing or action, we begin to feel the cultural connection we have to hinges. Hinges hold a lot weight. Much about a car’s functionality is related to its hinges. Lessons for life in having strong, smooth hinges.
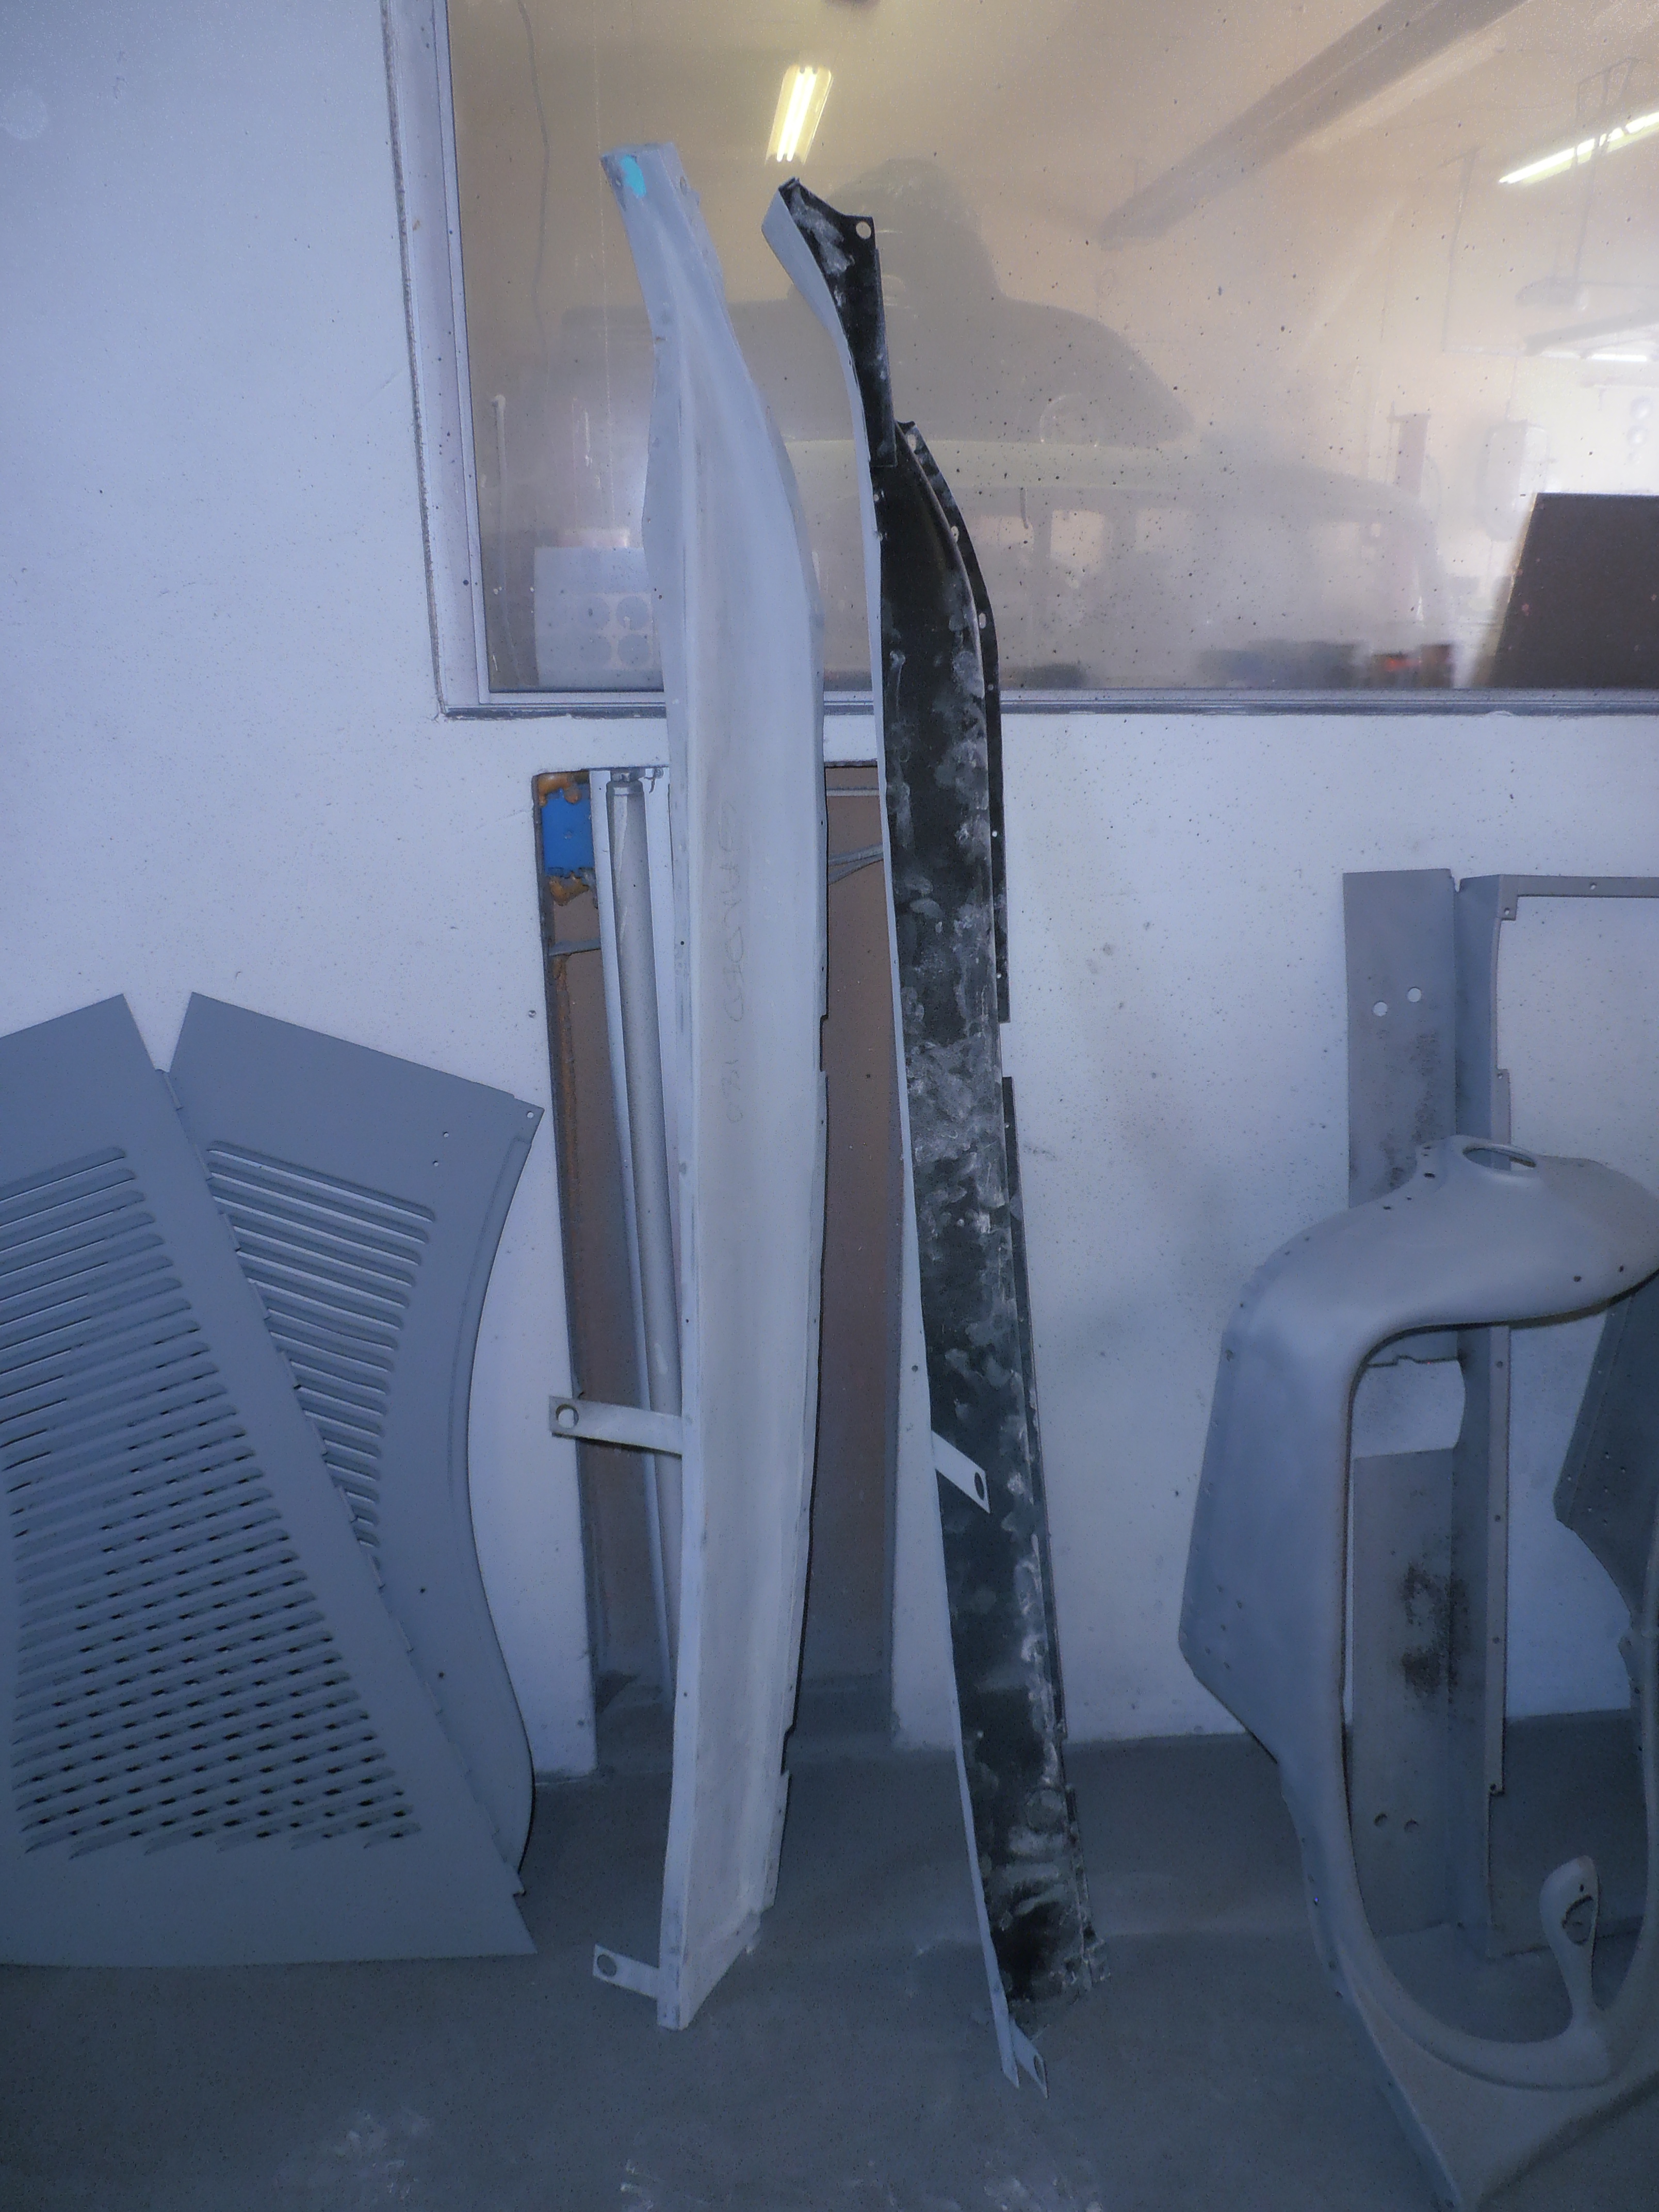
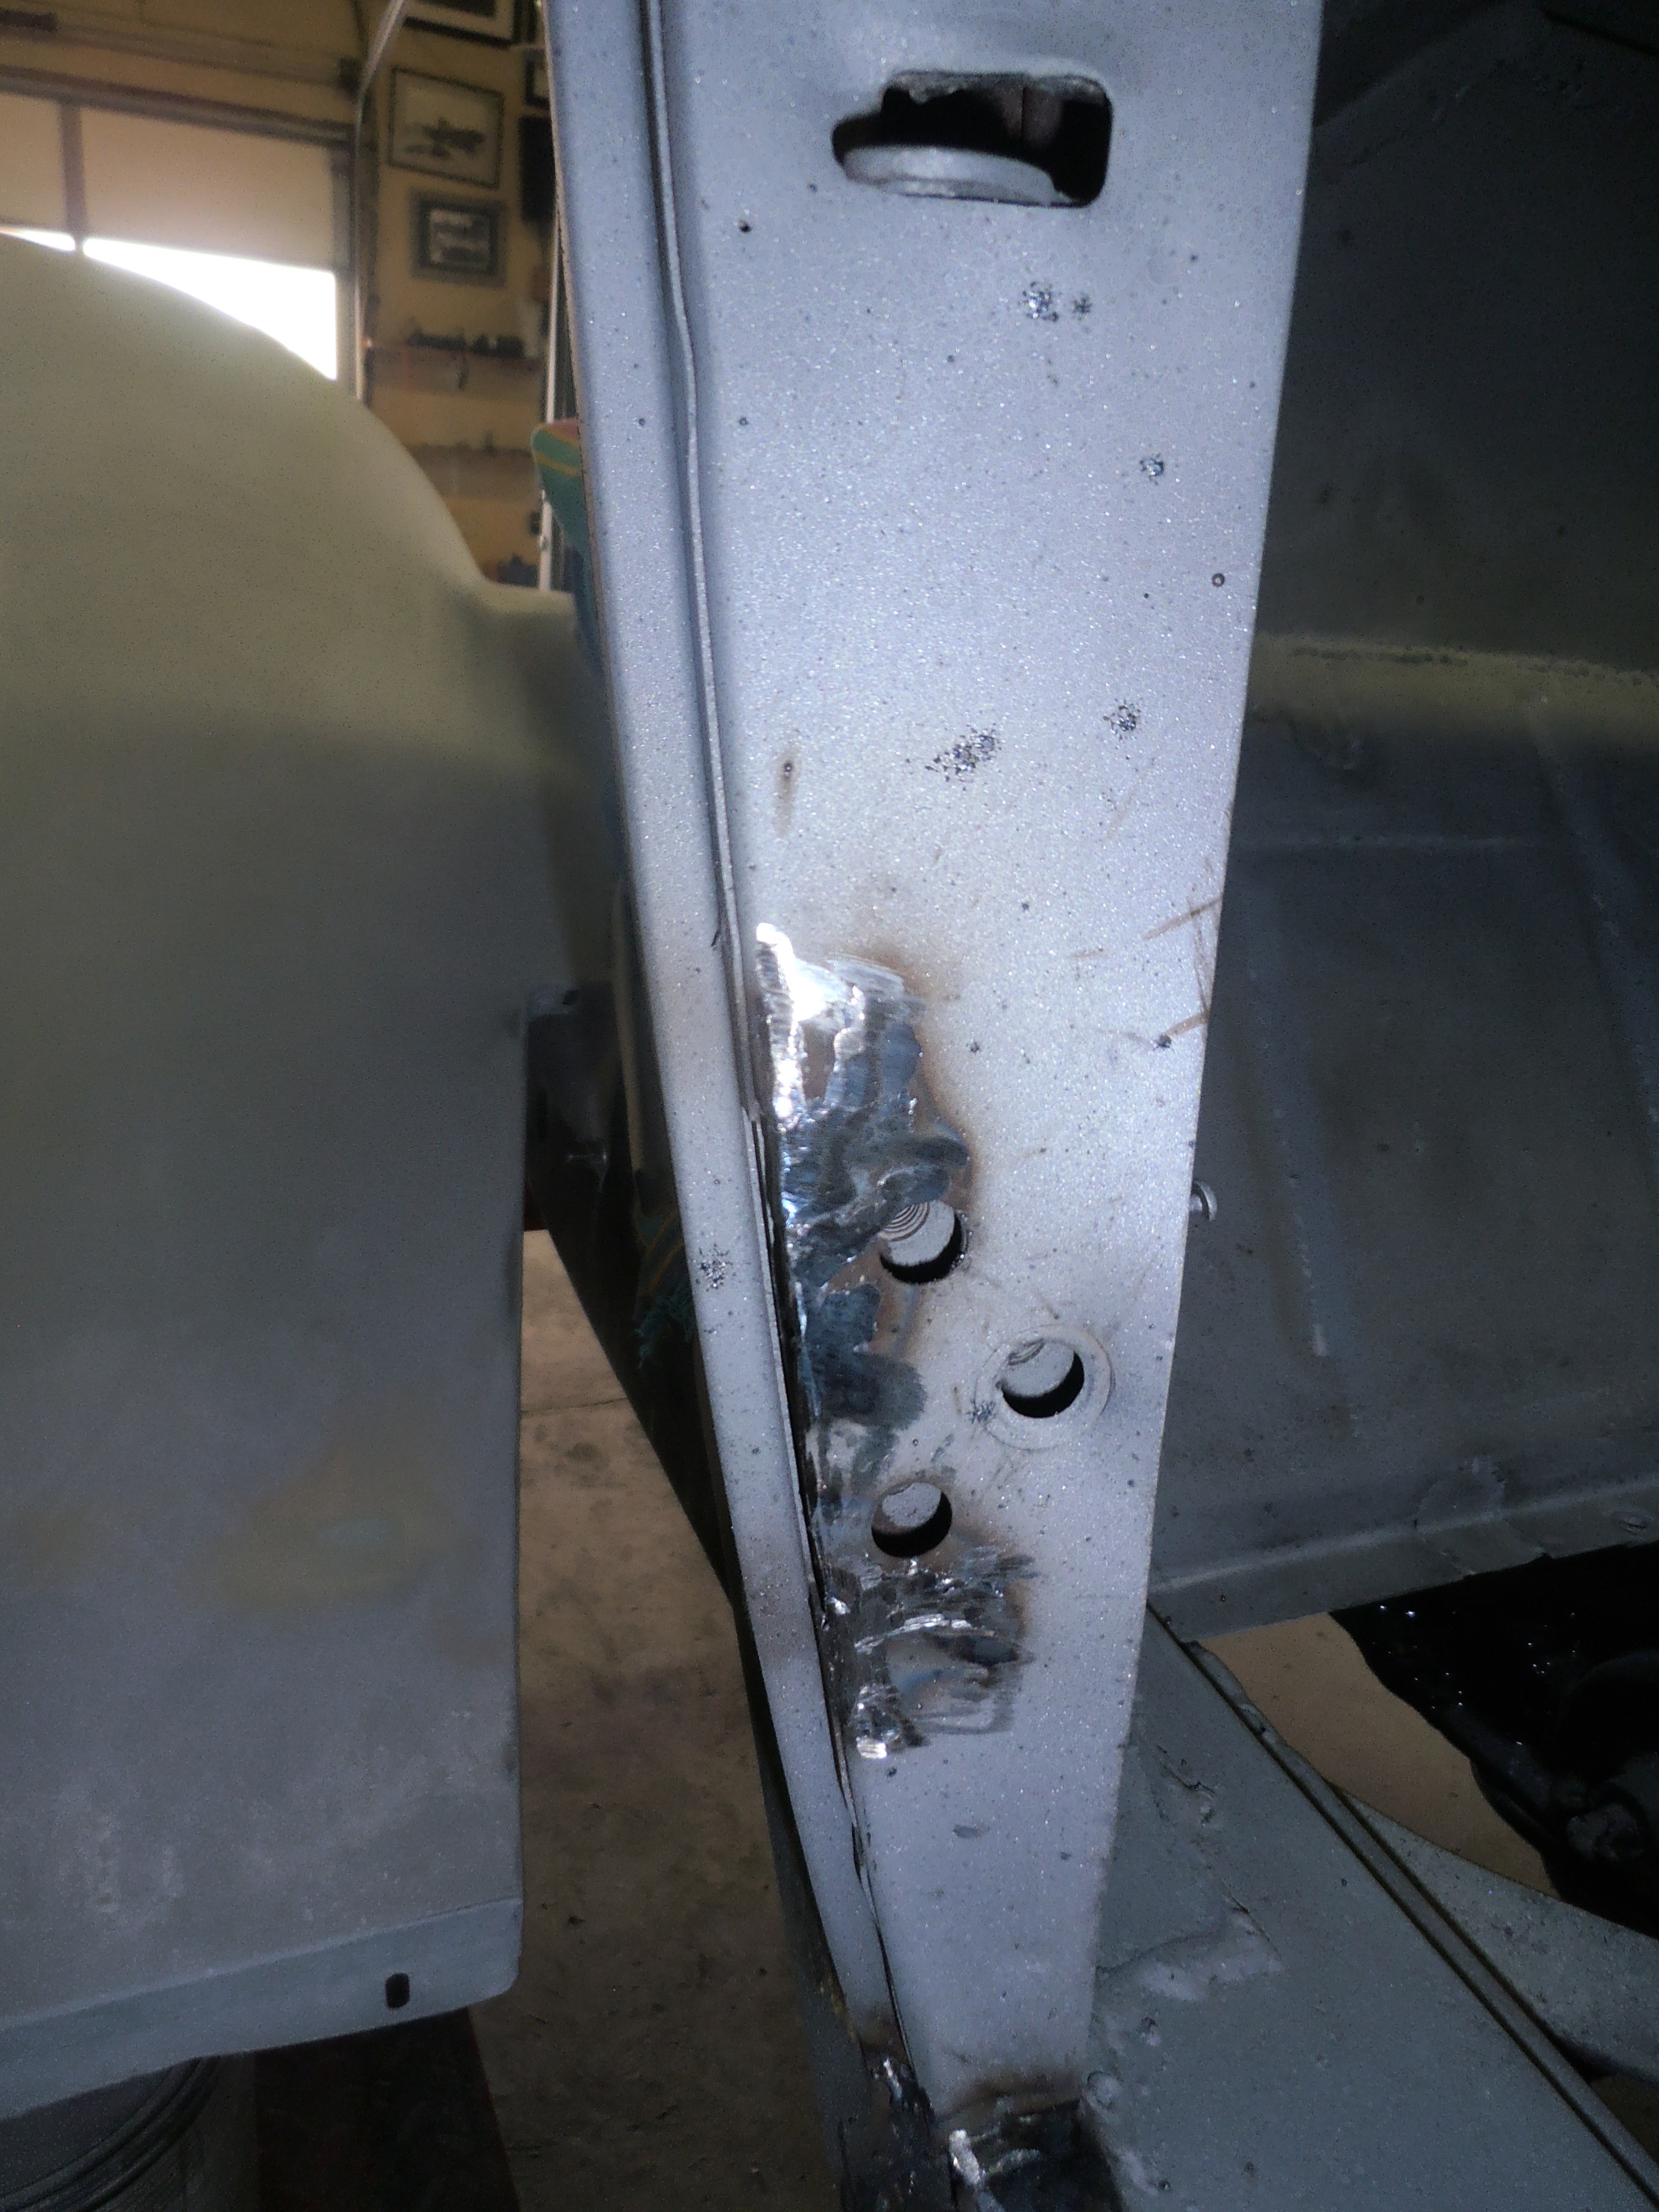
Sometimes the old mounting points have so deteriorated as to require a little structural reinforcement. Ralph adds new metal and grinds away the excess. It might seem simple but hanging a hot rod door is excruciatingly difficult to get right and continuously even door gaps will be the ultimate standard by which success is measured.
The lower body reveal is also in need of work to correct its bulge created by a patch panel that was overlapped in its installation.
A gap was created at the bottom of the door opening when the patch panel on the lower section of the quarter-panel was repaired. The gap is effectively filled after grinding down the welds.
Fine-tuning the precise placement and alignment of the hinges and latches is done when the rest of the quarter panel and bottom reveal are finished.
And, finally, an old door re-hung correctly. When you come along for a ride, you’ll be swinging this one open and marveling at how nice it looks and how well it functions.
A long time elapsed between the initial trial fitting or “hanging” of the doors on the pickup cab, and the final fitting on March 24, 2018. Why the long interval?
Well it is not because we weren’t busy. I say “we” loosely here and don’t wish to imply that I have had a direct role in the physical or even in the intellectual part of this build. Don’t be deceived here. There is a lot of math and engineering that goes into this. I would liked to have been more directly involved in a “hands-on” sense but my assignment in Geneva made that impossible. But I was also more than a passive observer. Ralph checks in with me on nearly every step.
There are several things that we observe in this photo.
Of course the stripe that covers the reveal on the door and around the entire cab has been painted in the contrast color, an off white that is technically “pepper white” from the BMW mini. It isn’t on the cowl because that part will be covered by the hood and the stripe is on the hood.
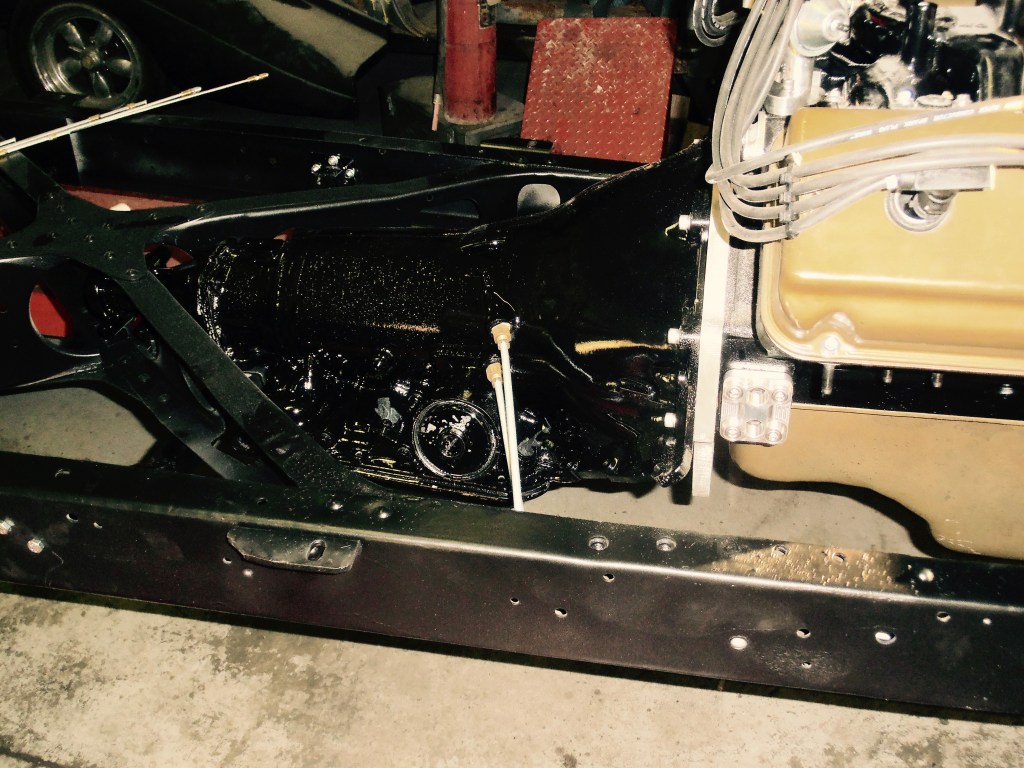
But there is also a lot more to see here as the splash aprons, running boards, dual exhaust outlets, wheels and specially machined hub caps are all visible. The engine is sporting its new valve covers. Not visible here is the oil pan. At this particular time in the build the original pan has been discarded due to a leak not visible at first. A new custom made aluminum pan has been ordered and is at the powder coater when this photo was taken.
Perfection may be impossible in a street rod. Budgetary constraints assure that work will not go on forever. Despite the tedium of seemingly endless trial runs, the fitting and refitting of heavy and awkward parts, sanding, smoothing, putting it all together and taking it apart again, and again—it’s the only way. But don’t expect it to be finished next Friday like on TV shows. Ralph sands until his hands bleed. It hurts my feelings to think about it but that’s what it takes.
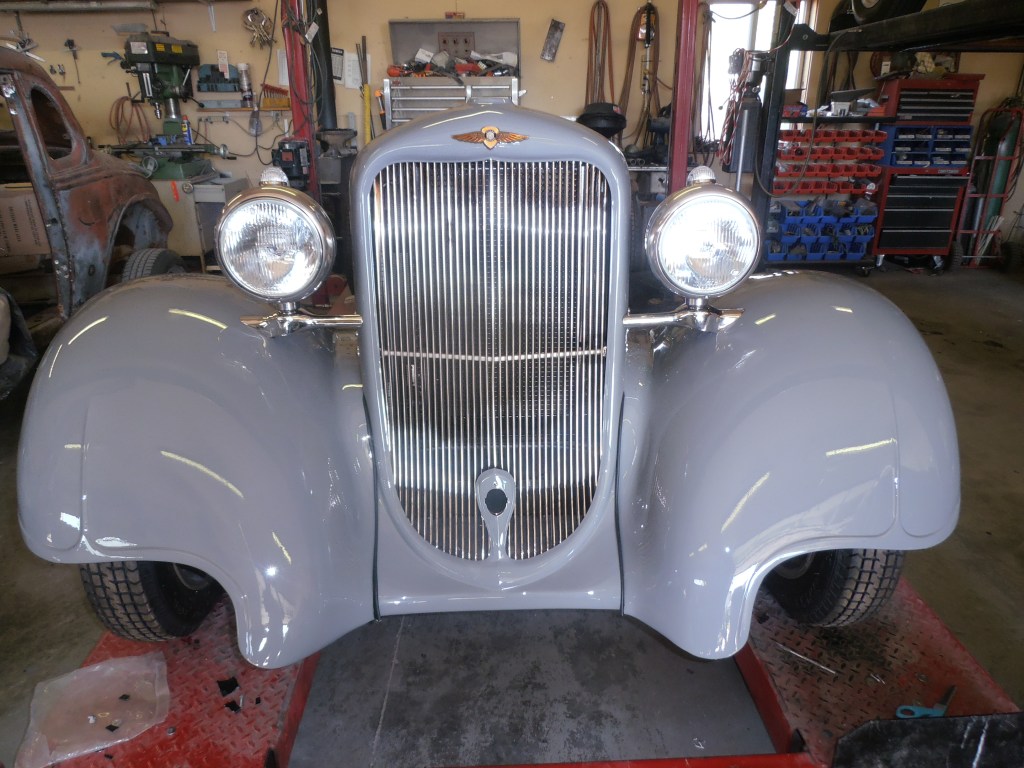
Here are “before” and “after” photos of the front end. “After” does not mean “final” by any stretch of the imagination. The front view you see here (left) is the “before” view. Way back in an earlier post you saw the fenders and grille as they were when we acquired the pickup. Of course, no part of this project truck will never be quite as good as when it left the factory 82 years ago. But then I don’t intend this exercise as a restoration.
Progress is evident, no argument on that point. How many hours, professional hours that is, would you think it took to get to the place seen in the photo to the right? I myself am not sure, but whatever you think the right number is, the correct answer is probably found by multiplying your guess by two.
Notice that the grille insert is missing, exposing the engine which is covered by a shop towel. The grille is out because it was sent off to a chrome plating establishment in Nebraska. That is after the bullet hole was repaired and the grille prepped by cleaning and sanding. Fortunately, there was only one hole. I am reminiscing now. When I was just 14, but with a driver’s license, I bought my first car. It was also a 1935 model. A Chevrolet four-door sedan. It wasn’t much to look at and I never drove it on a public street. But there were no bullet holes. I was 14 and thought of the ’35 Chevy as really old.
Permit me some memory time–I am reminiscing now. When I was just 14, but with an Idaho driver’s license in my pocket, I bought my first car. It was also a 1935 model. A Chevrolet four-door sedan. It wasn’t much to look at and I never drove it on a public street. But there were no bullet holes. I was 14 and thought of the ’35 Chevy as really old.
Here is a peek inside the cab. If you look carefully you can see the frame and the transmission on the right. On the left are the shiny new “patch” panels that were grafted in. Miscellaneous holes that won’t be needed, Ralph welds shut and grinds smooth. The floor of the cab will receive a heavy coat of a ceramic paint that seals and sound proofs the interior.
Holes or thin spots in the cab that look like potential trouble are also filled in. Many imperfections are revealed by the sandblasting process. Best to address these issues now before any more sanding and priming takes place.
Progress here is like my efforts to lose weight. It is so slow that only my closest friends notice even a huge change. Well for me 40 pounds is huge–that is two sacks of salt for our water softener and those bags are heavy. So why can’t we see change. We can but it requires paying close attention.
If you really examine the cab below you should be able to visualize the enormous amount of work that has transformed this complex piece of sheet metal. It is getting close to being ready for final paint.
This is the backside of the cab. If you examine photos from the first few blog posts you would recall that this is the part that gets beat up from heavy stuff spilling over the top of the bed and getting slammed into the back of the cab when the brakes are pressed to the floor. And this is where water accumulates and ice and snow. There is new metal grafted in to the back but it is now one seamless piece of body art.
Okay, patience is the theme here. It’s a quality that I have never enjoyed in abundance. There is a long way to go–a very long way and I will need to show patience here because this phase of the work appears to proceed at a snails pace. So serve me up a big portion of patience. I seem to have less than I (and others) think I should have. Fortunately for me, Ralph has a bunch of that useful attribute. And, I promise you, it will eventually have its own rewards. Stay tuned.
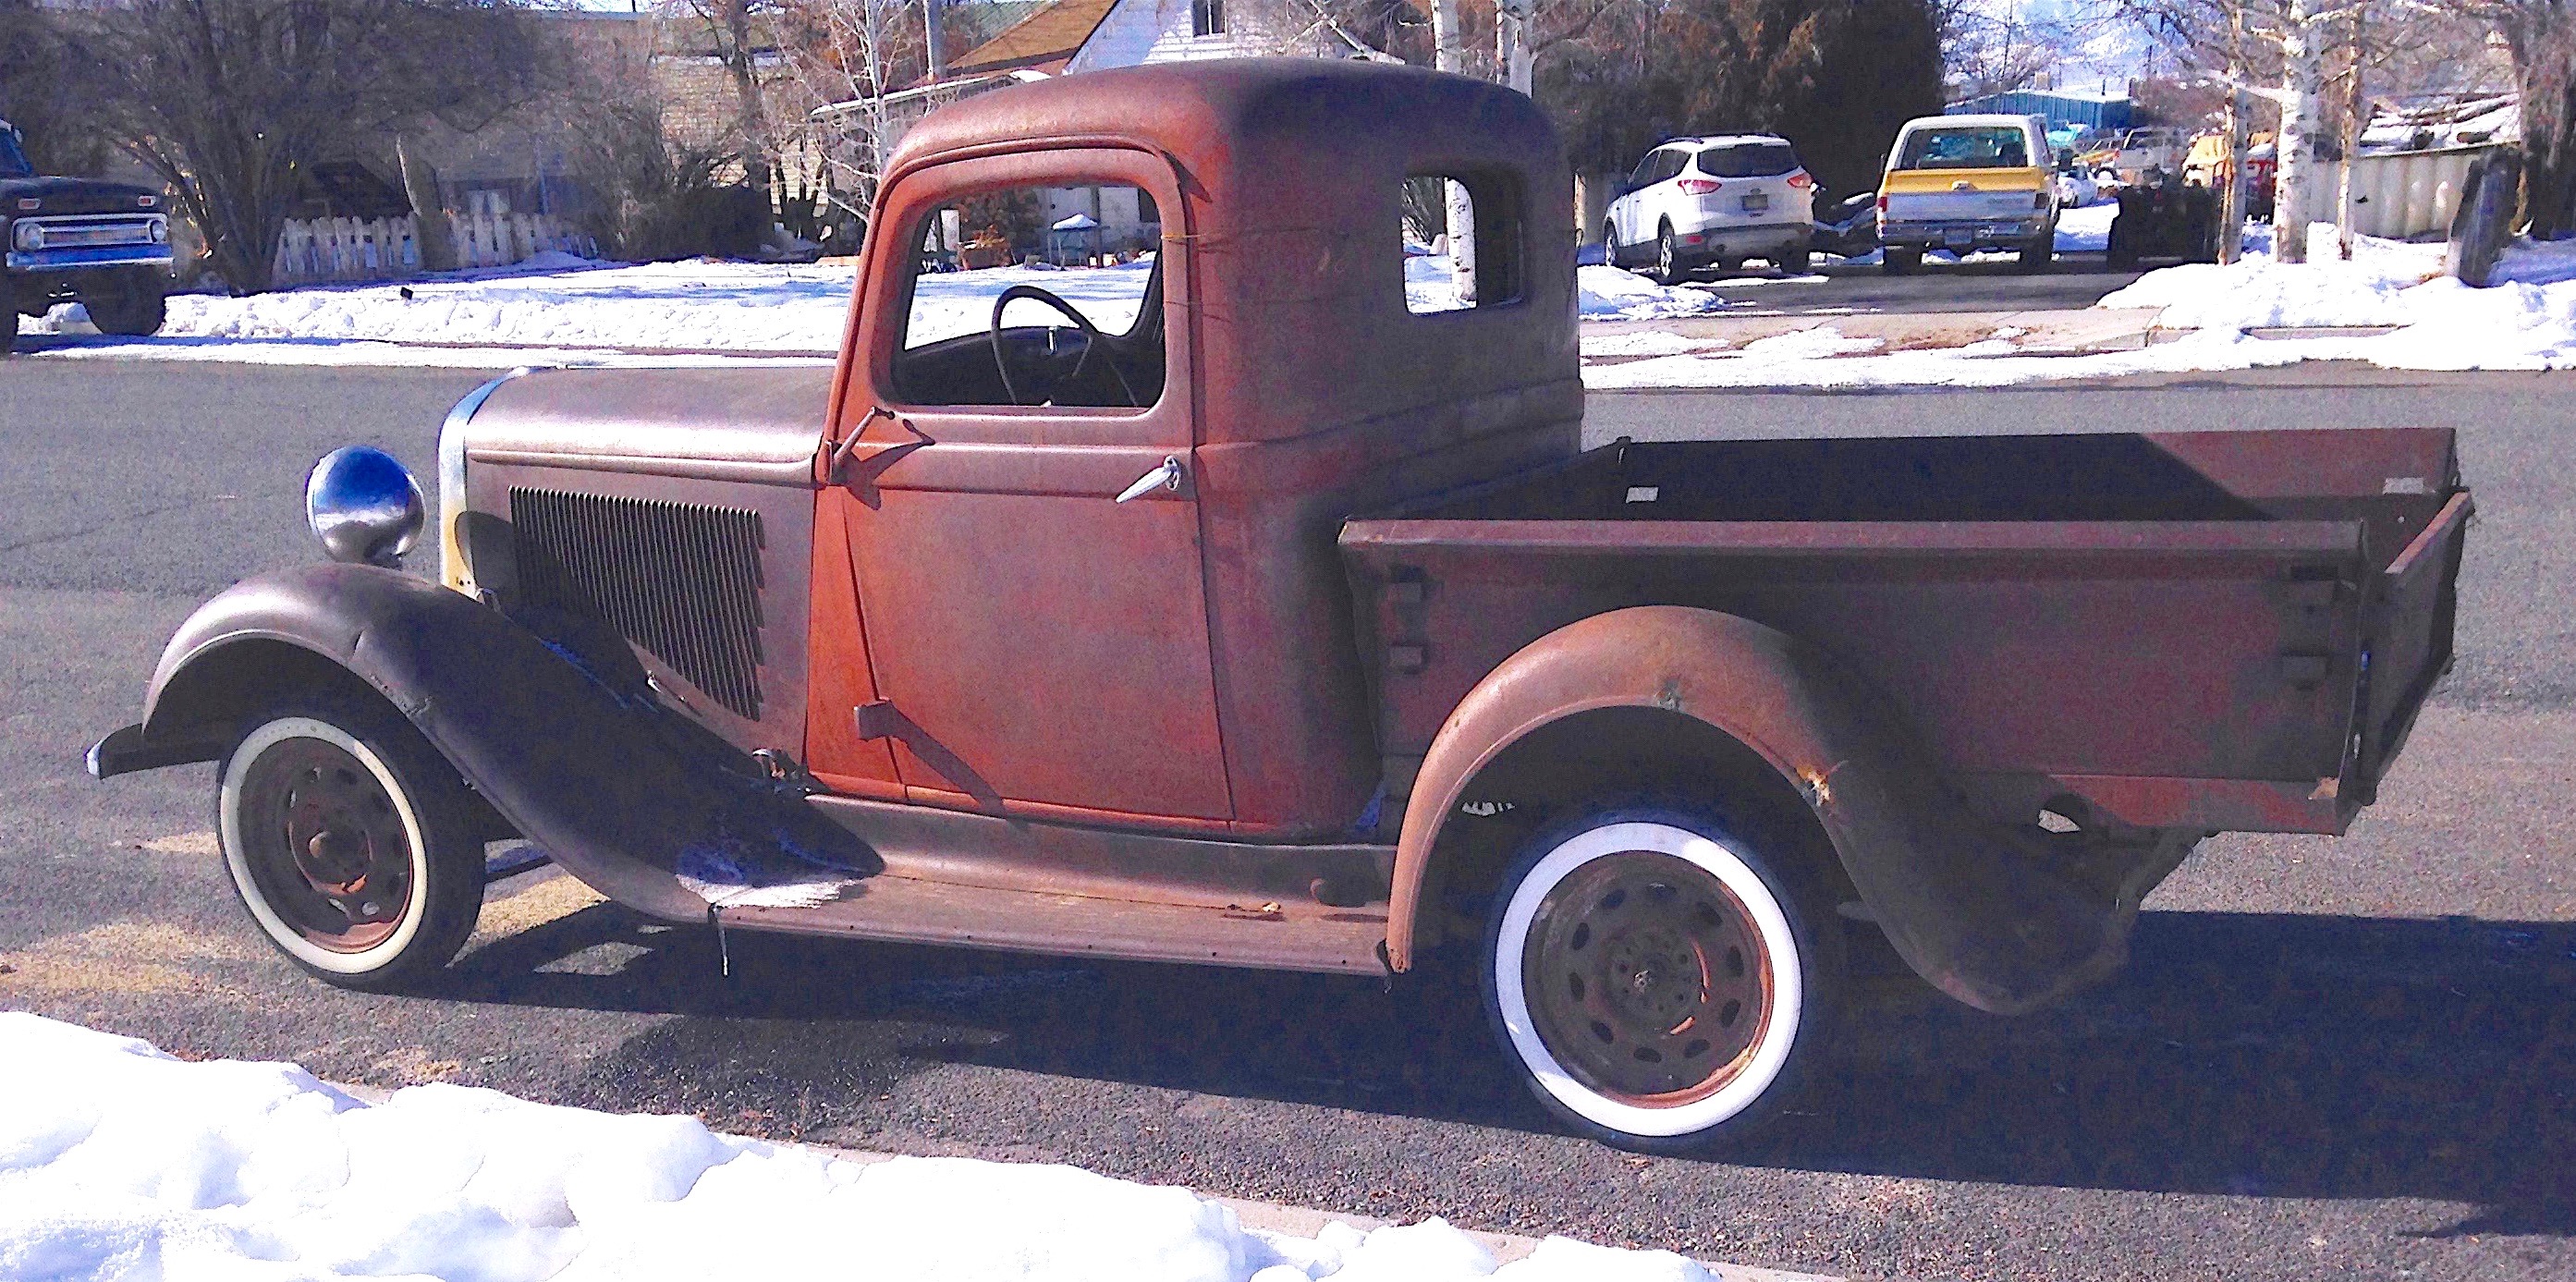
Pickups by definition have a box or bed attached to the frame behind the cab. Pickups are small trucks built with heavy frames and stout boxes meant to carry things. The box can get pretty ugly after a very short time. After 50 years, well, they are simply beyond repair.
The box on our Dodge was all there but still a mass of scars, cuts, deep scratches, dents, with ample evidence of extensive repairs including riveting, welding and re-welding. We suspect that one reason this truck survived at all was that it remained valuable to someone for work until not long ago.
The search for a new bed resulted in locating this fine looking reproduction. The problem was that the builder was asking over three grand and shipping was another $500. A close examination revealed some finish details that seemed, well, unfinished.
We kept looking for something closer to home.
One of the great aspects of old car restoration and hot rodding is that the aftermarket suppliers have discovered that there is money to be made in producing old parts. Some are made as exact reproductions like the bed on the right. This was from another manufacturer. We were tempted but didn’t bite. Others take some liberty in reinterpreting old metal. But the volume is low and the price is high.
We kept the search alive. Maybe a general metal fabricator could reproduce the box using our old one as a model? We began to look around. One shop in Orem was already well known to us and we were pleased with the quality. But the prices were so high that we didn’t bother. But we found exactly the right shop in southern Utah–Premier Metal Crafters in LaVerkin. Never heard of LaVerkin? Neither had I but I was very impressed when Ralph and I paid them a visit. LaVerkin City lies on the north banks of the Virgin River opposite Hurricane City to the South, and Toquerville to the North. LaVerkin is centrally located in the heart of what is known as the Grand Circle, which includes Zion National Park (20 miles) Bryce Canyon National Park (106 miles) and Grand Canyon National Park (125 Miles). Okay, just say it is close to St. George and you aren’t far off.
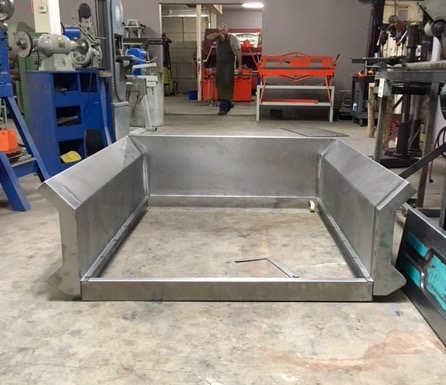
We dropped off the old bed with Steve at Premier Metal Crafters. Steve measured, measured again, and when he was sure he had it right, started to bend and shape new, heavy gauge sheet metal to match the original. He did so perfectly. We heard no complaints or second guessing. Just honest, straight talk and work to match.
You might say that this looks easy compared to the compound curves in, say, the front fenders. And that would be correct. But the metal is twice as thick, the lines or folds must be arrow straight, and in the end, it has to be perfectly square and dimensional equal to the old rusted bed that it will replace. In truth, a lot of very heavy equipment is required to do this work.
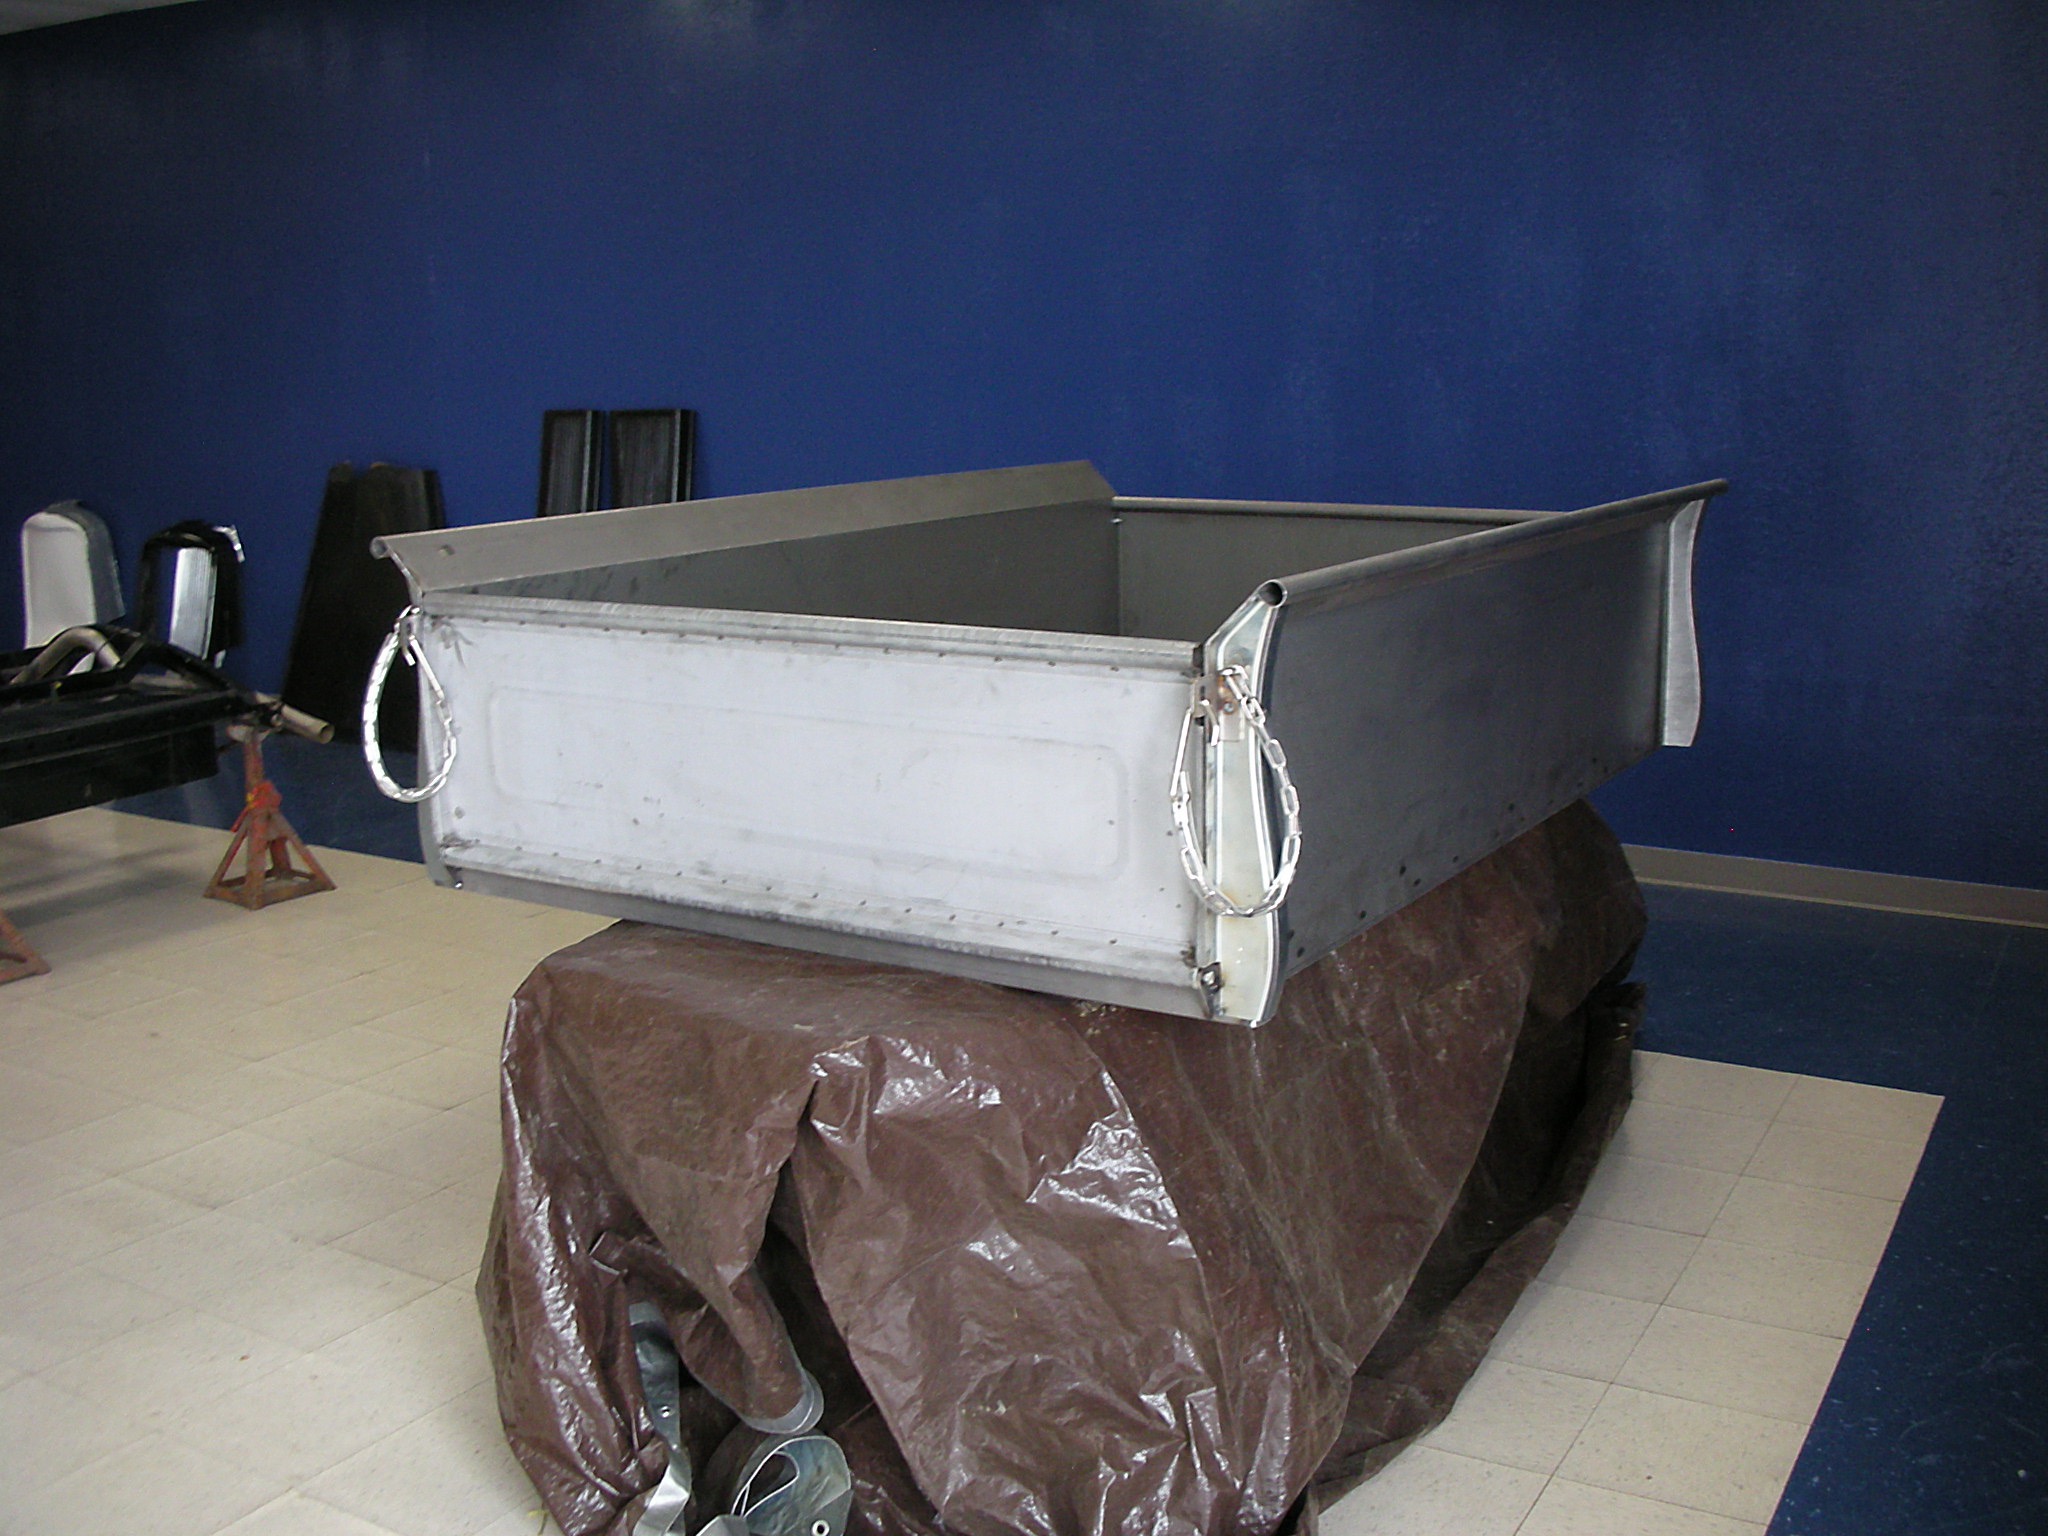
Here we see the new bed taking form. Steve even managed to produce parts that cover the unsightly fasteners that connect pieces.
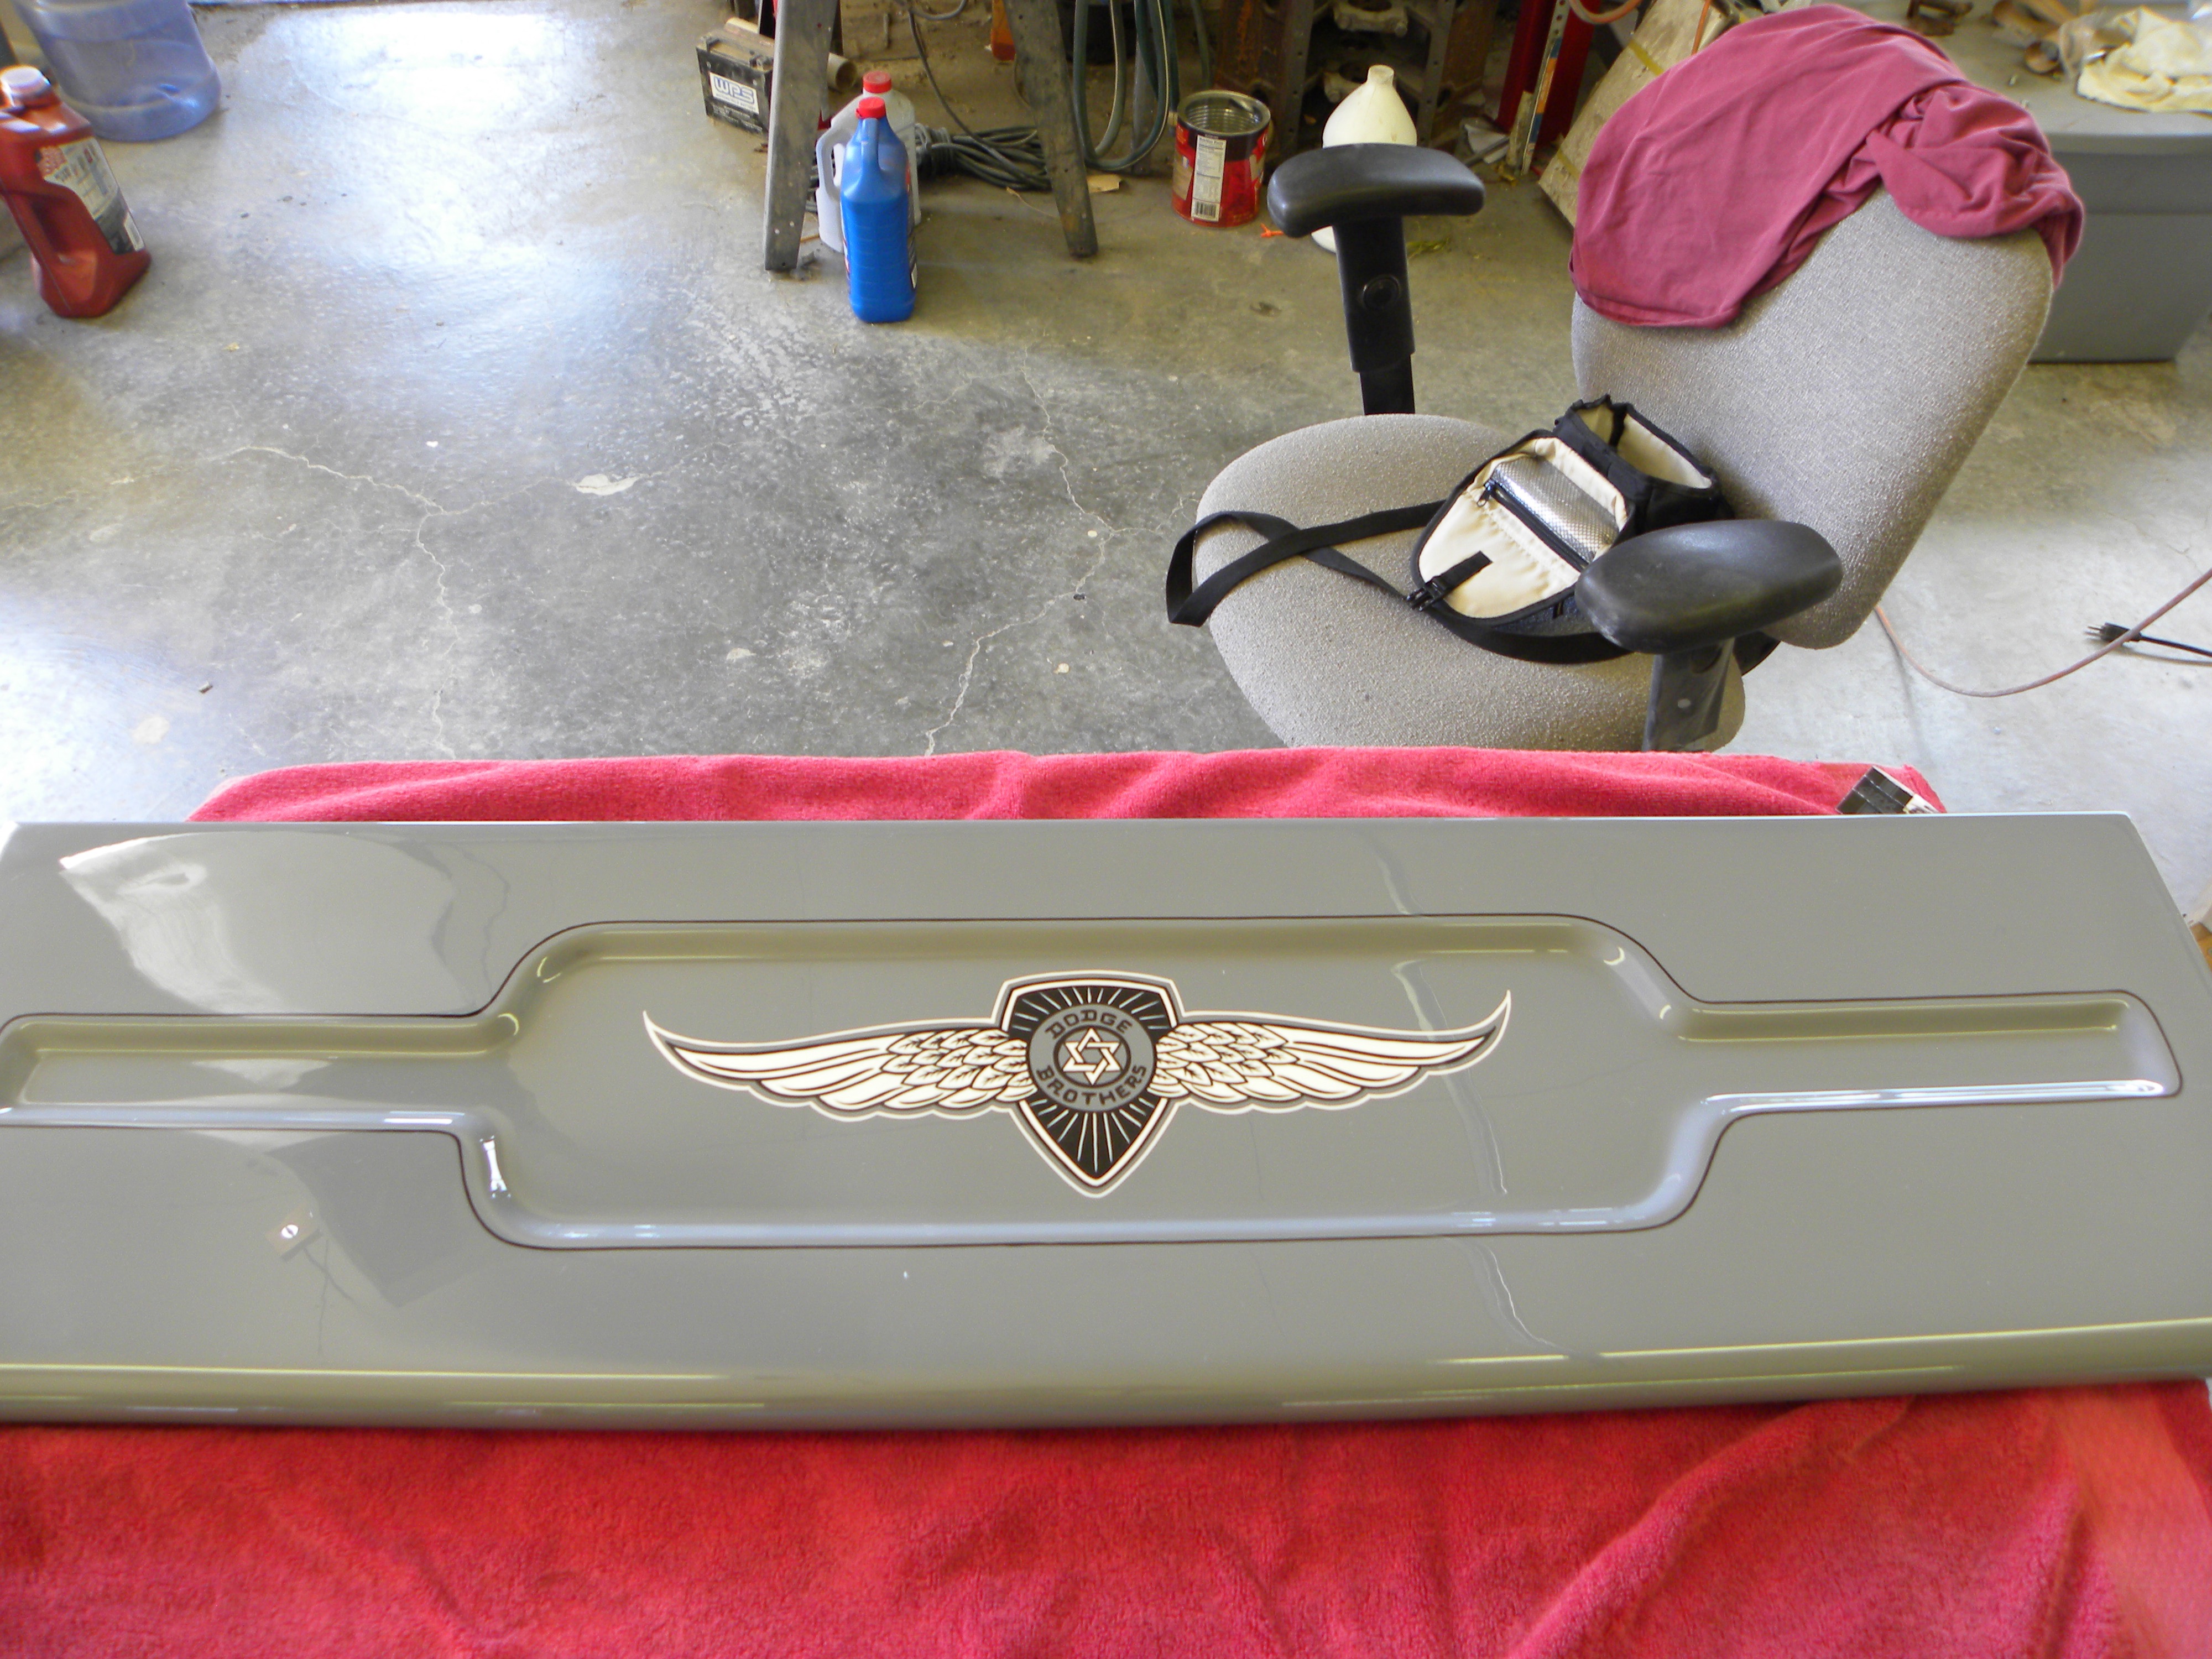
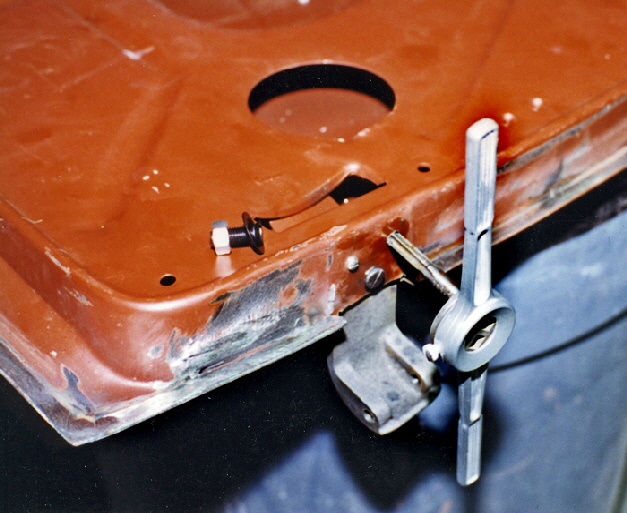
From this end, we don’t see the tailgate attached. It is off to the side. But that is jumping way ahead of what was a more difficult problem than anticipated. The tailgate on a pickup is a thing of beauty. It is often seen and is typically used to advertise the brand—Dodge or Ford or Chevrolet or whatever.
The tailgate is a critical piece of this build and it had to be just perfect. But, as they say, “perfection takes a little longer.” In fact, it required a great deal more work than originally anticipated.
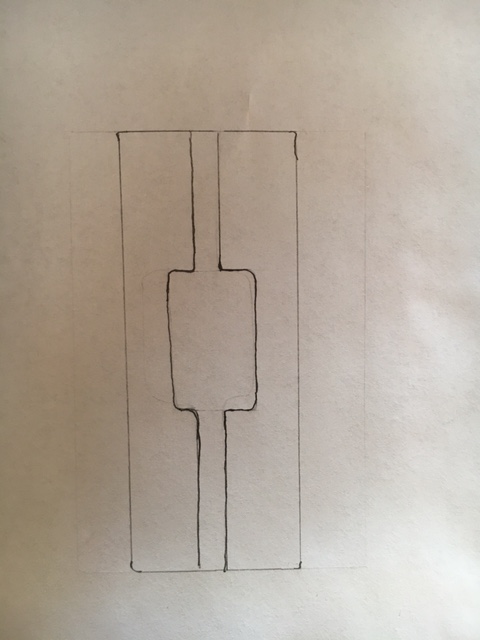
First the sketch. Must look about like this:
The plan called for the tailgate to look like a Dodge embossed tailgate but be the same size as the tailgate on my 35 that was not so embossed. This would require cutting out the metal parts in relief and grafting the old metal into a new tailgate that was the correct size and shape for my 35 pickup.
But where would we get a piece that matched a Dodge tailgate stamping exactly? The answer was to cut one out of a Dodge tailgate.
I wanted the Dodge look and even the Dodge letters if possible. In the end, I couldn’t get the letters but I came close. First, an authentic Dodge tailgate in reasonable shape had to be located. I found one on eBay. Everything (almost) is for sale on eBay.
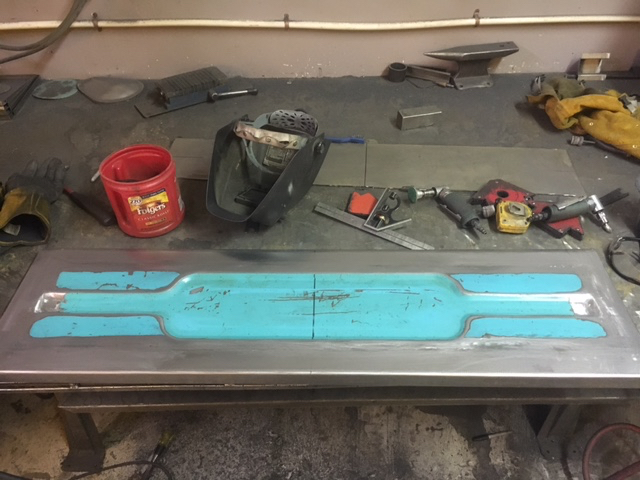
Making a tailgate like this is possible but falls into the category of “don’t try this at home.” This kind of work is what earns you the title “premier metal fabricator.
Believe me, the new tailgate is a piece of metal craftsmanship. It will be much admired by people who know. Others, well, they won’t know and that, too, is okay.
In the end, we have a new, old appearing box for the hot rod pickup.
Steve is a metal fabricator. He isn’t the only person going by that professional identification to work on the Dodge. But we’ll come to that later when other bits are featured. Steve is shown here admiring his work. We think “Premier Metal Crafters” in LaVerkin, Utah is a great place and we would certainly go back to Steve again.
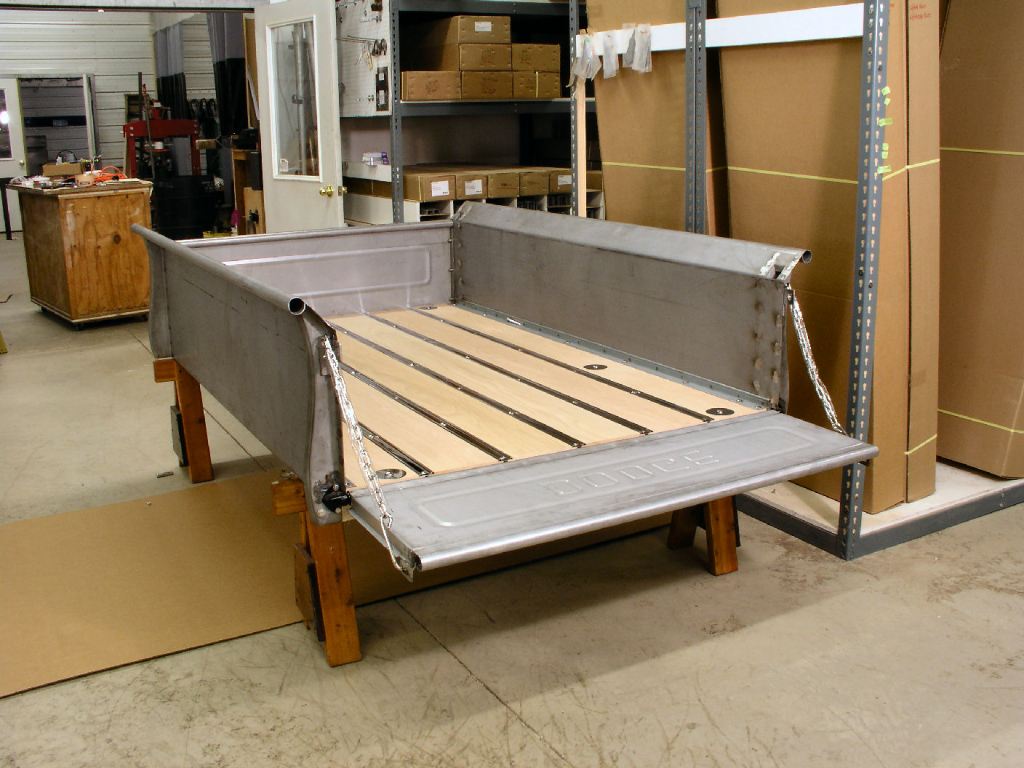
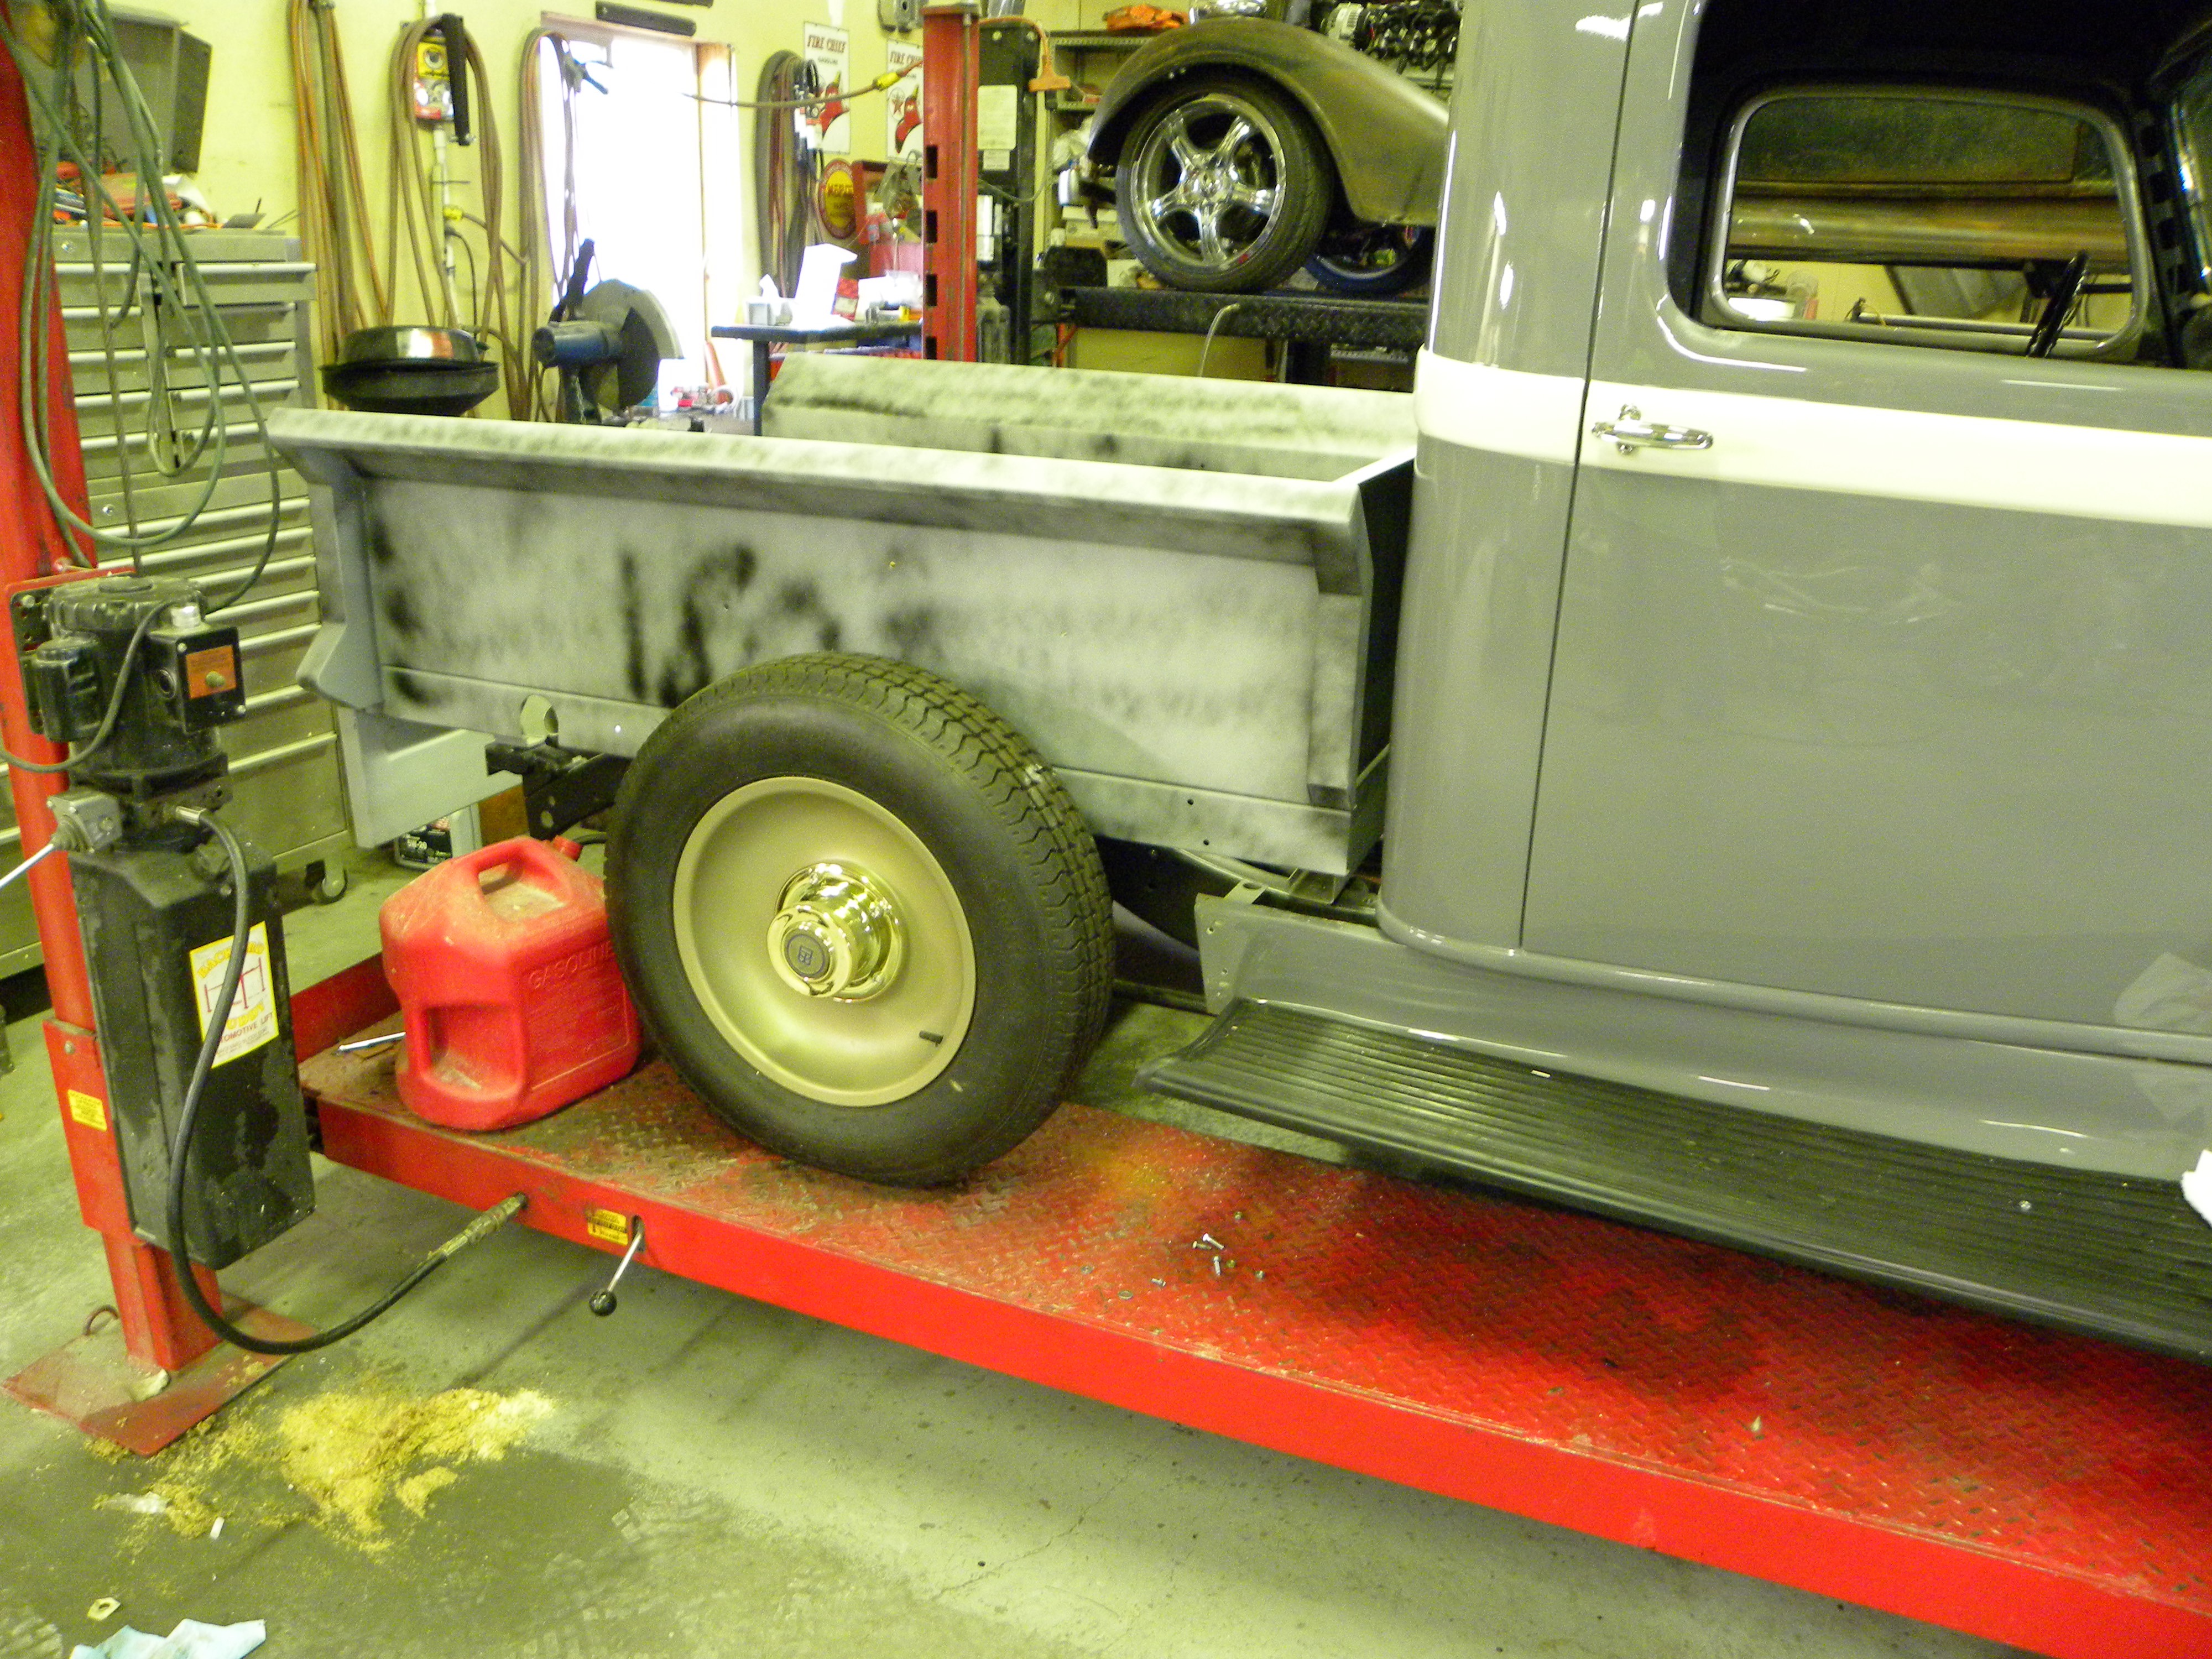
It would be May of 2018 before the bed pieces would be bolted together again and hoisted onto the frame. It is rare that anyone in the hot rod industry has the opportunity of putting a brand new bed on a truck manufactured in 1935. Of course, this one isn’t identical to the factory item and anyone in the restoration side of the old car or truck industry would quickly call foul. In fact, this bed is better. The steel is thicker, it is made from an anti-corrosive alloy, and it is perfectly straight. Far superior. But would it fit?
Well, yes and no. Truthfully, the first fitting was disappointing. Although painful, the gaps and misalignment are obvious. But this was just the first of many disassemblies and reassemblies and hoisting the whole heavy steel assembly back on the frame.
The second fitting of the new bed parts took place after the rear fenders had enjoyed their brief moment on center stage. Holes were drilled, parts that fit fine before are after painting and sanding never quite right in the next round. Knowing this ahead of time helps prevent making irreversible fastening efforts such as welding. Note this difference in the colors between these two photos–so much depends on what kind of light is available.
The tailgate as seen here on the left has been primed and sanded several times and will soon be painted and sent off to the pinstriping crowd that gets together early summer in Manti, Utah. I am going to let them have a go at painting a “Dodge Brothers” emblem from the early days on the tailgate. Meantime Ralph is assembling all the necessary hardware to mount the tailgate permanent to the bed.
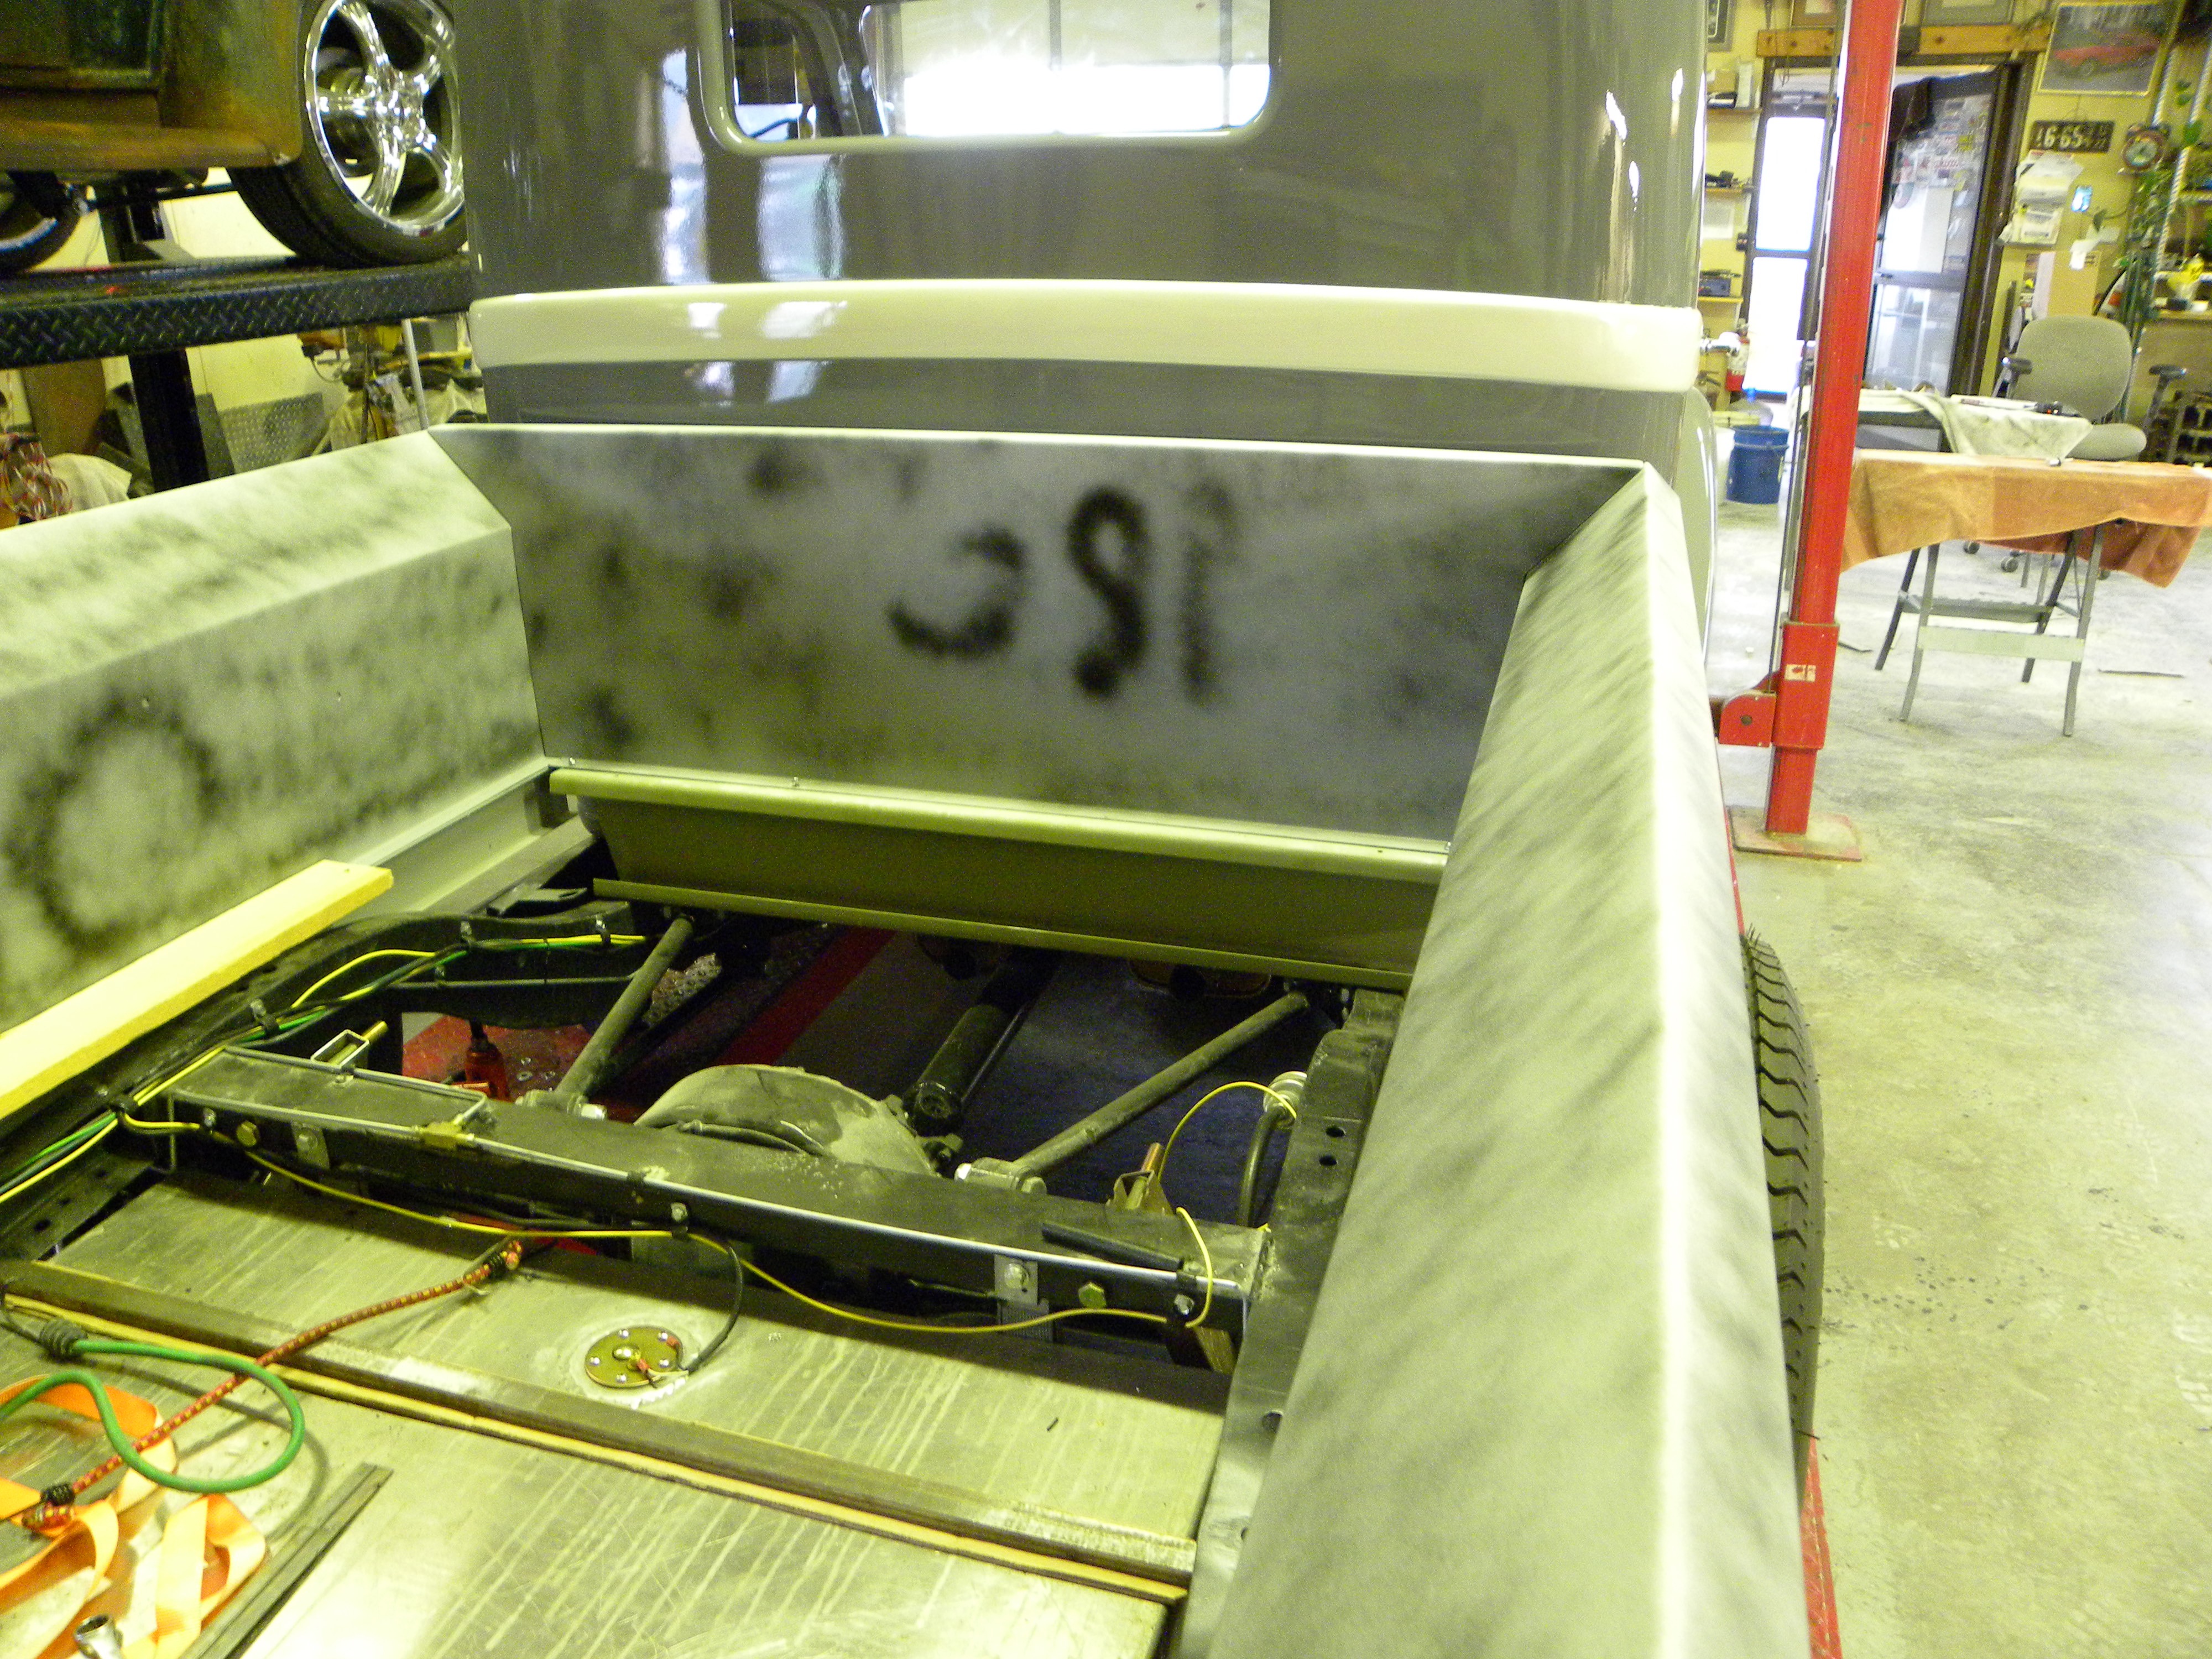
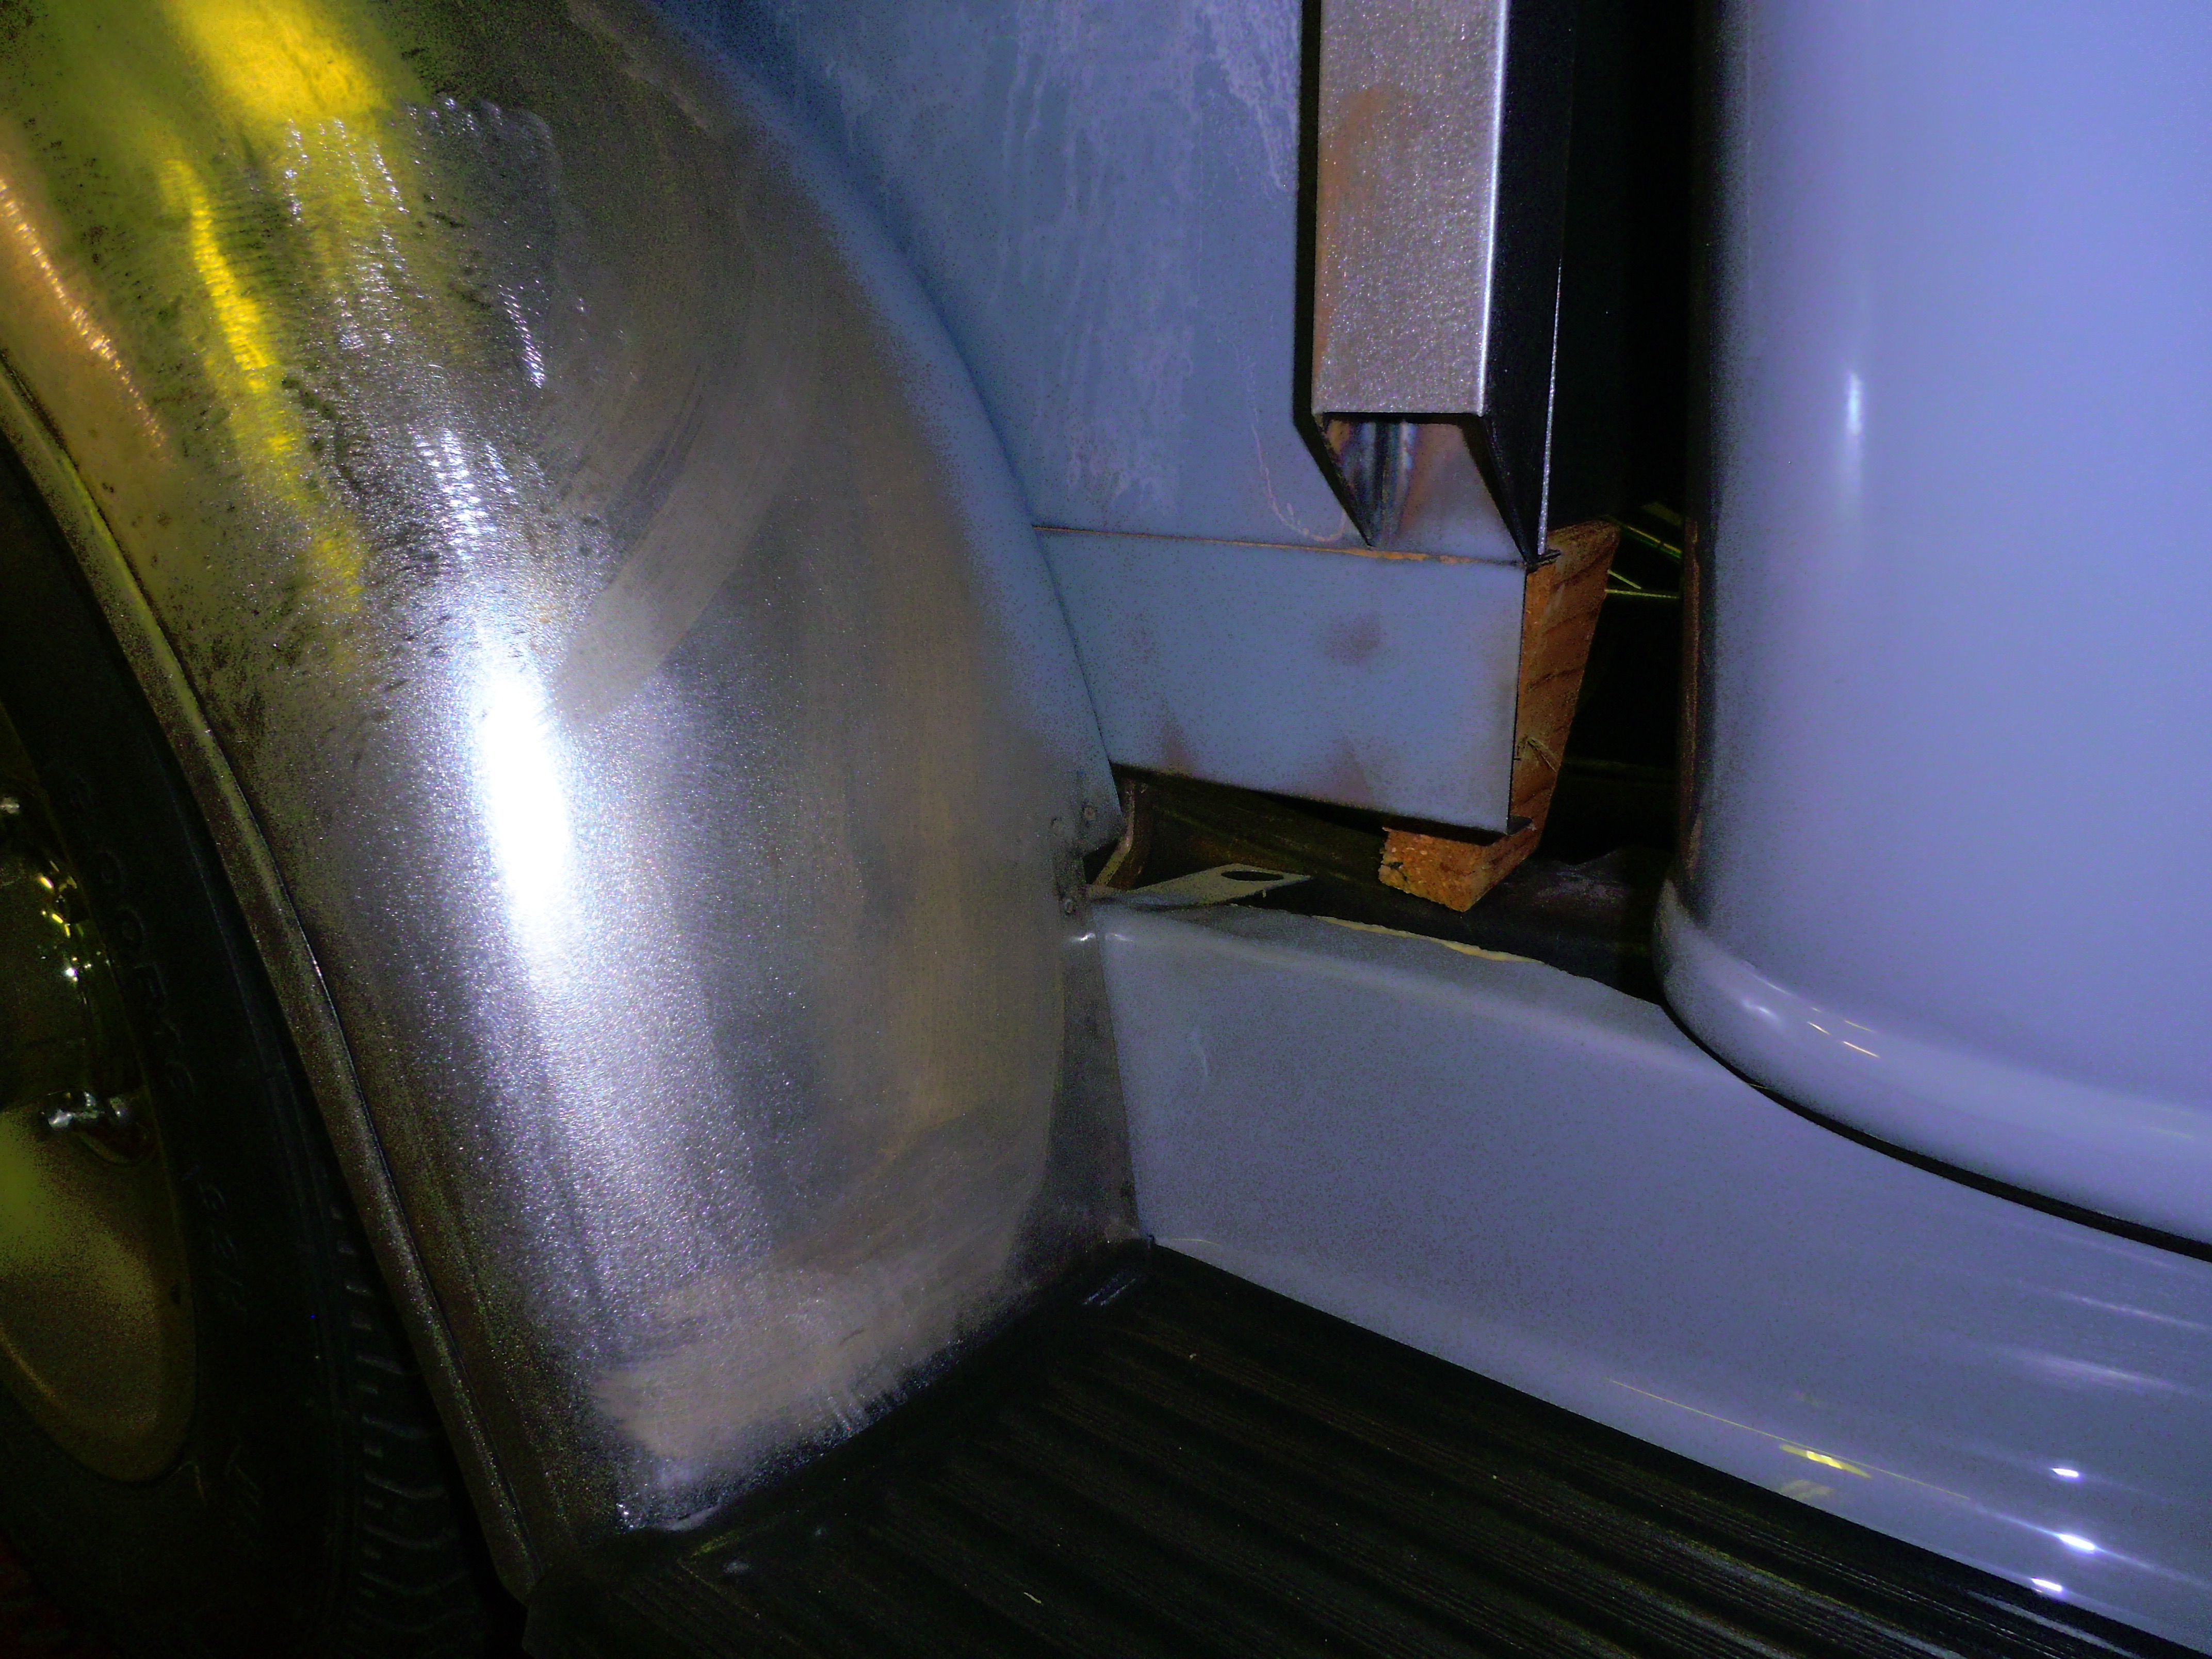
I throw this image in the mix because without the floor in, many of the suspension parts are still visible. You can see the top of the parallel four-bar suspension. This is, to my knowledge, never done in factory stock automobiles. It is too expensive and too fiddly. The four bars located the rear axle in relation to the bed but they themselves have no other suspension function. That will require a set of coil overs or coil springs with a shock absorber inside. We will wait until the last minute with all the weight on the back that will probably ever go there before determining how much shock and how much spring function is ideal. Most pickups still have leaf springs or “buggy” springs because the weight on the back can be highly variable and leaf springs are good at handling different weights, but never really give a truly smooth ride.
After more than a year of patient waiting for its turn in the spotlight, the tailgate has received its final coat of grey with a couple of topcoats of clear gloss. I’ve wrestled with what type of “DODGE” lettering, if any, I wanted to put in the center section. The decision as of June 1, 2018, is to let the pinstriping boys in Manti paint one of the gorgeous Dodge Brothers emblems in that section. Before too long I should be able to update with some additional detail.
And here it is with an early Dodge Brothers insignia so carefully painted on the tailgate that is could almost appear to be a decal but it isn’t. These guys are terrific and I will tell you a bit more about them later.
And finally as installed at the back of the bed. No one will believe the number of steps and the overall effort by so many just to produce the tailgate. By any measure, really quite extraordinary.
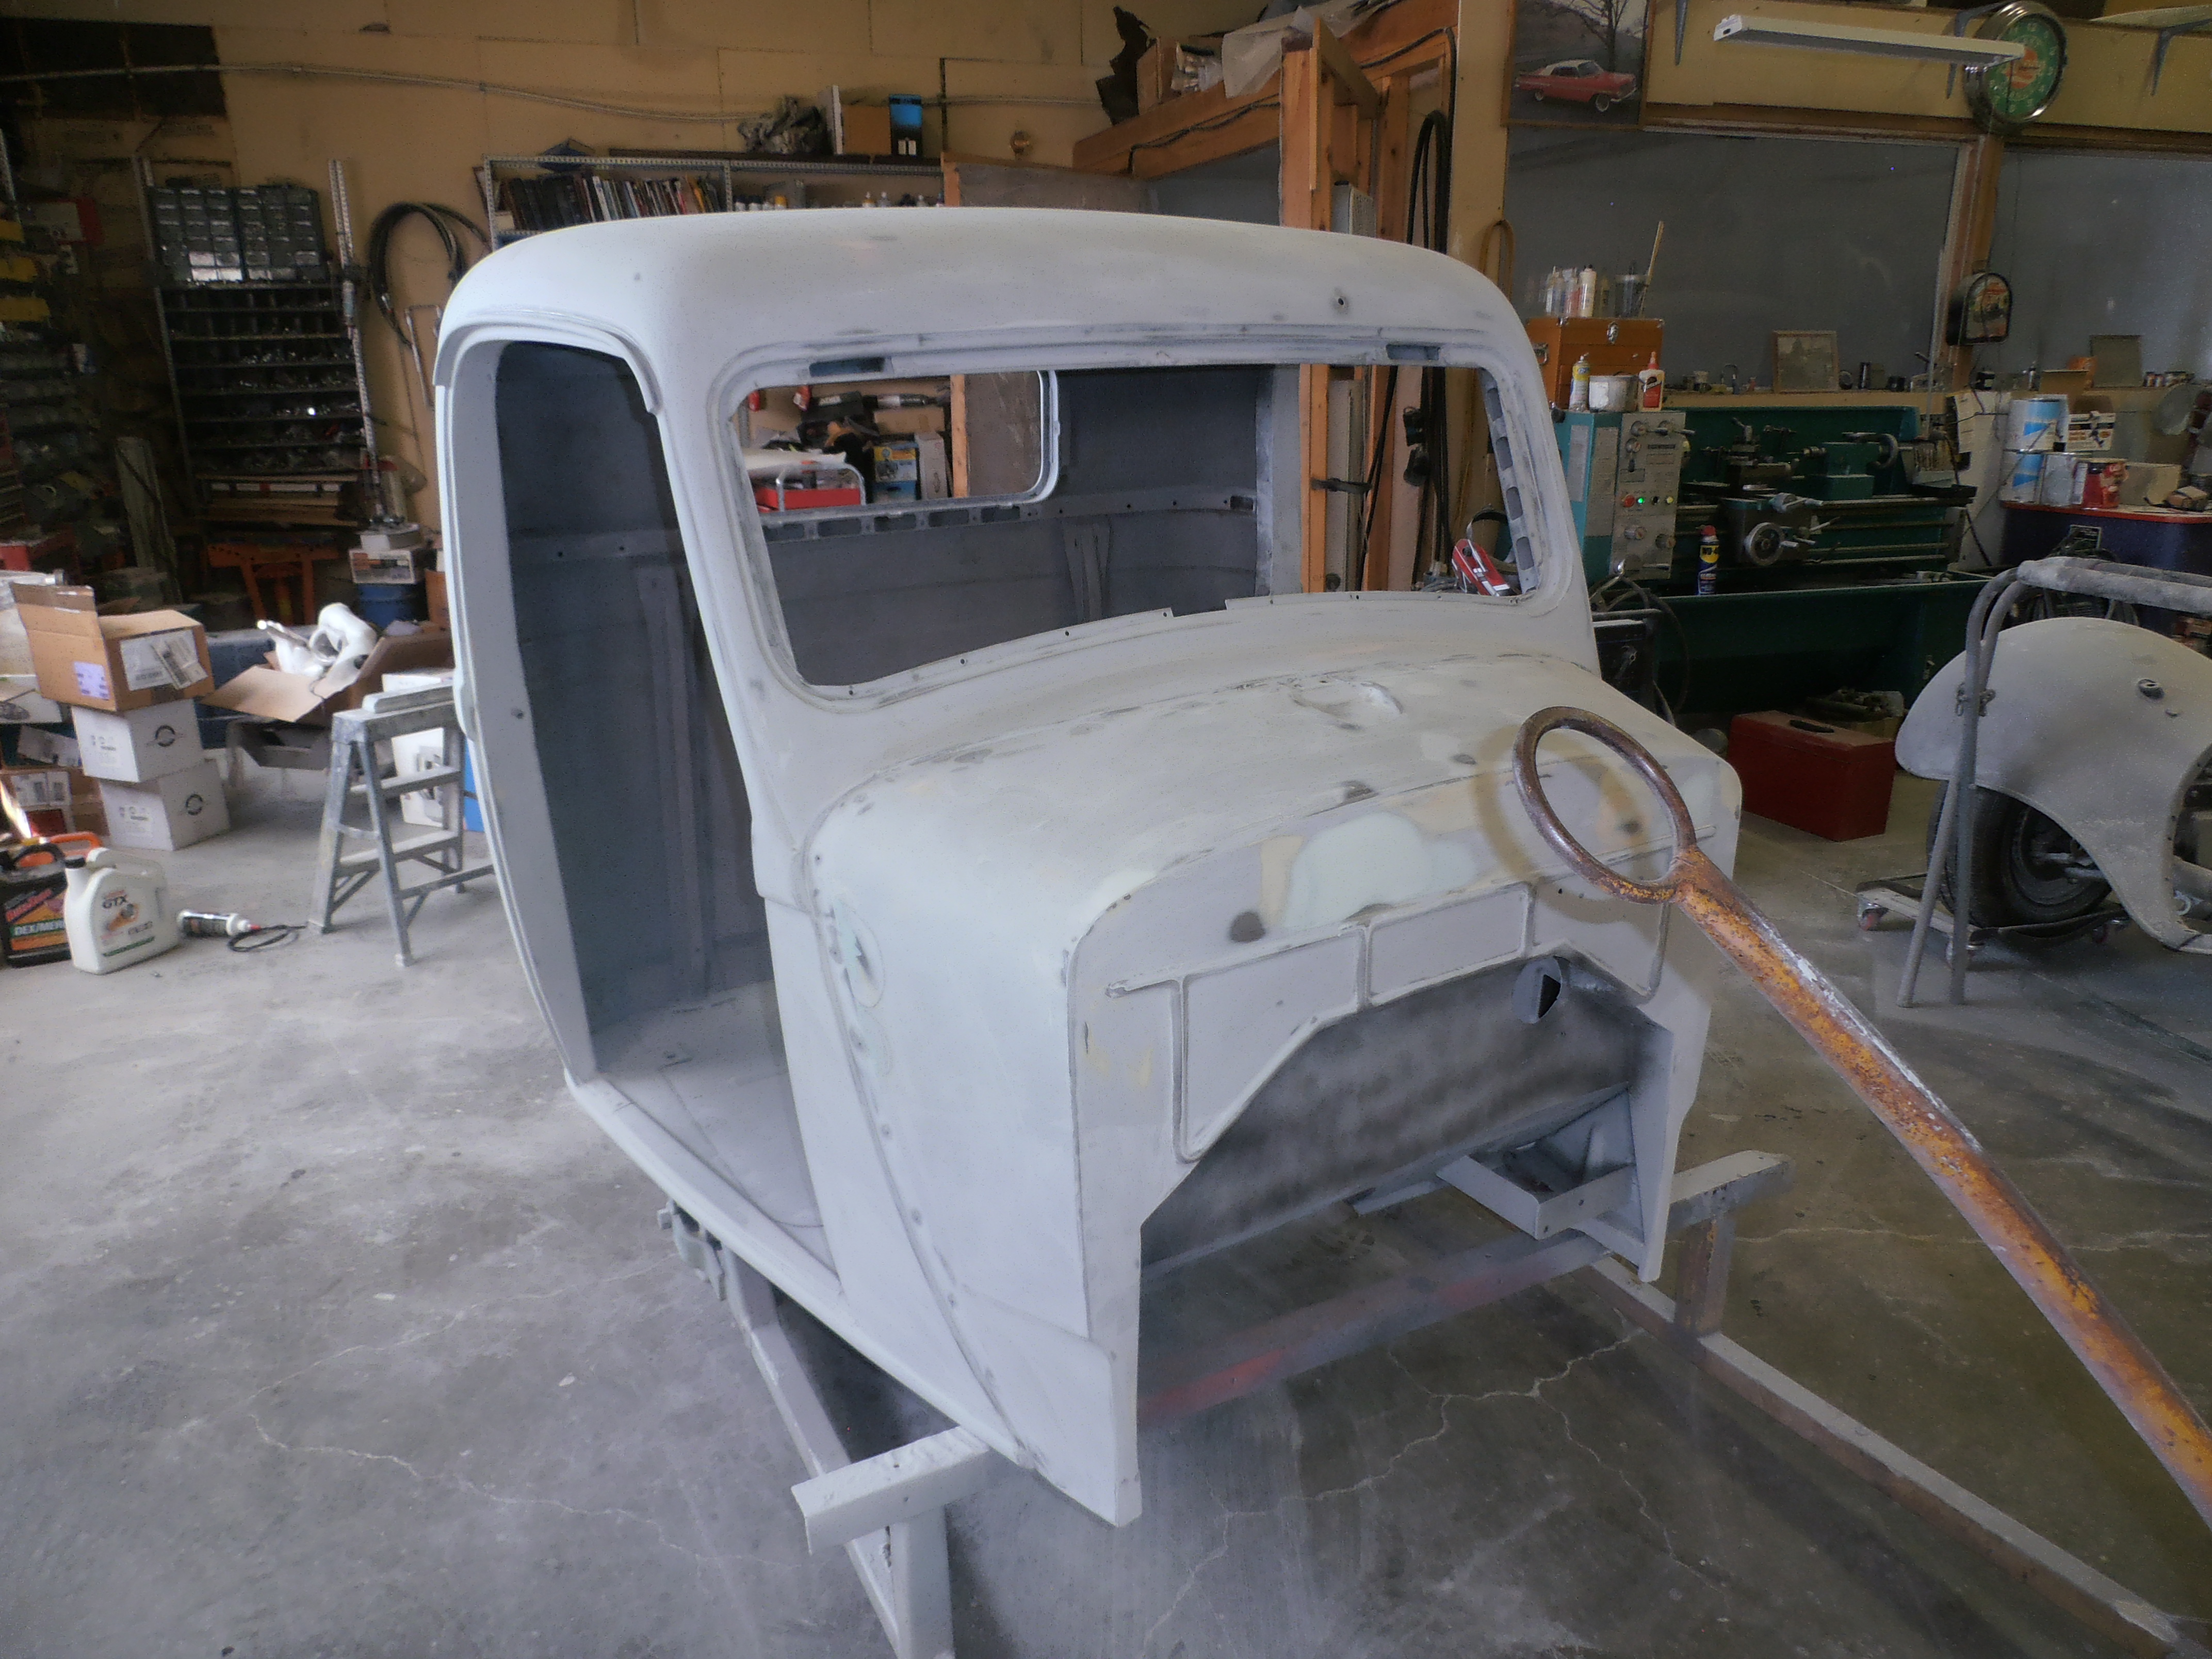
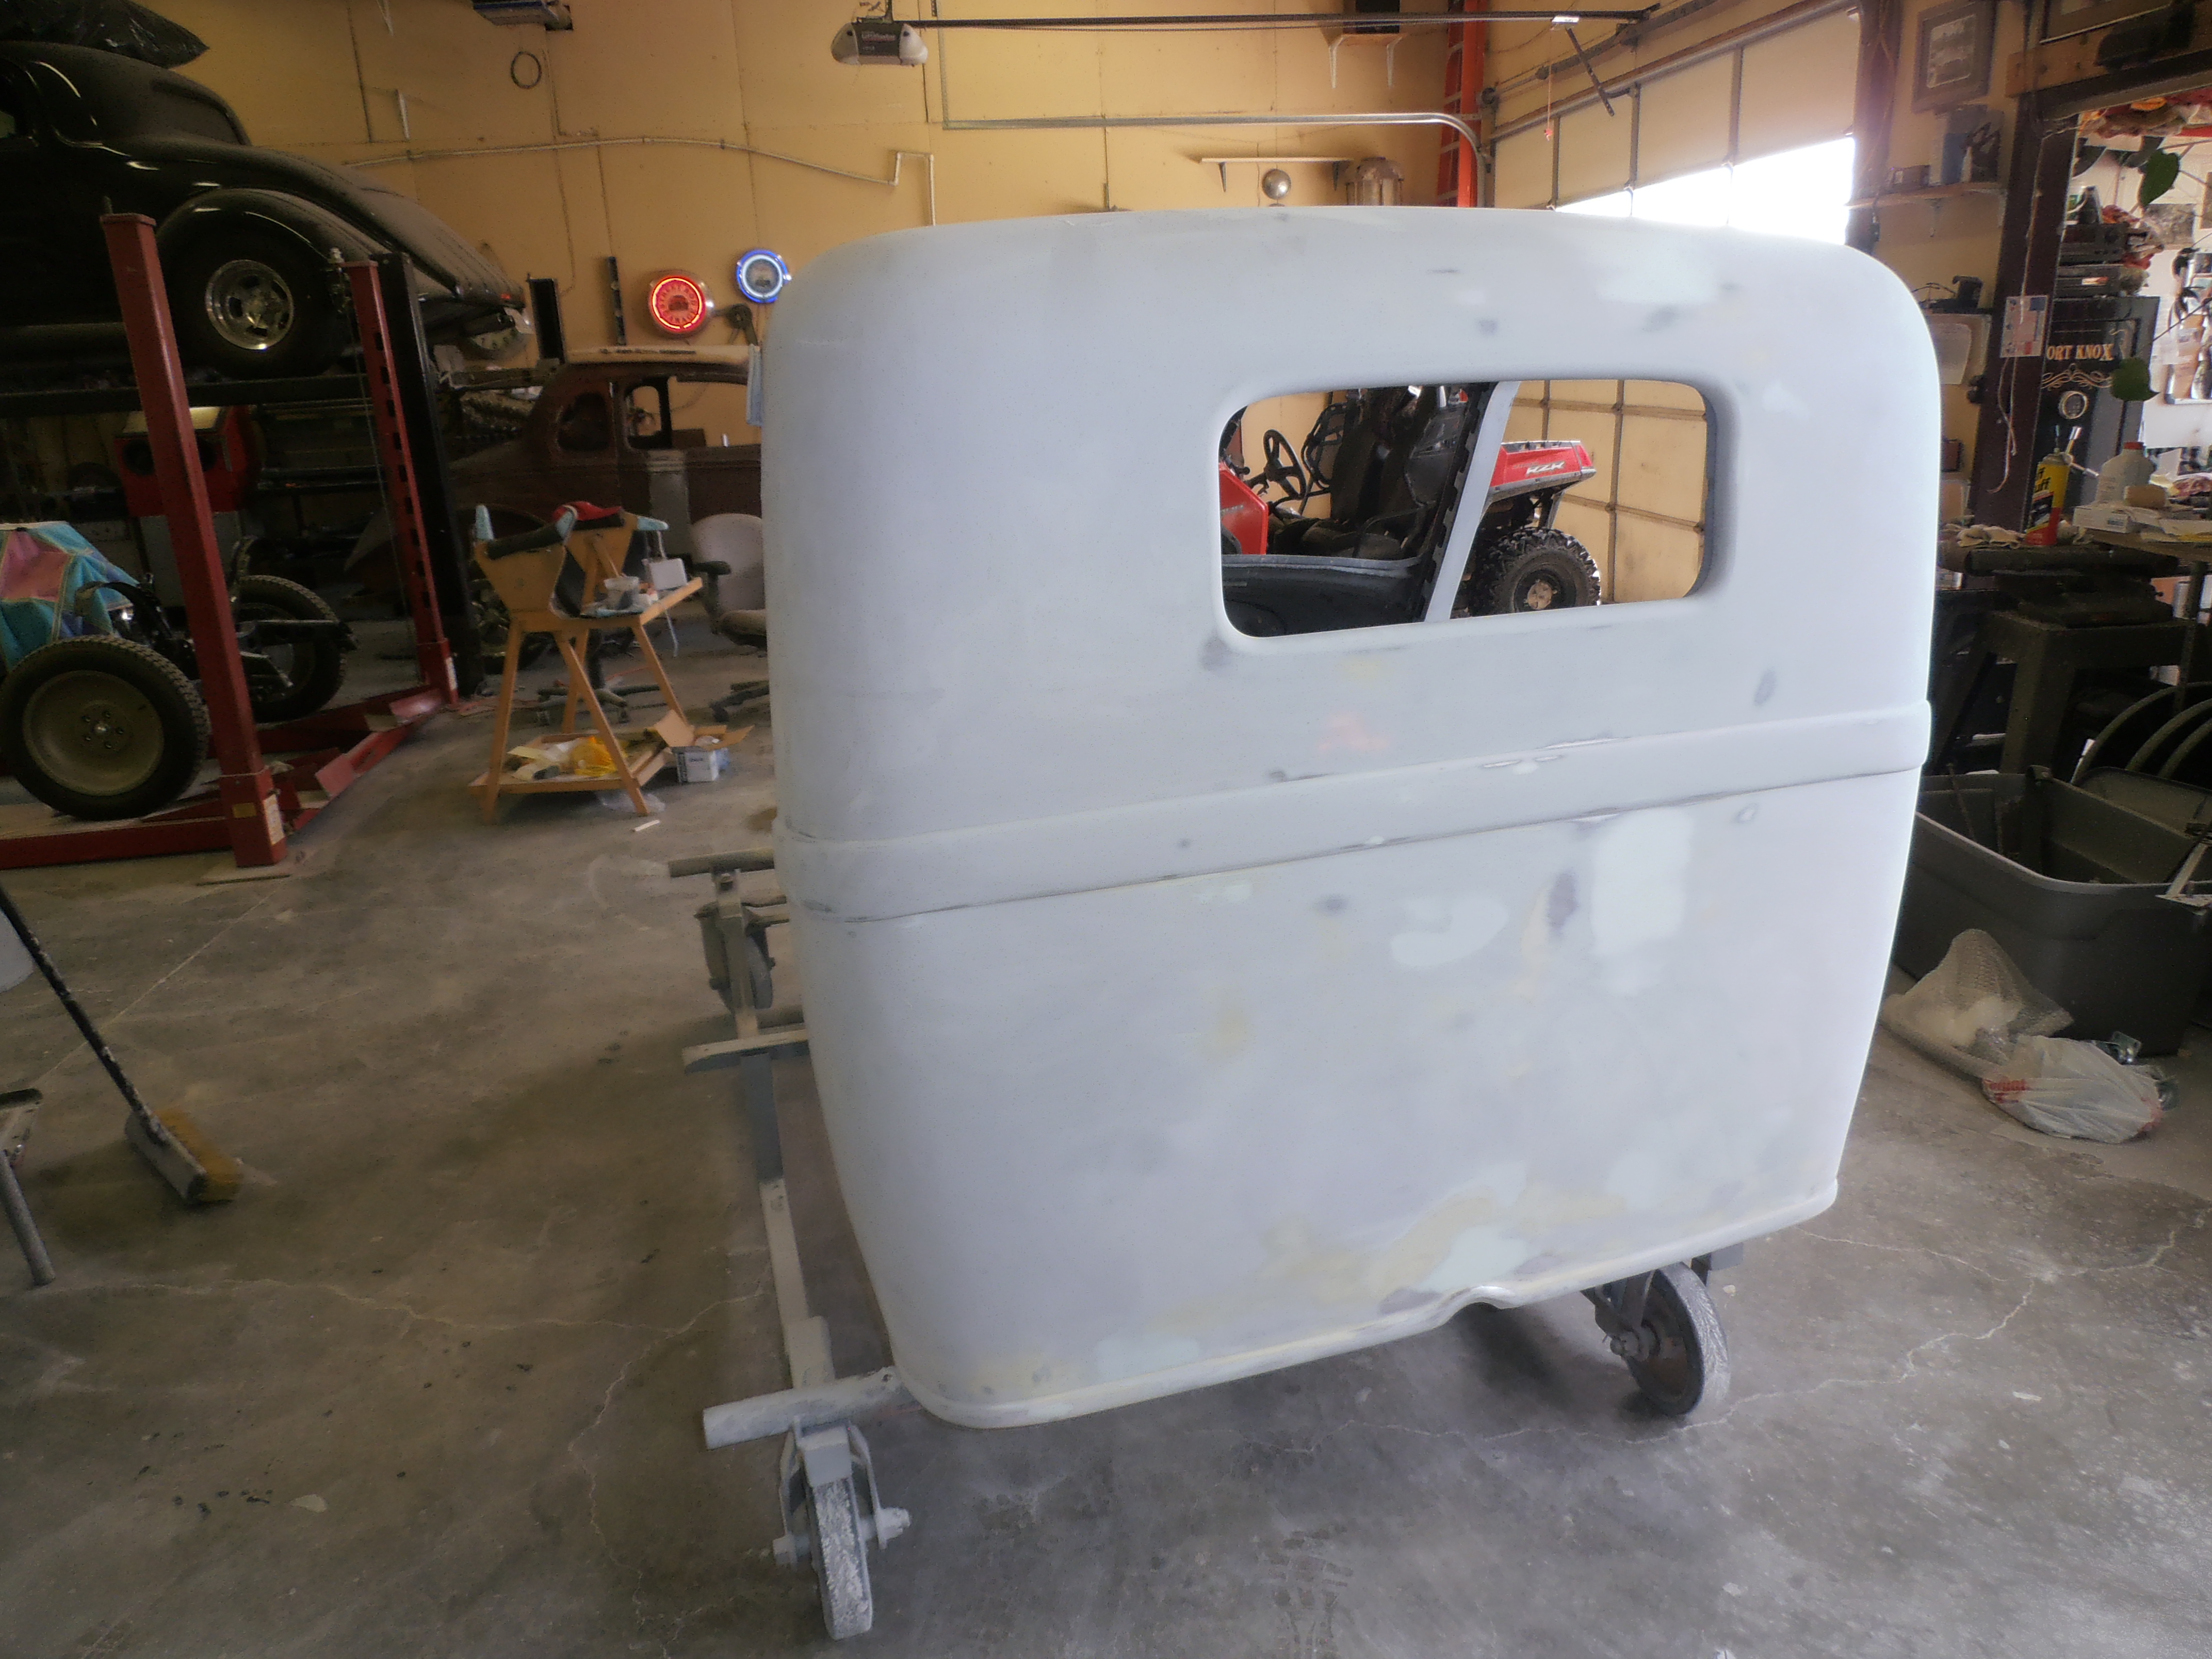
The old ’35 Dodge pickup cab and bed were in pretty rough shape, with many dings and small dents, pin holes, bullet holes, and substantial but mostly surface rust. I’ve already described the sand blasting step. Some guys don’t need that but we did–big time.
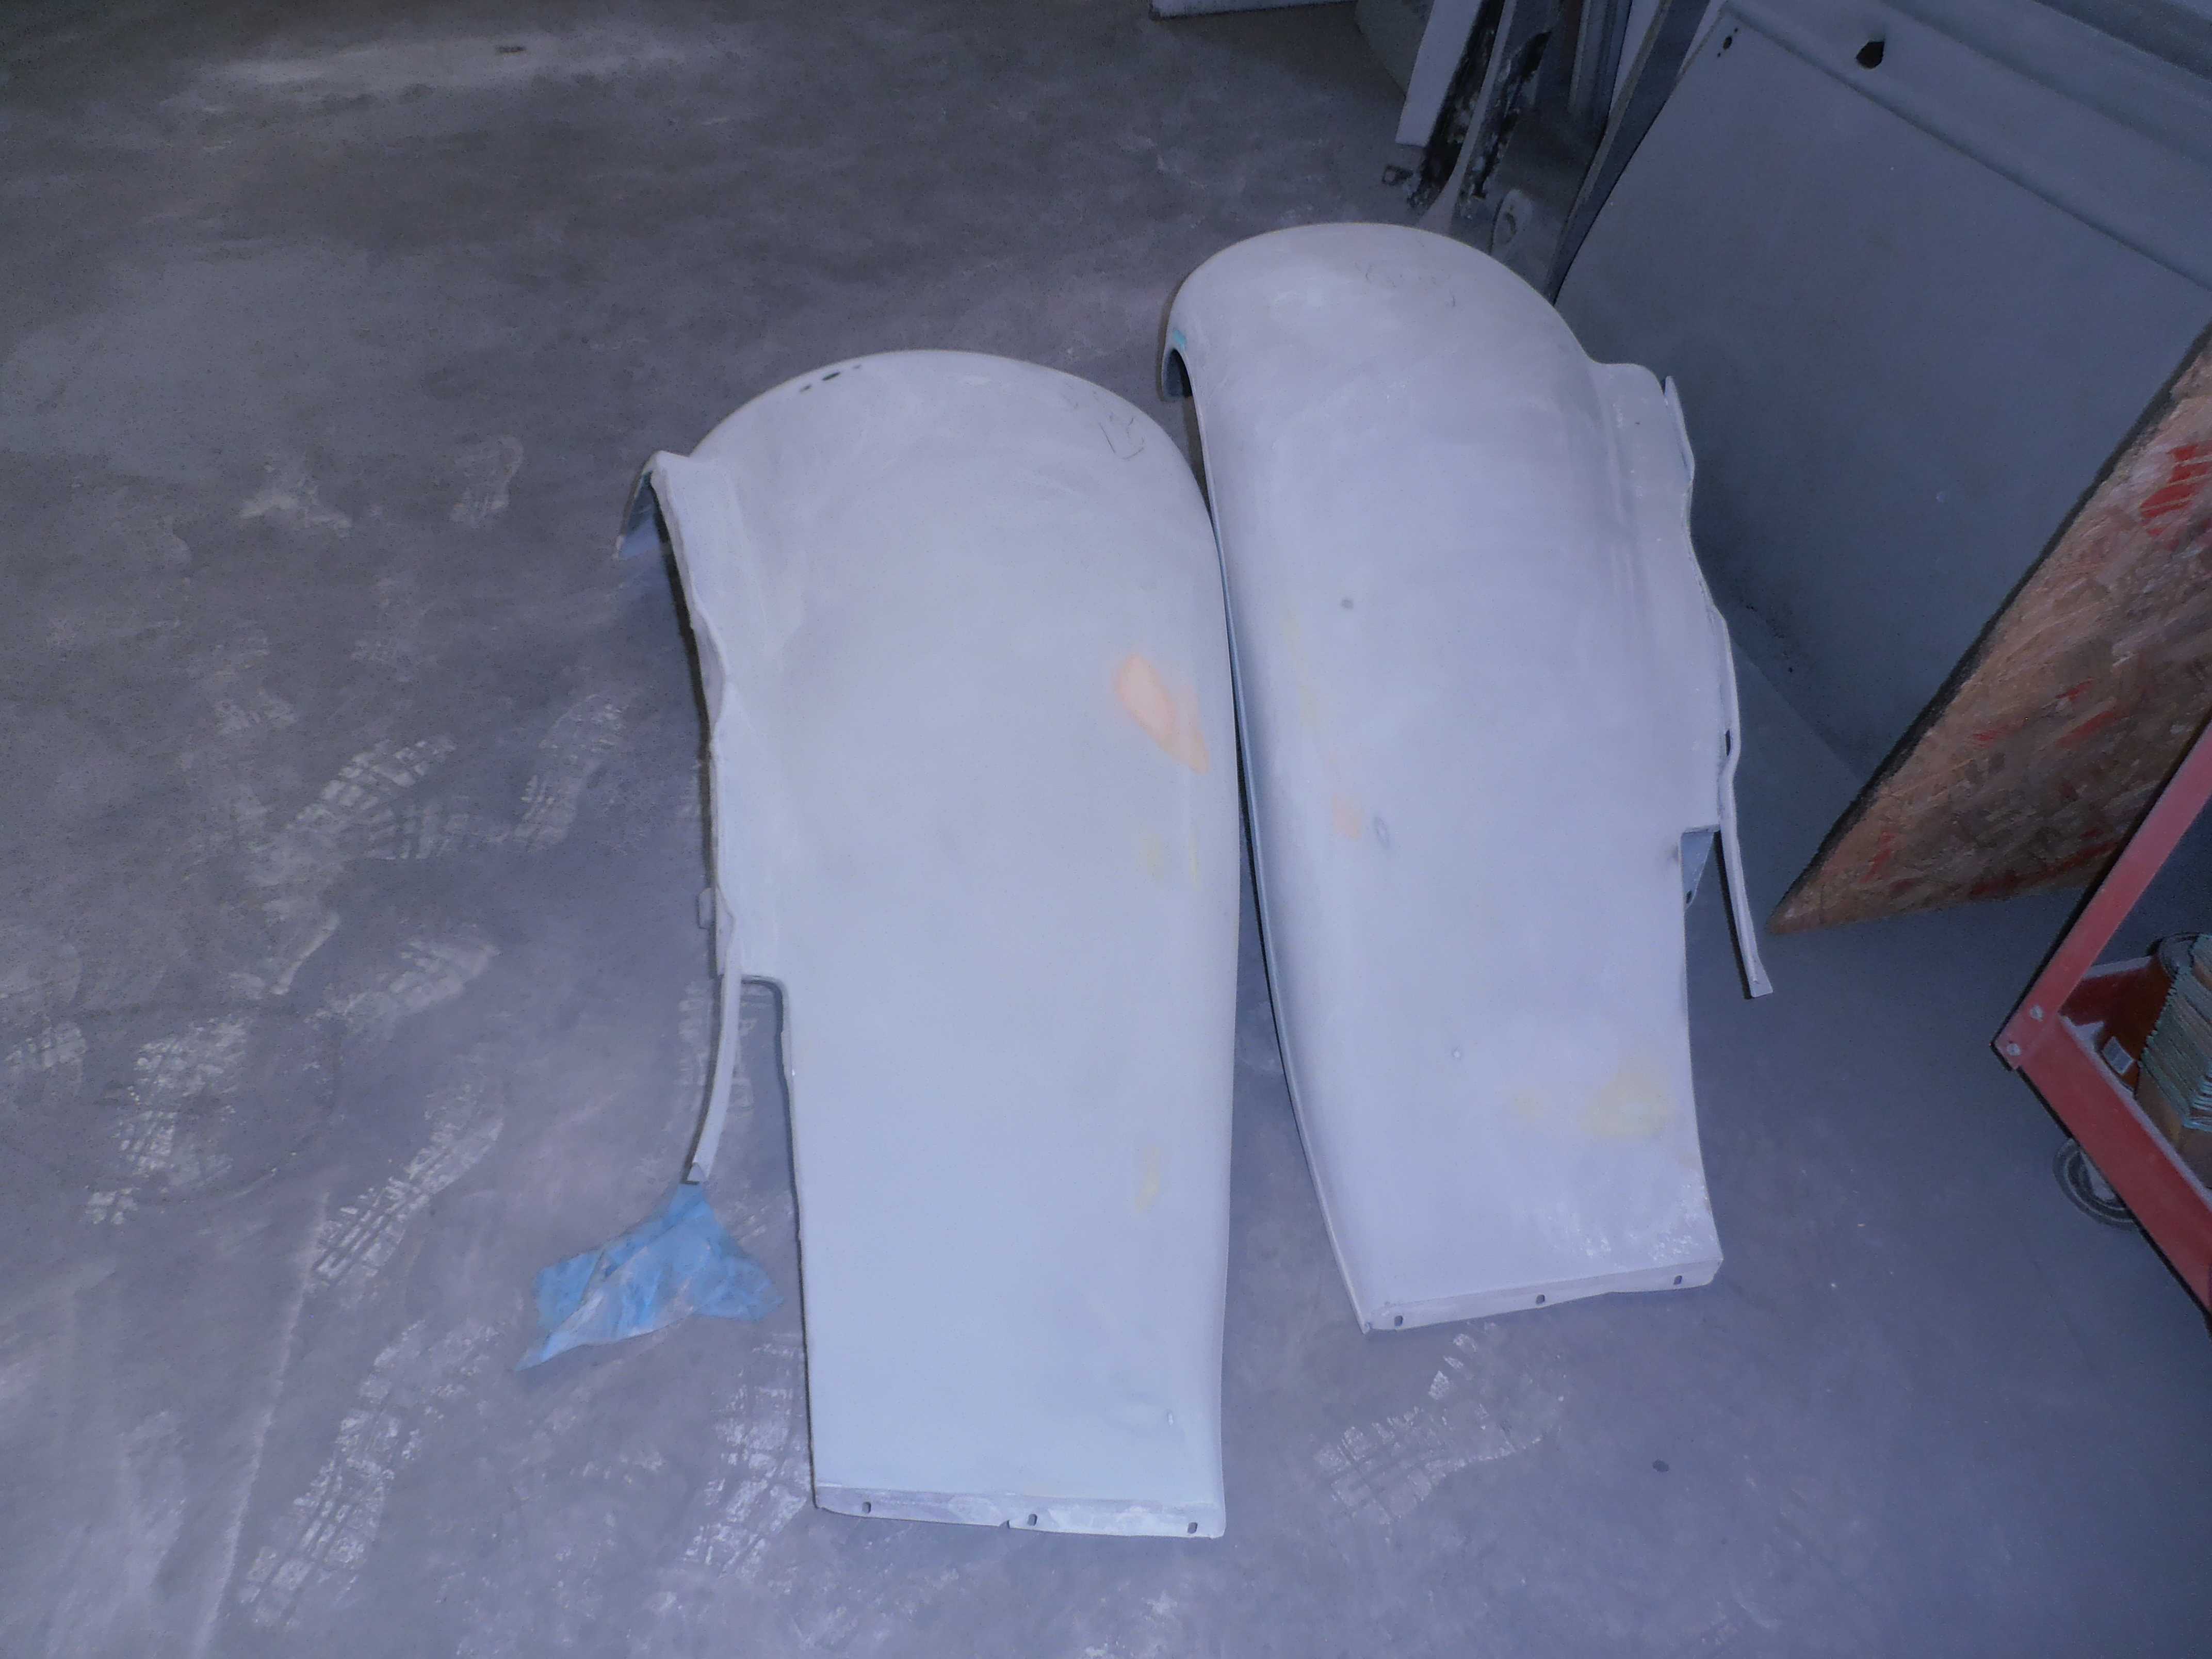
At this point in the early history of my ’35 Dodge pickup project, Ralph’s effort is beginning to show progress. If I’m not too terribly mistaken, I concluded an earlier segment on the fenders. They were beaten and used up at that point. Now, with minor bodywork and panel straightening behind us, and patch panels welded in, it is time for filler.
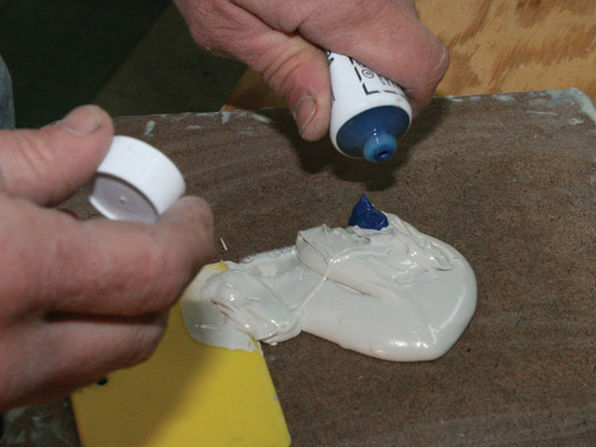
Don’t gasp—this isn’t your old bondo trick. This is a professional step in the process toward a near perfect body from that rusty hulk you have seen earlier.
Bondo is a brand of body filler, but it’s also the generic term for plastic filler that, when uttered, makes many car guys cringe and run. Anyone restoring an old car knows what it’s like to start working on it and find half inch layers of the stuff on damaged bodywork, troweled there by a previous body “sculptor” to get body panels straight quickly.
Let me set those nightmares aside. Using body filler isn’t as evil as you might think. Properly used, bondo is a great thing (and usually mandatory) when finishing sheet metal.
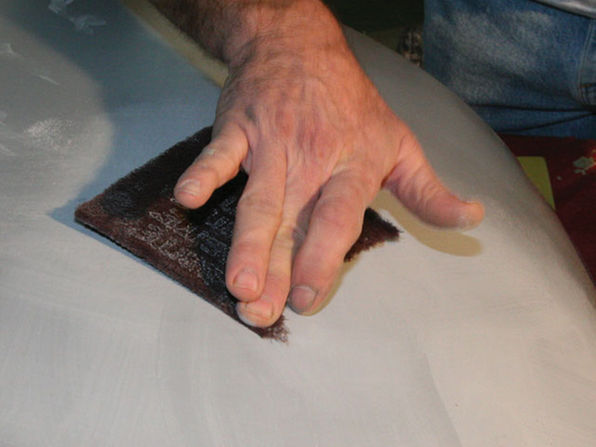
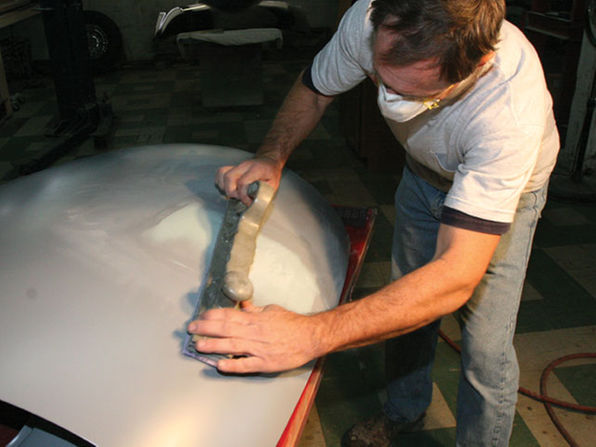
After a good amount of sanding on front fenders, hood, and splash apron, some areas of the panels that still showed low spots get filler.
On the application of filler, Ralph just applies it locally to the area needing it. Using a trusty piece of spring steel Ralph evens out the filler to match roughly with the panel’s surface.
After the area had been scuffed by Ralph, the next thing he did was blew off all the sanding dust so the surface would be nice and clean for the filler and filler primer to adhere to.
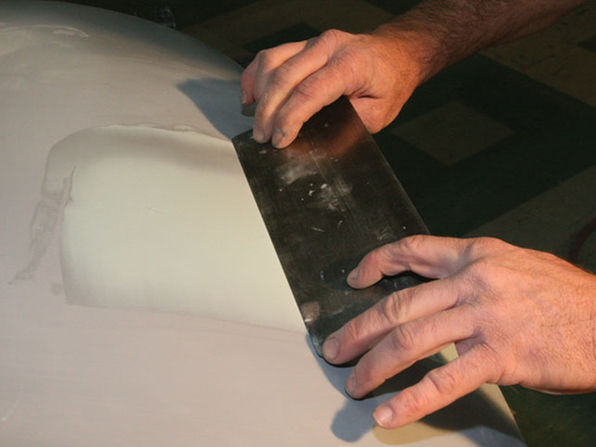
A straight edge helps assure that no more bondo is used than necessary and that sanding is kept o a minimum.
Here Ralph uses 180-grit sandpaper to finish the surface of the primered metal in preparation for paint. A lot of work has been done to get to this point.
Unwanted holes and welding seems are now history—vanquished from sight. Ralph has labeled the Dodge’s front fenders “180 sanded” so that he knows exactly where he is in the process with respect to each part of the body.
Handles, hinges, locks brackets, etc. that are bolted to any of the panels require their own holes in the sheet metal and nothing can be painted until the proper placement of these parts has been determined.
You don’t want to drill a hole through a finished surface. Any welding-in of new metal distorts the area enough that a high-build filler-primer isn’t quite enough—some plastic filler or “bondo” is necessary.
When you run your fingers over a great paint job, you are not only witnessing the efforts of a great painter, but also the person who spent the time block-sanding the vehicle body prior to paint. Sanding by hand and block sanding techniques can be mastered, of course, but the mental willingness to spend hour after hour at this task is not learned but acquired by sheer will power. Ralph does both hand and block sanding.
In most cases, you will want to primer the body at least twice before even thinking about applying paint. If flaws are detected in the primered surface, a little spot putty can be applied, sanded smooth, covered with primer, and blocked again. With each successive blocking session, the sandpaper used should become smoother, moving up to 400-grit before the painting stage. These parts are now looking good and set aside for more trial fitting, hardware, and almost at the very end–painting.
If my hot rod pickup were slated to be a smoothie street rod for show, I would want to block and prime at least once more. Well, it is and it isn’t meant for car shows. It will be a driver and also an occasional show car. Ralph will go to a high number sand paper grit before spraying the paint. And after that, we might just need some of that modern wrap over the top of the finished paint. That will keep the paint looking good while driving along old Highway 66!
This is the question: wither ’tis nobler in the minds of car enthusiasts to use a third pedal (clutch) or not. This is a matter for debate. Apologies to William Shakespeare, but for old car guys can any question be more important than choosing the right transmission for your build?
I’ve been part of many street rod builds and have experience with a range of transmission options. The well-rehearsed mantra, “a true hot rod has three pedals” is still heard but seldom heeded. My last street rod was a 1938 Ford. I built it with a manual three-speed transmission. I learned a lesson.
It was a gorgeous black coupe with a little Chevy 283 V8 engine. The car was very original and I decided to keep the manual three speed transmission—three pedals. Some would argue that when the driver can shift the transmission, he has more feel for the car. When the transmission is in the proper gear to match the torque range of the engine, acceleration is instantaneous and controlled. By downshifting, the driver can also use the compression of the engine to help slow down the car.
The good part was that it indeed had three pedals and the transmission was genuine Ford although a rebuilt 39 model with truck gears and open drive line. It looked good. However, from a performance point of view, it left a lot to be desired and was probably the weak link in the entire vehicle.
And that is after considerable expense and effort. It was noisy, the synchronizers were terrible, shifting was slow and notchy. The clutch was hard to adjust and the clutch pedal not adjustable and poorly positioned. Was some of this my fault? Yes, to be sure. But not all. We could have had a modern five speed manual transmission and in retrospect it would have been a better idea. Oh well. Live and learn.
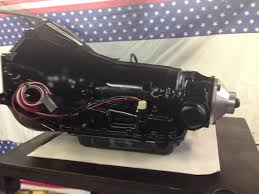
When it comes to installing the right transmission, the decision to use either a manual or an automatic trans depends on your intended use for that vehicle. If you are a purist and drive a hot Cobra, then a four-speed manual transmission is a tradition. There are no rules as to what the correct application is. If you drive much in modern urban traffic, you might grow tired of shifting. I think I fall in that category.
There are advantages of running a manual transmission over an automatic. For one, automatic transmissions tend to be physically larger. This can rob valuable real estate in the relatively tight confines of most street rods. Automatic transmissions also tend to generate more heat, and therefore need to be cooled by external means. This usually equates to either running a transmission cooler incorporated into the radiator, or running a separate tranny cooler (which takes up even more space). Additional drawbacks to running an automatic transmission are that most need a kick-down cable of some sort attached to the carburetor or throttle body, a vacuum line connected to the intake manifold, a dipstick, and of course, the shift linkage. In a tightly packed car such as a ’35 Dodge pickup, all these small items can quickly add up.
The advantages of a properly built automatic transmission in a hot rod application are also numerous. Nothing will be as consistent or as strong as a properly built automatic and complementing torque converter.
A properly built automatic will accelerate slightly faster than will an identically outfitted manual vehicle.
On the street, auto gearboxes greatly increase the drivability and “fun-factor” for the hot rod enthusiast. No more traffic jams spent with the clutch halfway engaged.
Transmissions, even automatic ones, need to be shifted. And for that, a shifter is required.Fortunately there numerous aftermarket folks who have supplied enthusiasts with a range of options. Some, like this floor shifter from Lokar, mimic the design an feel of the original manual transmission shifter.
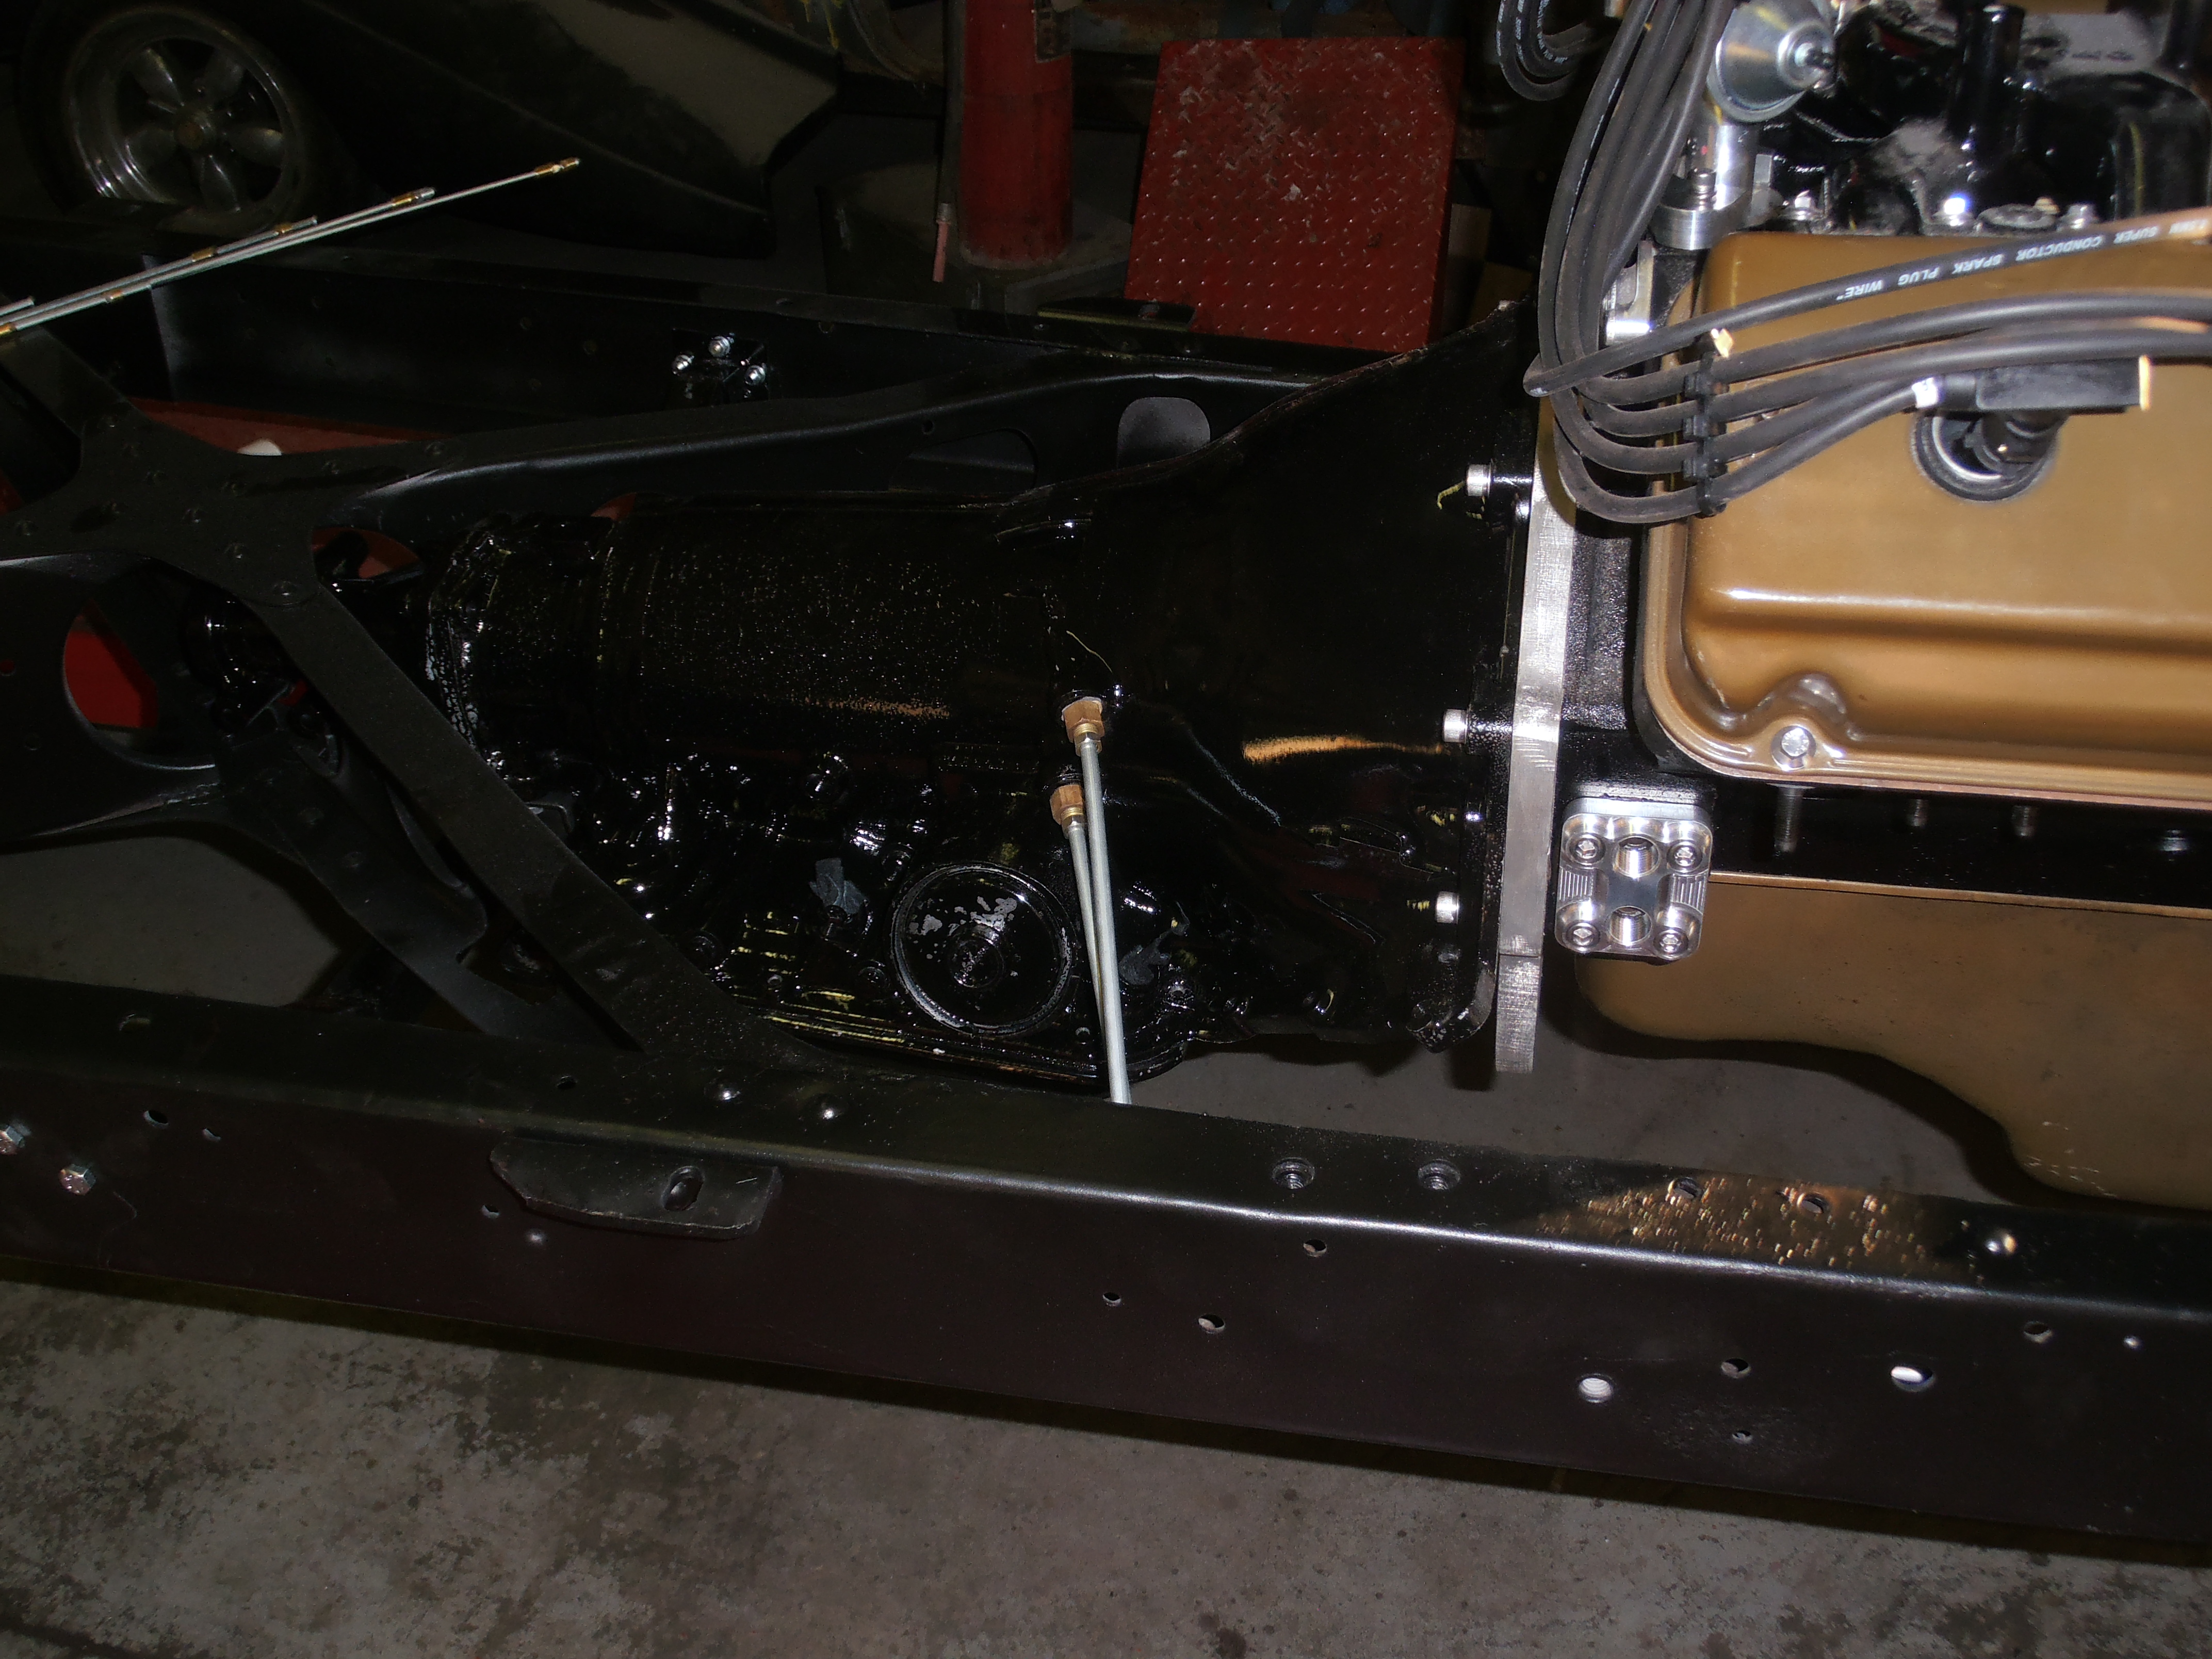
Finally you may wonder how an old Dodge hemi engine can be mated to a GM automatic transmission. This combination never occurred through the typical factory design process. But it is quite easily accomplished today by using appropriate adapters provided for this very purpose.
Equally clever is the shifter mechanism we’ve used. After an initial debate about how far to push an “aircraft” theme, we decided to use a time-test Lokar “double bend” floor shifter as shown above in the company’s advertisement. Ours has a slightly different bend configuration to better suit the needs of the small cab environment. These shifters employ a integrated button in the knob that when pushed down allows the transmission to be placed in reverse gear.
You may think “fenders” is a boring topic. Or, like millennials, you believe that a fender is a guitar rather than an essential part of automotive history. Fenders almost don’t exist on modern automobiles and haven’t for some time. So who can blame you? The tires and wheels of modern cars are under vast expansions of mostly shapeless body panels. The only time they are important for most of us today is when we get into a little crash, euphemistically known as a “fender bender.”
The actual word has been around since the 13th century although with a different application. It is a short form of “defender” so immediately you get the idea that it is supposed to protect you somehow. And that is correct. Like the dashboard discussed in a previous post, the fender protects you and the rest of the vehicle from unwanted water, mud and worse being dashed on you. The first use of a fender on an automobile was in 1919.
The running boards are vulcanized rubber over steel, and are normally secured to the frame by means of several support brackets. On each end the running boards are bolted to the fenders making for a complete side protection system.
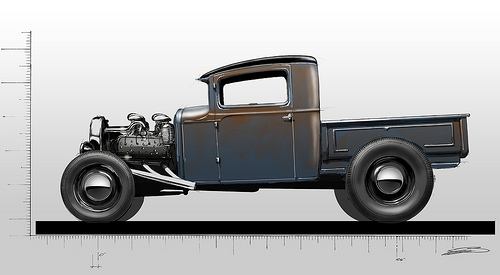
The first question is whether the 35 Dodge would be a full fendered street rod or a fenderless one. That was decided during the planning phase–it would have fenders.
For as long as there have been hot rods, there have been fenderless and fendered variants. It would have been in the first couple days after anyone who had taken their car down some road, be it dirt, gravel, asphalt, concrete, or dry lake bed, that they figured out when you remove your fenders, the car’s lighter and you can go faster. And it may look racier to some guys.
But pickups generally worked in a mud and dirt environment and needed those fenders to keep from coating the truck and everything following it in earth tones.
Their utility notwithstanding, and happily for all of the hot rodders who followed suit in the next several decades, a fenderless hot rod looked, pretty good and, some would say, is the way they should be presented. So the debate raged on.
It’s usually a pretty big step to take to remove a car’s fenders, as it radically changes the look and one’s perception of the car.
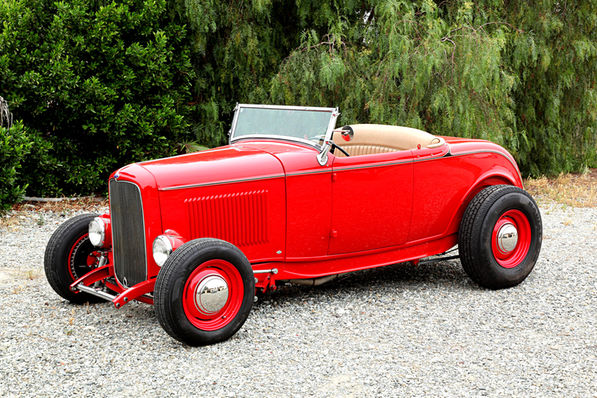
But it may possibly be an even bigger step when you decide to put them back on. I’ve illustrated this with a “before” and “after” photos of a ’32 Ford roadster that went in the unusual direction of have fenders returned after first being removed for a long time by a previous builder.
There is no “right” or “wrong” way here, only your individual taste and artistic preference.By way of illustration, I show above a ’32 Ford roadster that went in the unusual direction of having its fenders restored after first having been removed by a previous owner.
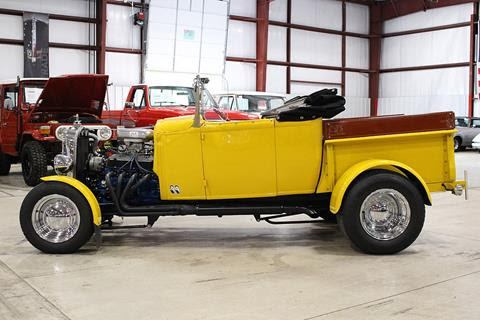
This yellow roadster pickup represents another fender alternative. These are “motorcycle” style fenders adapted to fit over the tires. I don’t personally care much for this approach. Some states mandate fenders–maybe that is the reason behind this application. Not sure.
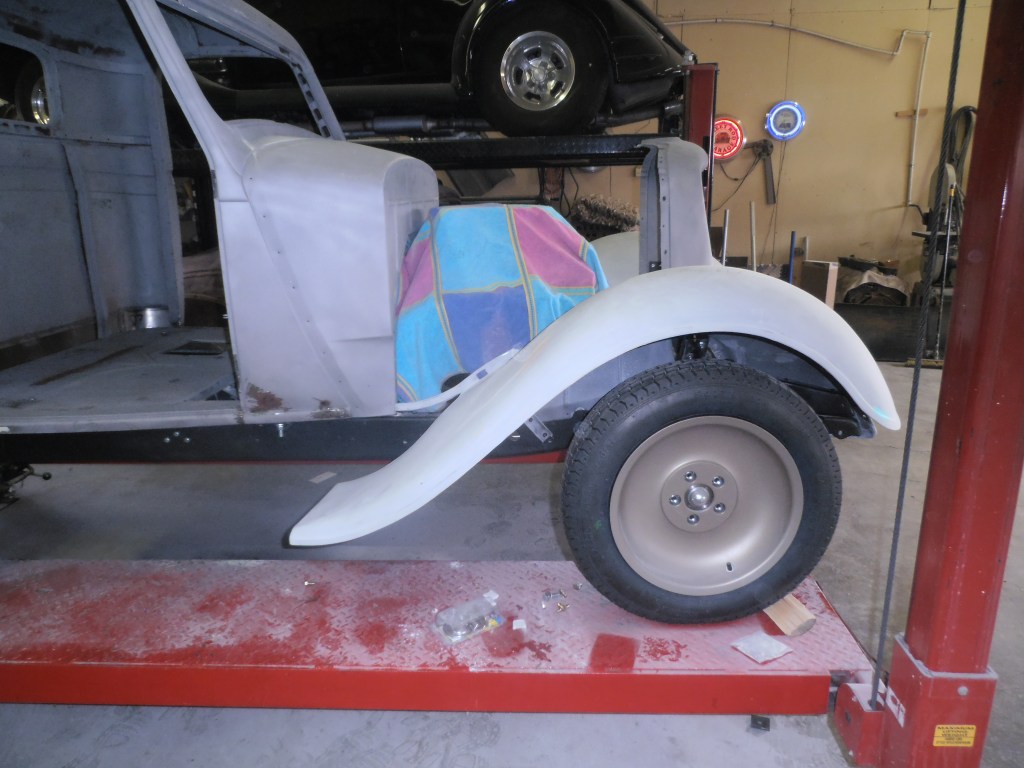
For the time being our Dodge pickup is in a state of complete disassembly. We’ve examined the fenders carefully because it is our intention to return them to their original location at the right time. This is a major part of the build and requires a great deal of patience and skill. And some money. Sadly.
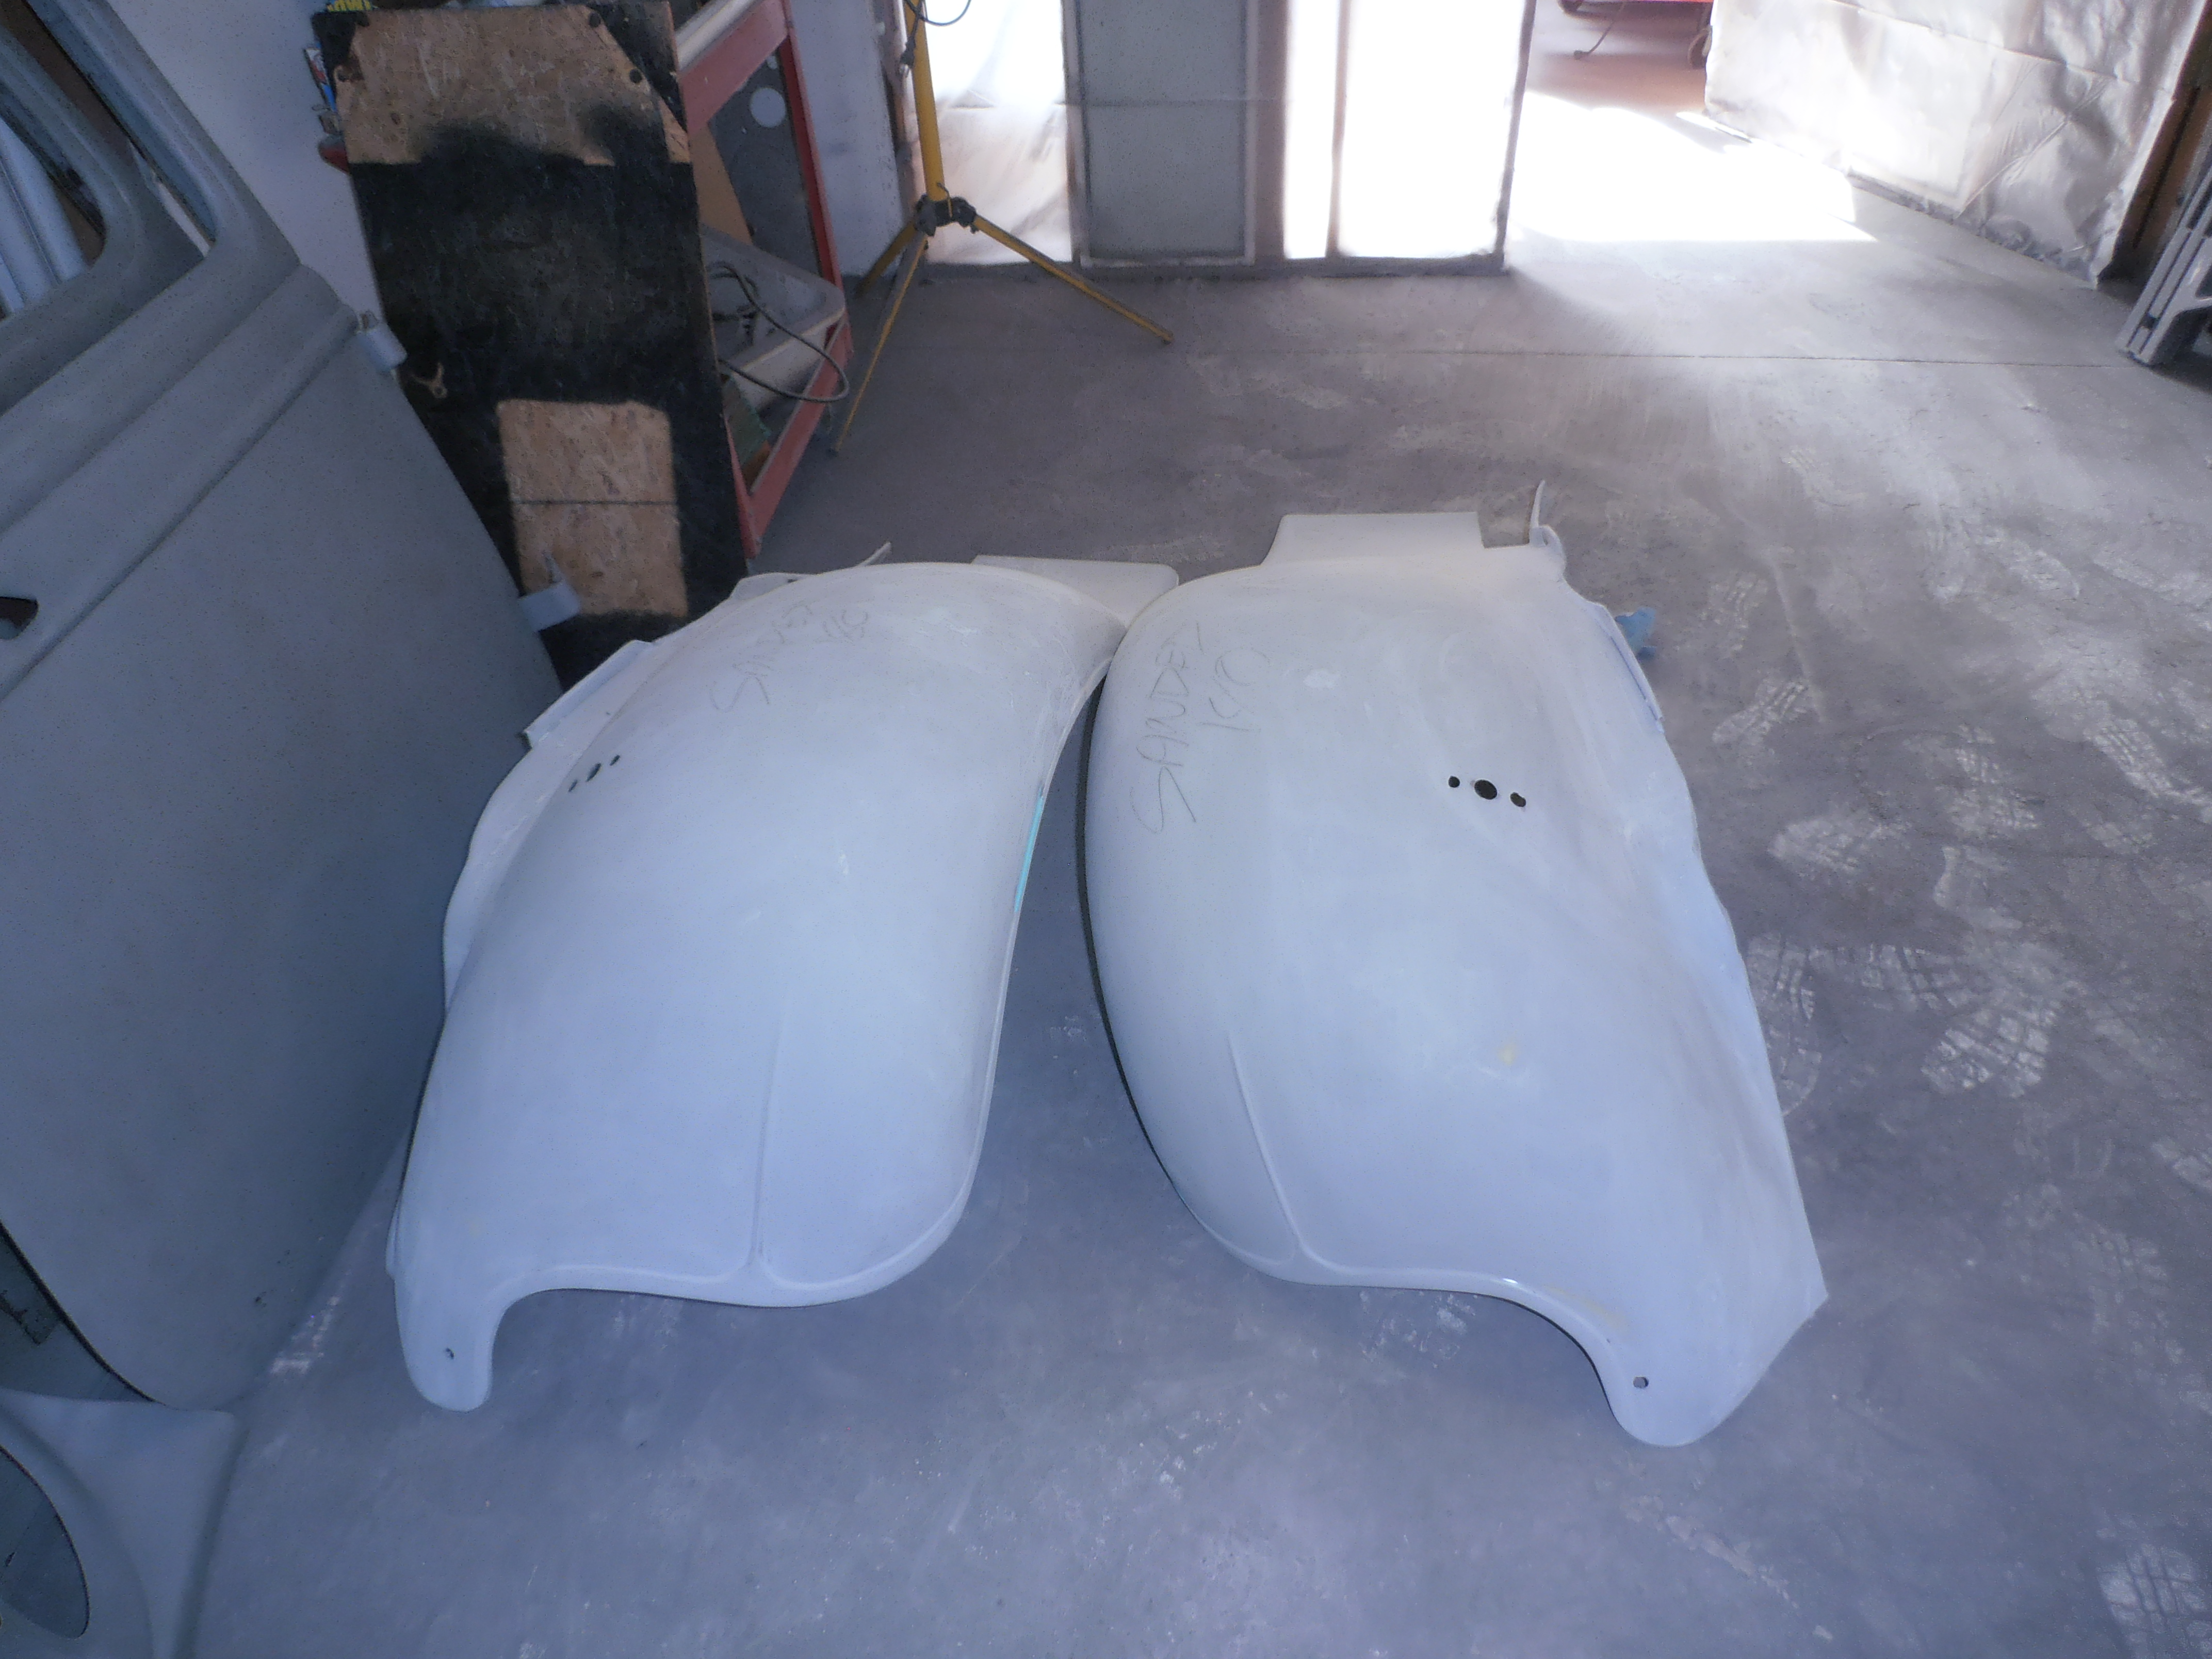
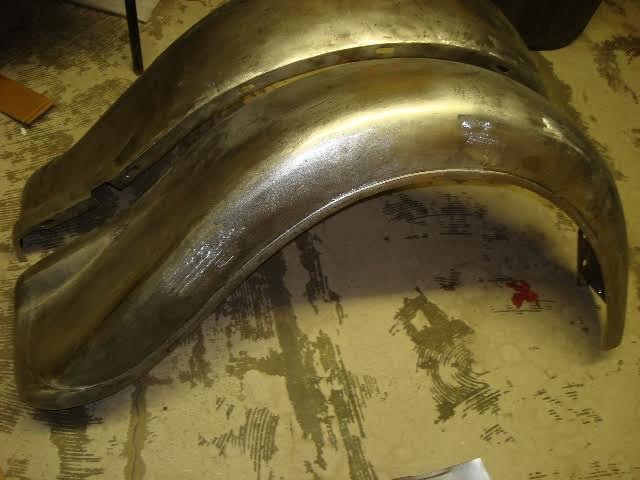
The Dodge’s front fenders were in rough shape. But aftermarket reproduction items are simply not available for the Dodge. Fords and Chevrolet’s yes, but the old Dodge pickup hasn’t attracted as much attention in the hot rod community. They had to be repaired. Lots of work in this.
The rear fenders on our Dodge pickup were beyond Ralph’s ability to repair. Or, put differently, the time that would be required to return them to their original state would cost more than the price of reproduction new steel fenders which, fortunately were available.
Close to a year after I posted the photo above of the new, hand made steel fenders above, the time came to actual fit the fenders to the emerging truck. Finally most of the parts were on hand, painted or primed, and ready to assemble the back part, the bed, of our Dodge pickup, for the first time. Gasp! This is not what you want to see. Nothing really aligns. I can’t even say “aligns perfectly because that would imply that it was close. It wasn’t. But it isn’t time for panic. Ralph and I have been here before.
No, I won’t reveal how much the pair of hand built reproduction steel fenders cost. After all, Ellen reads these posts from time to time. She is supportive but no reason to cause alarm. I view the cost side of the equation as an investment. That’s harder for others to appreciate at this stage.


 Then making small changes, one at a time, until each problem is identified and sorted, and the old doors are correctly re-hung.
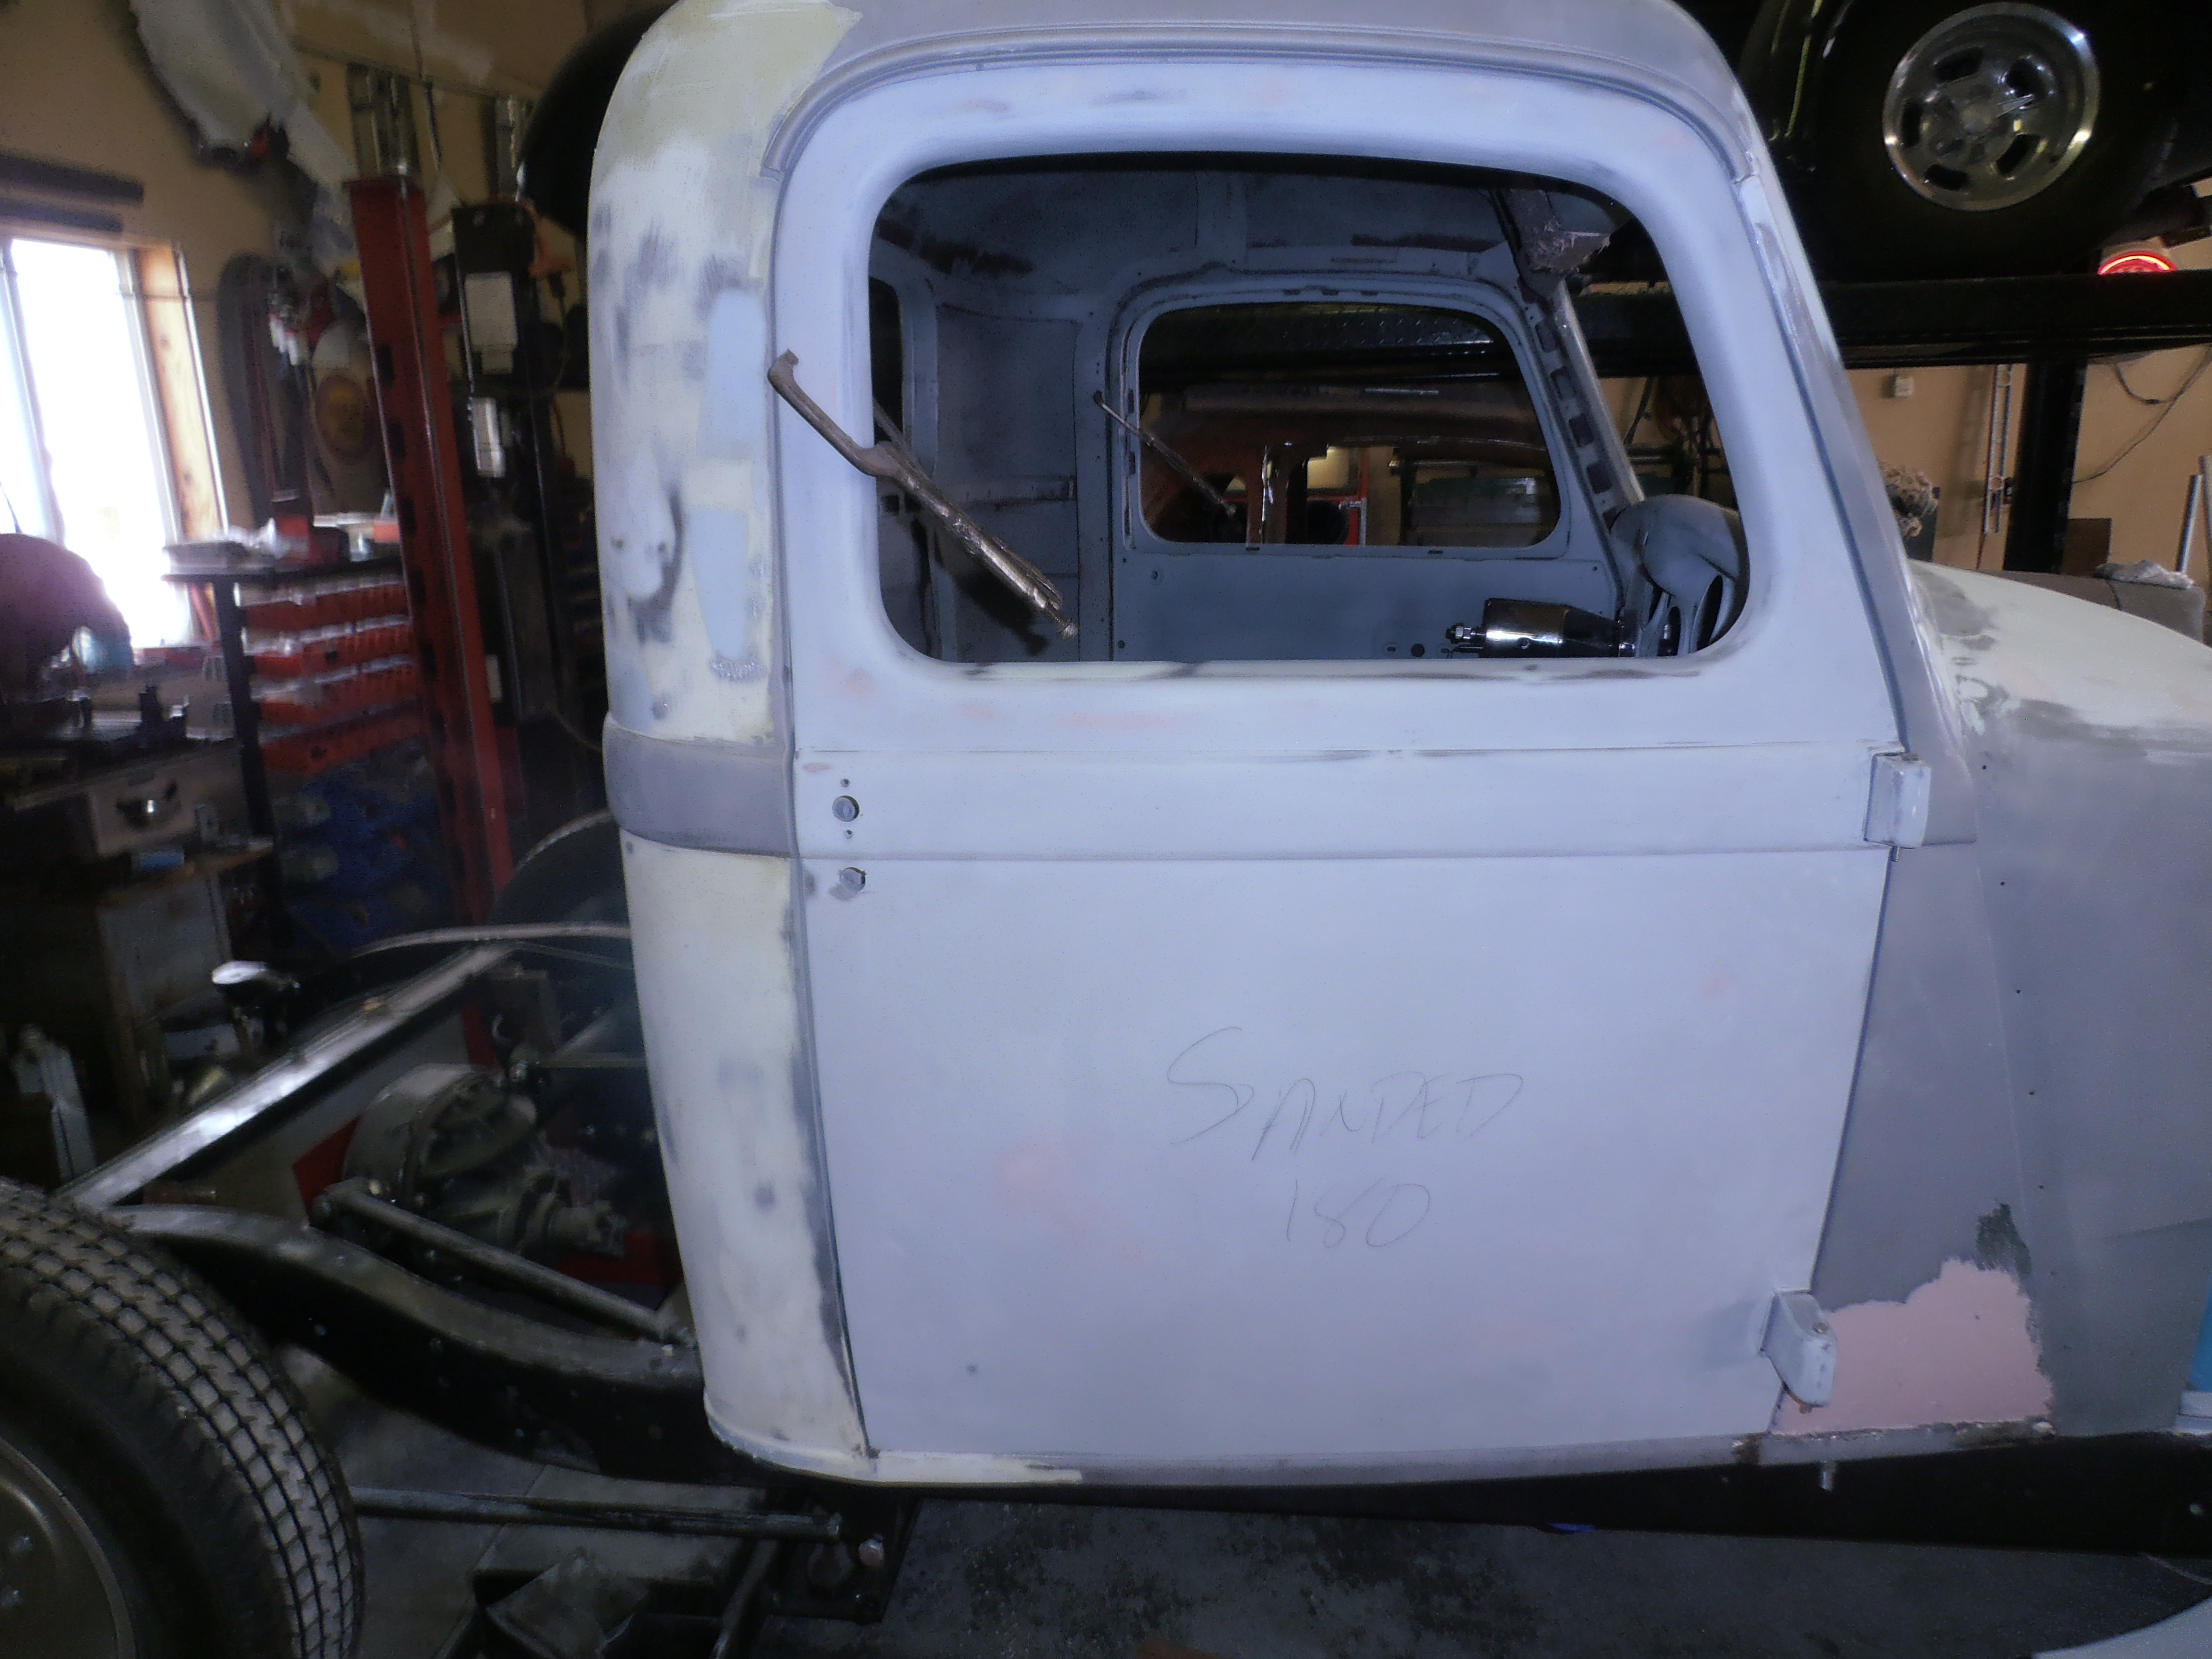


 The box on our Dodge was all there but still a mass of scars, cuts, deep scratches, dents, with ample evidence of extensive repairs including riveting, welding and re-welding. We suspect that one reason this truck survived at all was that it remained valuable to someone for work until not long ago.
 The search for a new bed resulted in locating this fine looking reproduction. The problem was that the builder was asking over three grand and shipping was another $500. A close examination revealed some finish details that seemed, well, unfinished.
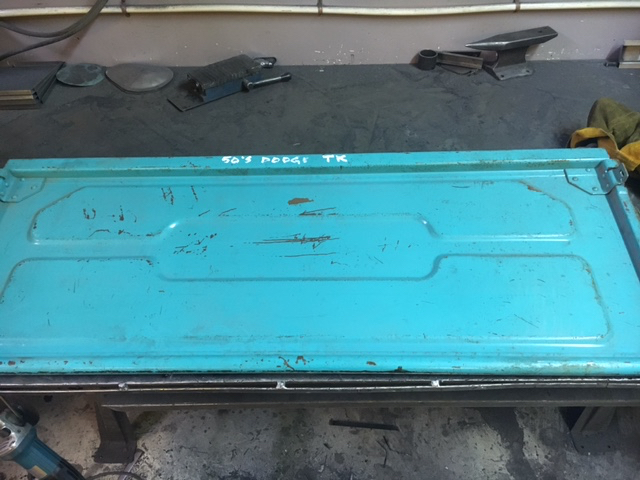
 I wanted the Dodge look and even the Dodge letters if possible. In the end, I couldn’t get the letters but I came close. First, an authentic Dodge tailgate in reasonable shape had to be located. I found one on eBay. Everything (almost) is for sale on eBay.
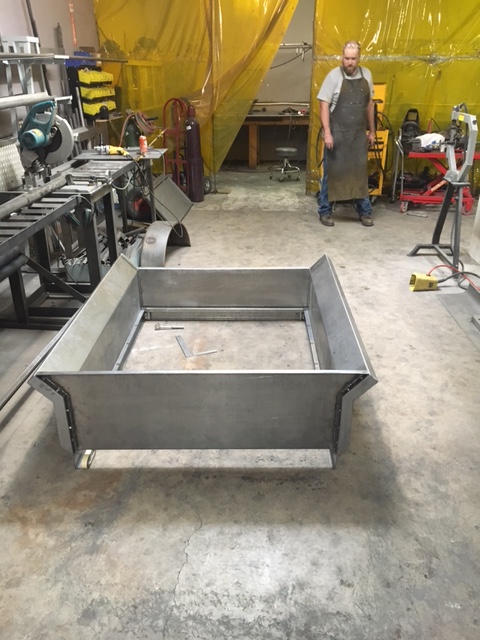 Making a tailgate like this is possible but falls into the category of “don’t try this at home.” This kind of work is what earns you the title “premier metal fabricator.
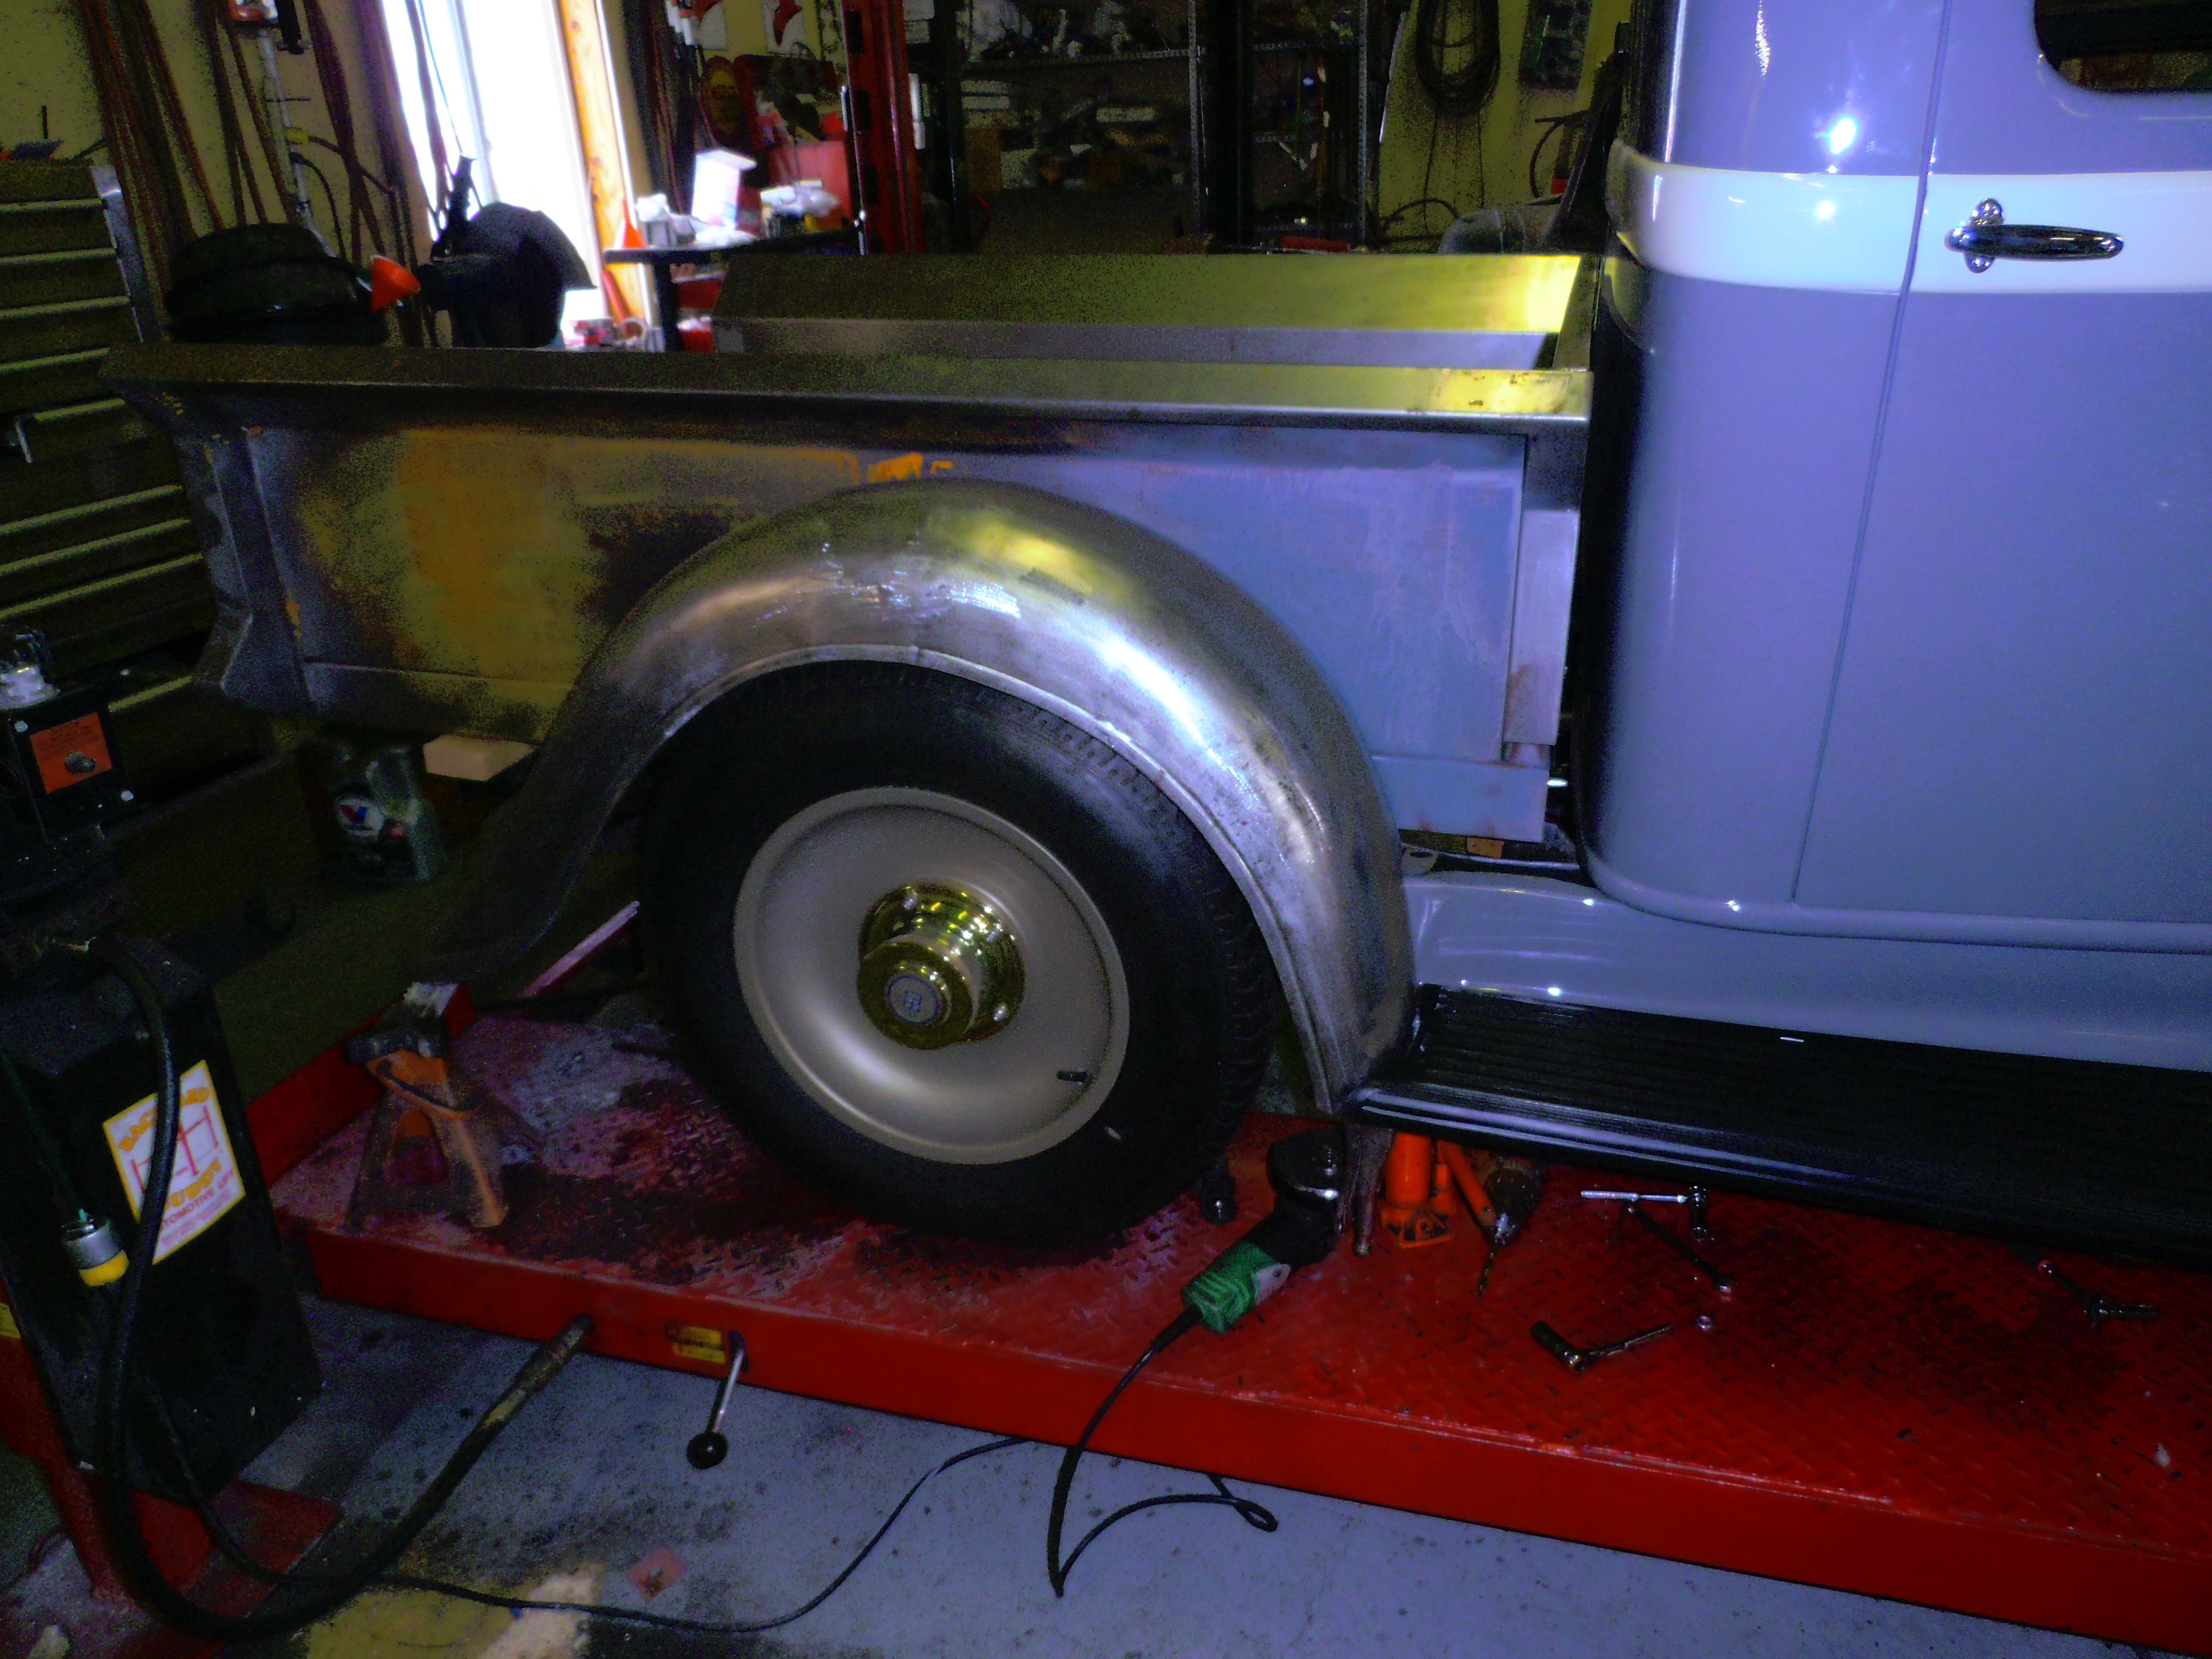
 The second fitting of the new bed parts took place after the rear fenders had enjoyed their brief moment on center stage. Holes were drilled, parts that fit fine before are after painting and sanding never quite right in the next round. Knowing this ahead of time helps prevent making irreversible fastening efforts such as welding. Note this difference in the colors between these two photos–so much depends on what kind of light is available.